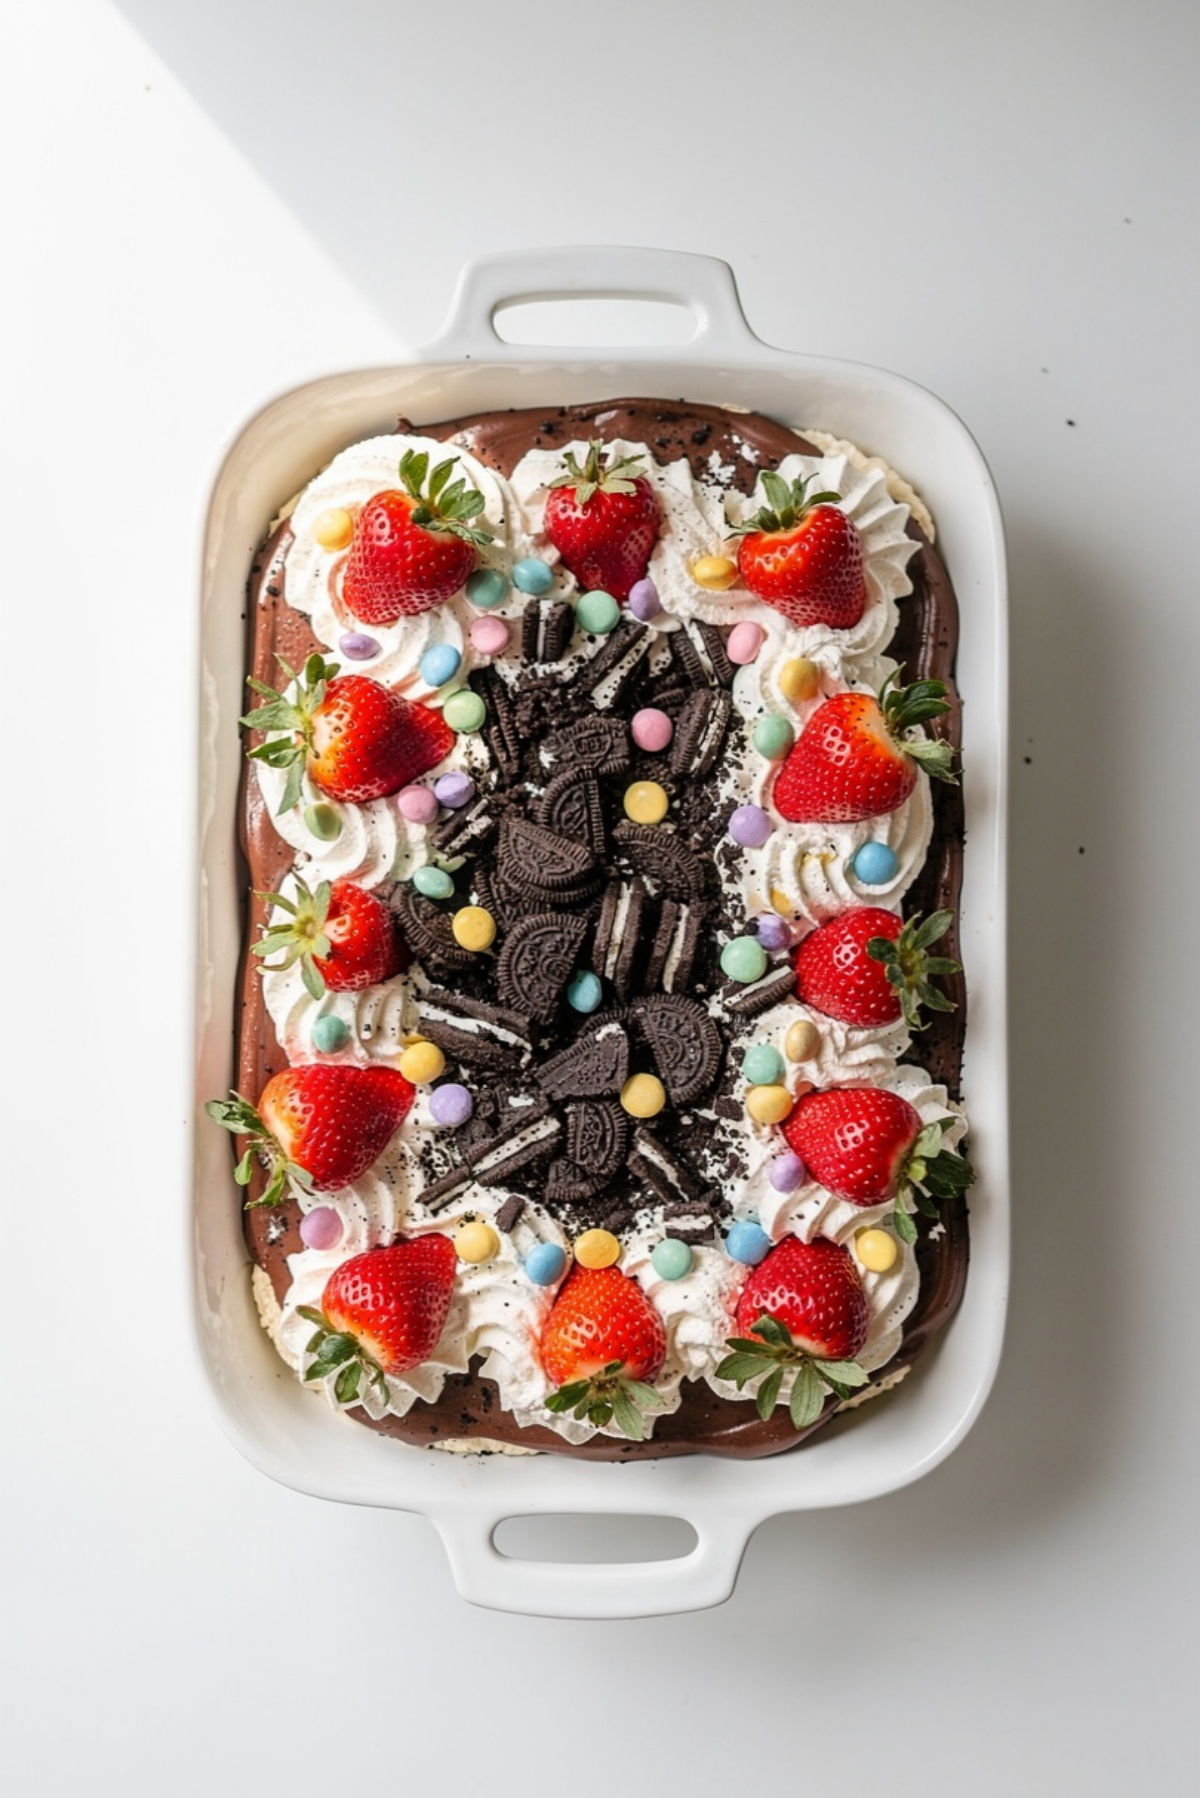
Healthy Easter Dirt Cake Casserole Recipe
There is something so nostalgic and comforting about digging into a creamy dirt cake dessert, especially when it comes dressed up in cheerful Easter colors. This healthier casserole-style version keeps all the fun of the classic treat while making it feel lighter, fresher, and honestly a little more satisfying. Between the creamy chocolate layers, crunchy cookie crumbs, and pops of pastel candy, every bite feels playful and festive. Trust me, you’re going to love this.
What makes this dessert extra special is how easy it is to throw together while still looking impressive enough for a holiday table. The bright toppings and soft creamy filling create the perfect contrast, and let me tell you, it’s worth every bite.
Why This Easter Dessert Always Steals the Spotlight
Spring desserts should feel joyful, colorful, and easy to share, and this one checks every box. The creamy texture melts beautifully against the chocolate cookie crumble, while the fresh fruit and lighter ingredients keep everything balanced instead of overly heavy.
It also happens to be one of those recipes that gets people talking the second it hits the table. Kids love the candy topping, adults appreciate the lighter twist, and everyone goes back for seconds. This one’s a total game-changer for Easter gatherings because it feels festive without requiring hours in the kitchen.
The Sweet Story Behind Dirt Cake Desserts
Classic dirt cake desserts first became popular in American kitchens during the 1980s, especially at family gatherings and potlucks. Traditionally, they featured layers of pudding, cream cheese, whipped topping, and crushed chocolate cookies designed to resemble “dirt.” Over time, holiday versions started popping up, especially around Easter and Halloween.
The Easter version became especially loved because it naturally lends itself to pastel candies, spring decorations, and playful presentation. This healthier casserole variation keeps the spirit of the original alive while adding fresher ingredients and lighter textures that fit modern dessert cravings beautifully.
Why This Recipe Works So Well Every Single Time
Before we dive into the layers and creamy goodness, let’s talk about why this recipe deserves a permanent spot in your dessert rotation.
Versatile: You can serve it at Easter brunch, spring birthdays, potlucks, or even as a make-ahead weekend dessert. It adapts beautifully to almost any occasion.
Budget-Friendly: Most ingredients are simple pantry and refrigerator staples, which means you can create a beautiful dessert without spending a fortune.
Quick and Easy: There is no complicated baking process here. Most of the magic comes from layering and chilling.
Customizable: You can swap toppings, use different yogurt flavors, or add fruit depending on what your family enjoys most.
Crowd-Pleasing: The creamy texture and chocolate crunch combination is universally loved. Even picky eaters usually clean their plates.
Make-Ahead Friendly: This dessert actually tastes even better after chilling because the flavors settle together beautifully.
Great for Leftovers: The texture stays creamy and delicious for days, making late-night fridge visits very tempting.
Smart Tricks That Make This Dessert Taste Bakery-Level Good
A few simple tricks can take this casserole from good to unforgettable.
- Chill Thoroughly: Letting the dessert chill for at least 4 hours helps the layers set perfectly and improves the texture dramatically.
- Use Softened Cream Cheese: Smooth cream cheese blends much more evenly and prevents lumps in the filling.
- Fold Gently: When combining whipped topping with the pudding mixture, fold gently to keep the filling light and airy.
- Add Toppings Last: Save candy decorations until just before serving so they stay colorful and crisp.
- Crush Cookies Evenly: Fine crumbs create the best dirt-like texture and layer more evenly throughout the casserole.
Kitchen Essentials That Make Prep Easier
Before assembling everything together, having the right tools nearby makes the process smooth and stress-free.
Mixing Bowls: You’ll need a few medium bowls for preparing the pudding mixture and toppings separately.
Hand Mixer: Helps create a silky smooth filling quickly and effortlessly.
Rubber Spatula: Perfect for folding ingredients gently without deflating the mixture.
Food Processor or Zip Bag: Useful for crushing chocolate cookies evenly.
9×13 Casserole Dish: Gives the dessert plenty of room for beautiful layered presentation.
Ingredients That Bring Every Layer to Life
The beauty of this dessert comes from how every ingredient plays its own role in building creamy, crunchy, chocolatey perfection.
- Reduced-Fat Cream Cheese: 8 ounces, softened. Adds rich creamy texture while keeping the filling smooth and balanced.
- Plain Greek Yogurt: 1 cup. Brings tanginess and extra creaminess with added protein.
- Sugar-Free Instant Chocolate Pudding Mix: 2 packages, 3.4 ounces each. Creates that classic chocolate flavor and silky texture.
- Cold Low-Fat Milk: 3 cups. Helps the pudding set properly while keeping the dessert light.
- Light Whipped Topping: 8 ounces. Makes the filling airy and fluffy.
- Chocolate Sandwich Cookies: 24 cookies, crushed. Creates the iconic dirt-style layers and crunchy texture.
- Fresh Strawberries: 1 cup, sliced. Adds freshness and bright spring flavor.
- Pastel Candy-Coated Chocolates: 1 cup. Brings cheerful Easter color and sweet crunch.
- Mini Chocolate Eggs: 1/2 cup. Adds playful holiday decoration and extra chocolate flavor.
Easy Ingredient Swaps For Even More Flexibility
One of the best things about this recipe is how adaptable it can be depending on your preferences.
Greek Yogurt: Vanilla Greek yogurt works beautifully for a sweeter filling.
Chocolate Sandwich Cookies: Gluten-free chocolate cookies can easily be substituted.
Low-Fat Milk: Almond milk or oat milk can work if needed.
Light Whipped Topping: Homemade whipped cream is a delicious alternative.
Fresh Strawberries: Raspberries or blueberries also fit perfectly with the spring flavor profile.
The Ingredients That Truly Make This Dessert Shine
Some ingredients completely transform the experience of this casserole, and these two deserve special attention.
Greek Yogurt: It gives the filling a slight tang that balances the sweetness beautifully while making the texture incredibly creamy.
Chocolate Sandwich Cookies: These crumbs create the nostalgic dirt cake effect while adding the perfect chocolate crunch between layers.
Let’s Build This Creamy Easter Dessert Together
Now comes the fun part where everything starts coming together into a colorful spring masterpiece.
- Preheat Your Equipment: No oven is required for this recipe, but prepare your refrigerator space so the casserole can chill flat and evenly.
- Combine Ingredients: In a large bowl, beat the softened cream cheese until smooth. Add Greek yogurt and mix well. In another bowl, whisk pudding mix with cold milk until thickened, then combine both mixtures gently. Fold in the whipped topping carefully until fluffy.
- Prepare Your Cooking Vessel: Lightly wipe the casserole dish clean and dry to ensure neat layering.
- Assemble the Dish: Spread a layer of crushed cookies across the bottom of the casserole dish. Add half the pudding mixture, then repeat with another cookie layer and the remaining filling. Finish with extra cookie crumbs on top.
- Cook to Perfection: Refrigerate the casserole for at least 4 hours so the layers can fully set and the flavors blend together beautifully.
- Finishing Touches: Right before serving, decorate with strawberries, pastel candy-coated chocolates, and mini chocolate eggs.
- Serve and Enjoy: Scoop generous portions into bowls and enjoy the creamy chocolate crunch in every bite.
The Texture and Flavor Combination That Makes It Irresistible
One spoonful of this dessert gives you layers of creamy pudding filling, soft whipped texture, crunchy cookie crumbs, and bursts of sweet candy coating all at once. The fresh strawberries brighten everything up while the chocolate layers stay rich without becoming overwhelming.
As the casserole chills, the cookie crumbs soften slightly and absorb some of the creamy filling, creating that signature dirt cake texture everyone loves. It becomes cool, smooth, fluffy, and crunchy all at the same time.
Helpful Tricks For The Best Results Every Time
Making this dessert is simple, but these little tricks make a big difference.
- Chill overnight for the best flavor and texture.
- Add fruit toppings right before serving to keep them fresh.
- Use a food processor for ultra-even cookie crumbs.
- Keep the whipped topping cold until ready to fold in.
Common Mistakes To Skip For A Perfect Dessert
Even easy desserts have a few small pitfalls, and avoiding them helps guarantee success.
- Do not use warm cream cheese because it can create a runny filling.
- Avoid overmixing the whipped topping or the texture can become dense.
- Do not add candy toppings too early or colors may bleed.
- Skip overly thick cookie layers because they can overpower the creamy filling.
Nutrition Facts You’ll Appreciate
This lighter version keeps the dessert satisfying while balancing richness and freshness nicely.
Servings: 12
Calories per serving: 245
Note: These are approximate values.
Timing That Fits Busy Holiday Prep
One reason this dessert works so well for gatherings is how little active prep it actually needs.
Prep Time: 20 minutes
Cook Time: 0 minutes
Total Time: 4 hours 20 minutes
Make-Ahead Tips That Save Time During Busy Holidays
This casserole is honestly even better when made ahead because the layers settle and chill beautifully overnight.
You can fully assemble the dessert one day before serving and keep it tightly covered in the refrigerator. For longer storage, keep toppings separate until serving time so everything stays fresh and colorful.
Leftovers can be refrigerated for up to 4 days. Freezing is possible too, although the texture becomes slightly softer once thawed.
Fun Ways To Serve This Easter Dessert
This casserole looks beautiful served directly from the baking dish with extra candy scattered on top right before bringing it to the table.
You can also spoon it into clear dessert cups for individual servings. Pair it with fresh fruit, iced coffee, or a simple spring brunch spread for a cheerful holiday dessert experience.
Creative Ways To Reinvent Leftovers
If you somehow have leftovers, there are plenty of fun ways to reuse them.
Turn leftover casserole into parfaits layered with fresh berries. Freeze scoops into mini dessert bites for warm afternoons. You can even spread leftovers into graham cracker crusts for quick no-bake pie cups.
Extra Little Details That Make A Big Difference
Keeping the casserole chilled until serving helps maintain the fluffiest texture. If you want cleaner slices, place the dish in the freezer for 15 minutes before serving.
For extra crunch, reserve a handful of fresh cookie crumbs to sprinkle over individual servings right before eating.
Make This Dessert Look Absolutely Stunning
Presentation matters, especially during spring celebrations. Scatter pastel candies evenly across the top instead of piling them in one spot. Add sliced strawberries around the edges for color contrast and freshness.
Using a white casserole dish also helps the colorful toppings stand out beautifully.
Delicious Variations Worth Trying
This recipe is wonderfully flexible, which means you can get creative every time you make it.
- Berry Lovers Version: Add layers of raspberries and blueberries between the pudding layers.
- Peanut Butter Twist: Mix a few tablespoons of powdered peanut butter into the filling.
- Mint Chocolate Style: Use mint-flavored chocolate cookies for a refreshing variation.
- Banana Pudding Version: Swap chocolate pudding for banana pudding and top with banana slices.
- Extra Crunch Version: Add chopped toasted almonds between the layers.
FAQ’s
1. Can I make this dessert a day ahead?
Yes, and it actually tastes even better after chilling overnight.
2. Can I freeze leftovers?
Yes, although the texture becomes a bit softer once thawed.
3. Is this dessert very sweet?
It has balanced sweetness thanks to the Greek yogurt and lighter ingredients.
4. Can I use homemade whipped cream?
Absolutely, homemade whipped cream works beautifully.
5. What cookies work best?
Chocolate sandwich cookies create the classic dirt cake flavor and texture.
6. Can kids help make this recipe?
Definitely. Kids usually love layering the crumbs and decorating the top.
7. How long does it last in the fridge?
It stays fresh for about 4 days when covered properly.
8. Can I use frozen strawberries?
Fresh strawberries work best because frozen berries release too much liquid.
9. Is this dessert served frozen?
No, it should be chilled but still soft and creamy.
10. Can I make it gluten free?
Yes, simply use gluten-free chocolate sandwich cookies.
Conclusion
This healthy Easter dirt cake casserole brings together everything people love about nostalgic holiday desserts while keeping the flavors fresh, creamy, and perfectly balanced. From the crunchy cookie layers to the fluffy chocolate filling and cheerful Easter toppings, every spoonful feels playful and comforting at the same time.
Whether you’re making it for a big family gathering or simply treating yourself to something festive and fun, this dessert has a way of making the table feel extra special. Trust me, once you make it, everyone will ask for it again next Easter.
Print
Healthy Easter Dirt Cake Casserole Recipe
- Prep Time: 10 minutes
- Cook Time: 20 minutes
- Total Time: 30 minutes
- Yield: 6 servings 1x
- Category: Dinner
- Method: Baking
- Cuisine: American
- Diet: Low Salt
Description
A creamy, cheesy buffalo chicken pasta bake packed with bold flavor, tender chicken, and gooey melted cheese, perfect for busy weeknight dinners.
Ingredients
- 12 ounces penne pasta
- 3 cups cooked shredded chicken
- 3/4 cup buffalo sauce
- 8 ounces cream cheese, softened
- 1/2 cup ranch dressing
- 2 cups cheddar cheese, shredded
- 1 cup mozzarella cheese, shredded
- 1/2 cup milk
- 1 teaspoon garlic powder
- 1 teaspoon onion powder
- 1/2 teaspoon salt
- 1/2 teaspoon black pepper
- 2 tablespoons fresh parsley, chopped
Instructions
- Preheat oven to 375°F and grease a 9×13 baking dish.
- Cook penne pasta until slightly under al dente, then drain.
- In a large skillet over medium heat, combine cream cheese, buffalo sauce, ranch dressing, milk, garlic powder, onion powder, salt, and black pepper. Stir until smooth.
- Add shredded chicken, cooked pasta, cheddar cheese, and half the mozzarella cheese. Stir well.
- Transfer mixture into the prepared baking dish and spread evenly.
- Top with remaining mozzarella cheese.
- Bake for 15 to 18 minutes until hot and bubbly.
- Garnish with chopped parsley and serve warm.
Notes
- Use freshly shredded cheese for the creamiest texture.
- Add extra buffalo sauce if you prefer more heat.
- Let the casserole rest for 5 minutes before serving.
- Rotisserie chicken works perfectly for faster prep.
Nutrition
- Serving Size: 1 serving
- Calories: 620
- Sugar: 4g
- Sodium: 780mg
- Fat: 34g
- Saturated Fat: 17g
- Unsaturated Fat: 14g
- Trans Fat: 0g
- Carbohydrates: 42g
- Fiber: 2g
- Protein: 36g
- Cholesterol: 118mg
Keywords: creamy buffalo chicken pasta bake, buffalo chicken casserole, cheesy pasta bake, easy chicken pasta dinner, baked buffalo pasta