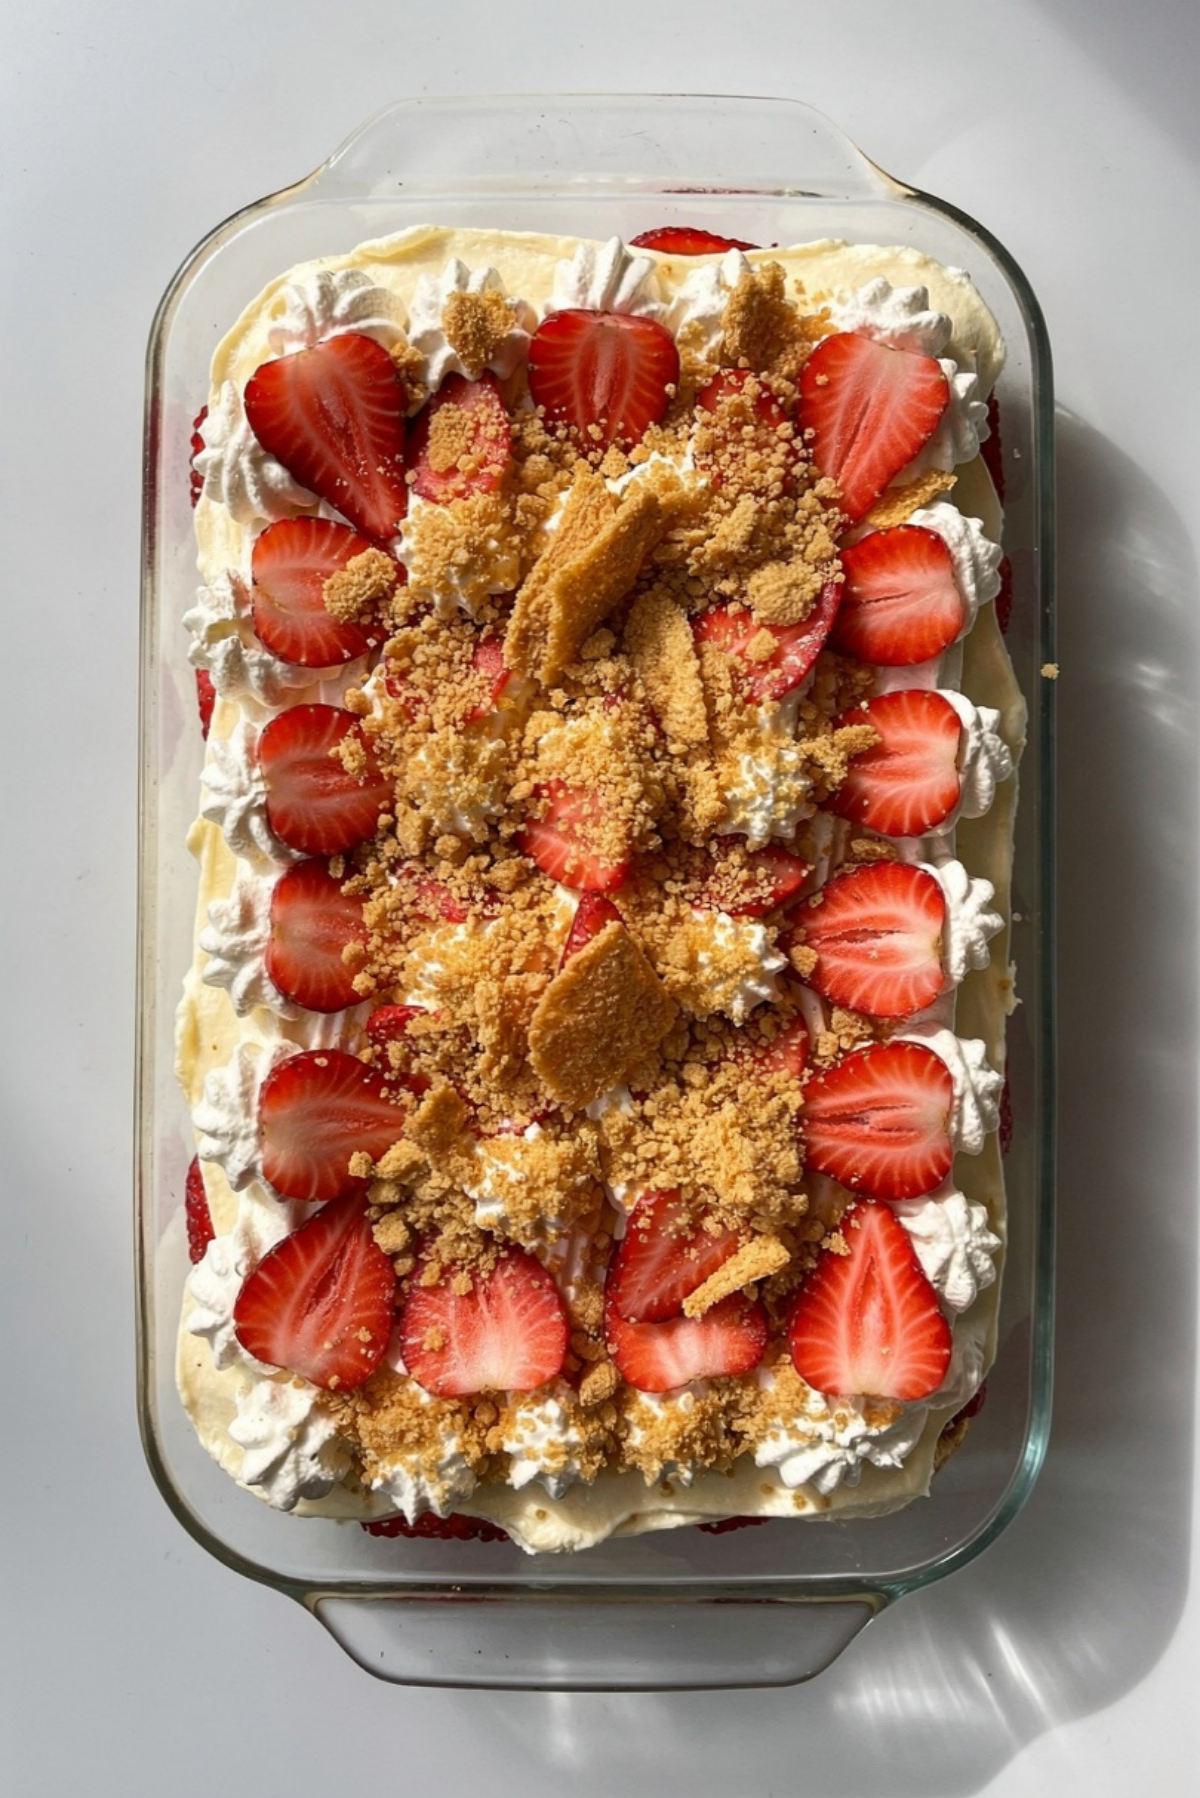
No Bake Strawberry Lasagna Recipe
There’s something about chilled strawberry desserts that instantly feels like summer at the table. This creamy layered treat combines sweet strawberries, fluffy whipped topping, velvety cheesecake filling, and buttery cookie crumbs into one ridiculously satisfying bite. Every forkful feels cool, light, and indulgent all at once. Trust me, you’re going to love this because it tastes like something straight from a bakery display case, yet it comes together without ever turning on the oven.
Why Everyone Falls in Love With This Creamy Strawberry Dessert
The first thing you notice is the contrast of textures. The soft cream filling melts into the juicy strawberries while the cookie crust adds just enough buttery crunch. It feels rich without being too heavy, which makes it perfect for warm afternoons, family gatherings, or even those moments when you just need a little sweet comfort after dinner.
And honestly, this one’s a total game-changer because it looks impressive while secretly being incredibly easy to pull together. Even beginner cooks can make it look beautiful.
The Sweet Story Behind Layered Icebox Desserts
Layered chilled desserts have been around for generations, especially in American home kitchens where simple no-bake treats became popular during hot summer months. Icebox desserts gained popularity because they were easy to prepare ahead of time and could chill beautifully in the refrigerator while flavors developed overnight.
This strawberry version brings together classic cheesecake-inspired filling with the nostalgic comfort of layered pudding desserts. Families often make variations for holidays, potlucks, and birthday celebrations because they travel well and always disappear quickly from the table.
What Makes This Dessert So Reliable Every Single Time
Before diving into the layers and creamy goodness, let me tell you why this recipe works so well for almost everyone.
Versatile: You can serve it at backyard cookouts, birthday parties, baby showers, or casual weekend dinners. It fits almost any occasion beautifully.
Budget-Friendly: Most ingredients are affordable grocery staples, which means you can create an impressive dessert without spending a fortune.
Quick and Easy: Since there’s no baking involved, the process feels simple and stress free, especially on busy days.
Customizable: You can swap fruits, cookies, or even flavored pudding to create your own twist.
Crowd-Pleasing: Creamy layers and fresh strawberries are always a winning combination. People usually ask for seconds.
Make-Ahead Friendly: This dessert actually tastes even better after chilling for several hours.
Great for Leftovers: The layers stay creamy and delicious for days in the refrigerator.
Smart Tricks That Make The Layers Perfect
Making layered desserts is easy, but a few little details can make the final result look and taste incredible.
- Chill the mixing bowl before whipping cream cheese filling for an extra fluffy texture.
- Pat strawberries dry before layering so excess moisture does not thin the filling.
- Let the dessert chill at least 4 hours before slicing for cleaner layers.
- Use a serrated knife for neat slices without squishing the creamy filling.
- Crush the cookies finely so the crust holds together better.
Kitchen Tools That Make Everything Easier
You really do not need fancy equipment here, which is part of the charm.
Mixing Bowls: Large bowls help combine the creamy filling smoothly.
Hand Mixer: Makes whipping the cream cheese mixture faster and fluffier.
Rubber Spatula: Perfect for folding whipped topping gently without deflating it.
9×13 Baking Dish: Gives enough room for beautiful layered sections.
Food Processor or Rolling Pin: Helps crush cookies evenly for the crust.
The Delicious Ingredients That Build Every Layer
The magic starts with simple ingredients that come together into something seriously irresistible.
- Golden Sandwich Cookies: 36 cookies, crushed. These create the sweet buttery crust and topping crunch.
- Unsalted Butter: 6 tablespoons melted. Helps bind the cookie crumbs together perfectly.
- Cream Cheese: 16 ounces softened. Gives the filling its rich cheesecake flavor.
- Powdered Sugar: 1 cup. Sweetens the creamy layers smoothly without graininess.
- Vanilla Extract: 1 teaspoon. Adds warmth and depth to the filling.
- Whipped Topping: 16 ounces thawed. Makes the dessert airy and light.
- Instant Cheesecake Pudding Mix: 2 boxes, 3.4 ounces each. Creates a silky thick filling.
- Cold Milk: 3 cups. Helps the pudding set into creamy layers.
- Fresh Strawberries: 4 cups sliced. Bring freshness, sweetness, and bright fruity flavor.
Easy Ingredient Swaps You Can Try
Sometimes you want to change things up a little, and thankfully this dessert is very forgiving.
Golden Sandwich Cookies: Graham crackers or vanilla wafers work beautifully.
Whipped Topping: Homemade whipped cream can replace store-bought topping.
Strawberries: Raspberries or blueberries also taste amazing.
Cheesecake Pudding Mix: Vanilla pudding works if cheesecake flavor is unavailable.
Ingredients That Truly Steal The Show
A couple ingredients really make this dessert unforgettable.
Fresh Strawberries: Their juicy sweetness balances the richness of the creamy filling perfectly.
Cream Cheese: Creates that cheesecake-style flavor which makes every bite feel luxurious.
Let’s Build Those Gorgeous Creamy Layers
Now comes the fun part, and honestly this process feels almost therapeutic once you start layering everything together.
- Preheat Your Equipment: Since this is a no-bake dessert, there is no oven needed. Instead, prepare a clean workspace and chill the baking dish for a few minutes if desired.
- Combine Ingredients: Crush the golden sandwich cookies into fine crumbs and mix with melted butter until evenly coated.
- Prepare Your Cooking Vessel: Press half the cookie mixture firmly into the bottom of a 9×13 baking dish to form the crust.
- Assemble the Dish: Beat cream cheese, powdered sugar, and vanilla until smooth. Fold in half the whipped topping. In another bowl whisk pudding mix with cold milk until thickened. Spread cream cheese mixture over the crust, add sliced strawberries, then spread pudding mixture evenly over the top.
- Cook to Perfection: Since there is no baking involved, place the dessert into the refrigerator for at least 4 hours so the layers can fully set.
- Finishing Touches: Spread remaining whipped topping across the top and sprinkle with the remaining cookie crumbs and extra strawberry slices.
- Serve and Enjoy: Slice chilled squares and serve cold for the creamiest texture and freshest flavor.
The Texture And Flavor Combination Is Unreal
The longer this dessert chills, the more the flavors blend together into something dreamy. The cookie crust softens slightly while still keeping a gentle crunch. Fresh strawberries release a little juice into the creamy layers, which creates this almost mousse-like texture that feels light and refreshing.
Every bite gives you buttery sweetness, cool creaminess, fruity freshness, and just enough richness to make it feel indulgent without overwhelming the palate.
Helpful Tips For The Best Results Every Time
A few simple habits can make this dessert even more delicious.
- Use softened cream cheese to avoid lumps in the filling.
- Chill overnight if possible because the flavor becomes even better.
- Slice strawberries evenly for prettier layers.
- Wipe the knife clean between slices for cleaner presentation.
Mistakes To Avoid While Making This Dessert
Even simple recipes can go sideways if a few details are skipped.
- Do not use warm melted butter directly on the filling because it can affect texture.
- Avoid watery strawberries since excess juice can loosen the layers.
- Do not rush the chilling time or the slices may fall apart.
- Avoid overmixing whipped topping because it can lose its fluffy texture.
A Quick Look At The Nutrition Details
This dessert feels indulgent, but it can absolutely fit into a balanced treat rotation.
Servings: 12
Calories per serving: 420
Note: These are approximate values.
Time Needed To Make This Chilled Dessert
One of the best parts is how little active time you actually need.
Prep Time: 25 minutes
Cook Time: 0 minutes
Total Time: 4 hours 25 minutes
How To Prepare Ahead And Store It Properly
This dessert was practically made for preparing ahead. You can fully assemble it the night before serving and let it chill overnight for even better texture and flavor.
Store leftovers tightly covered in the refrigerator for up to 4 days. Freezing is also possible for up to 1 month, though the strawberry texture may soften slightly after thawing. For best results, thaw overnight in the refrigerator before serving.
The Best Ways To Serve This Strawberry Treat
This dessert shines all on its own, but a few serving ideas can make it feel even more special.
Serve chilled with fresh strawberry slices on the side or a drizzle of strawberry sauce. A hot cup of coffee balances the sweetness beautifully, while iced tea makes it perfect for warm-weather gatherings.
For parties, try cutting smaller squares and serving them in cupcake liners for easier grab-and-go portions.
Delicious Ideas For Leftovers
If you somehow end up with leftovers, there are fun ways to reinvent them.
Layer pieces into parfait glasses with extra whipped cream and berries. You can also spoon leftovers into milkshakes for a rich strawberry cheesecake-inspired drink.
Some people even freeze small squares and enjoy them like frozen dessert bars.
Extra Tricks That Make Everything Better
Little details can make a big difference here.
- Add a tiny pinch of salt to the crust for deeper flavor.
- Use ripe strawberries for maximum sweetness and color.
- Chill serving plates before plating for extra freshness.
- Garnish with mint leaves right before serving for a prettier presentation.
How To Turn It Into A Stunning Dessert Table Centerpiece
Presentation makes this dessert feel bakery-worthy with very little effort.
Use a glass baking dish so the layers stay visible from the sides. Arrange strawberry slices neatly across the top and sprinkle cookie crumbs evenly for contrast. A few whole strawberries in the center instantly make it look party ready.
Let me tell you, it’s worth every bite and every compliment you’ll get after serving it.
Fun Variations You Should Definitely Try
Once you make the classic version, you’ll probably want to experiment.
- Chocolate Strawberry Version: Add chocolate pudding layers and chocolate cookie crumbs.
- Berry Mix Version: Combine strawberries, blueberries, and raspberries together.
- Lemon Strawberry Twist: Add lemon zest to the filling for bright citrus flavor.
- Cookies And Cream Style: Use chocolate sandwich cookies instead of golden cookies.
- Tropical Style: Add sliced bananas and toasted coconut for a beachy vibe.
FAQ’s
1. Can I make this dessert the day before?
Yes, and honestly it tastes even better after chilling overnight because the layers fully set.
2. Can I use frozen strawberries?
Fresh strawberries work best, but frozen strawberries can work if thawed and drained well.
3. How long does it stay fresh?
It stays fresh in the refrigerator for about 4 days when covered properly.
4. Can I use homemade whipped cream?
Absolutely. Just whip it until stiff peaks form before folding into the filling.
5. Why is my filling too soft?
Usually this happens if the dessert has not chilled long enough or if the strawberries released too much liquid.
6. Can I freeze it?
Yes, though the texture becomes slightly softer after thawing.
7. What cookies work best for the crust?
Golden sandwich cookies give the sweetest flavor, but graham crackers also work beautifully.
8. Can I make it in individual cups?
Definitely. Small jars or dessert cups look adorable for parties.
9. Is this dessert overly sweet?
The fresh strawberries balance the sweetness nicely, which keeps it refreshing.
10. Can I add extra fruit?
Of course. Blueberries, raspberries, or bananas all pair wonderfully with the creamy filling.
Conclusion
This no bake strawberry lasagna is one of those desserts that instantly brings people back for another slice. The creamy cheesecake filling, juicy strawberries, fluffy topping, and buttery cookie layers all come together into something cool, comforting, and seriously hard to resist. Whether you’re making it for a holiday table, a family gathering, or just because you need a sweet treat in the fridge, this dessert always delivers. Trust me, once you make it the first time, it’s going to become one of those recipes everyone asks you for again and again.
Print
No Bake Strawberry Lasagna Recipe
- Prep Time: 20 minutes
- Cook Time: 0 minutes
- Total Time: 4 hours 20 minutes
- Yield: 12 servings 1x
- Category: Dessert
- Method: No-Bake
- Cuisine: American
- Diet: Low Fat
Description
A lighter and creamy Easter dirt cake casserole layered with chocolate pudding, crushed cookies, whipped topping, and colorful Easter candies for the perfect festive dessert.
Ingredients
- 8 ounces reduced-fat cream cheese, softened
- 1 cup plain Greek yogurt
- 2 packages sugar-free instant chocolate pudding mix (3.4 ounces each)
- 3 cups cold low-fat milk
- 8 ounces light whipped topping
- 24 chocolate sandwich cookies, crushed
- 1 cup fresh strawberries, sliced
- 1 cup pastel candy-coated chocolates
- 1/2 cup mini chocolate eggs
Instructions
- Beat softened cream cheese in a large bowl until smooth.
- Add Greek yogurt and mix until creamy.
- In another bowl, whisk pudding mix with cold milk until thickened.
- Combine pudding mixture with cream cheese mixture.
- Fold in whipped topping gently until fluffy.
- Spread a layer of crushed cookies into a 9×13 casserole dish.
- Add half the pudding mixture over the cookies.
- Repeat with another layer of crushed cookies and remaining pudding mixture.
- Top with remaining cookie crumbs.
- Refrigerate for at least 4 hours.
- Before serving, decorate with strawberries, pastel candy-coated chocolates, and mini chocolate eggs.
Notes
- Chill overnight for the best texture.
- Add candy toppings right before serving for the freshest appearance.
- Use homemade whipped cream if preferred.
- Store covered in the refrigerator for up to 4 days.
Nutrition
- Serving Size: 1 serving
- Calories: 245
- Sugar: 18g
- Sodium: 290mg
- Fat: 9g
- Saturated Fat: 4g
- Unsaturated Fat: 4g
- Trans Fat: 0g
- Carbohydrates: 35g
- Fiber: 2g
- Protein: 7g
- Cholesterol: 15mg
Keywords: healthy Easter dirt cake casserole, Easter dessert casserole, no bake Easter dessert, chocolate pudding casserole, healthy dirt cake