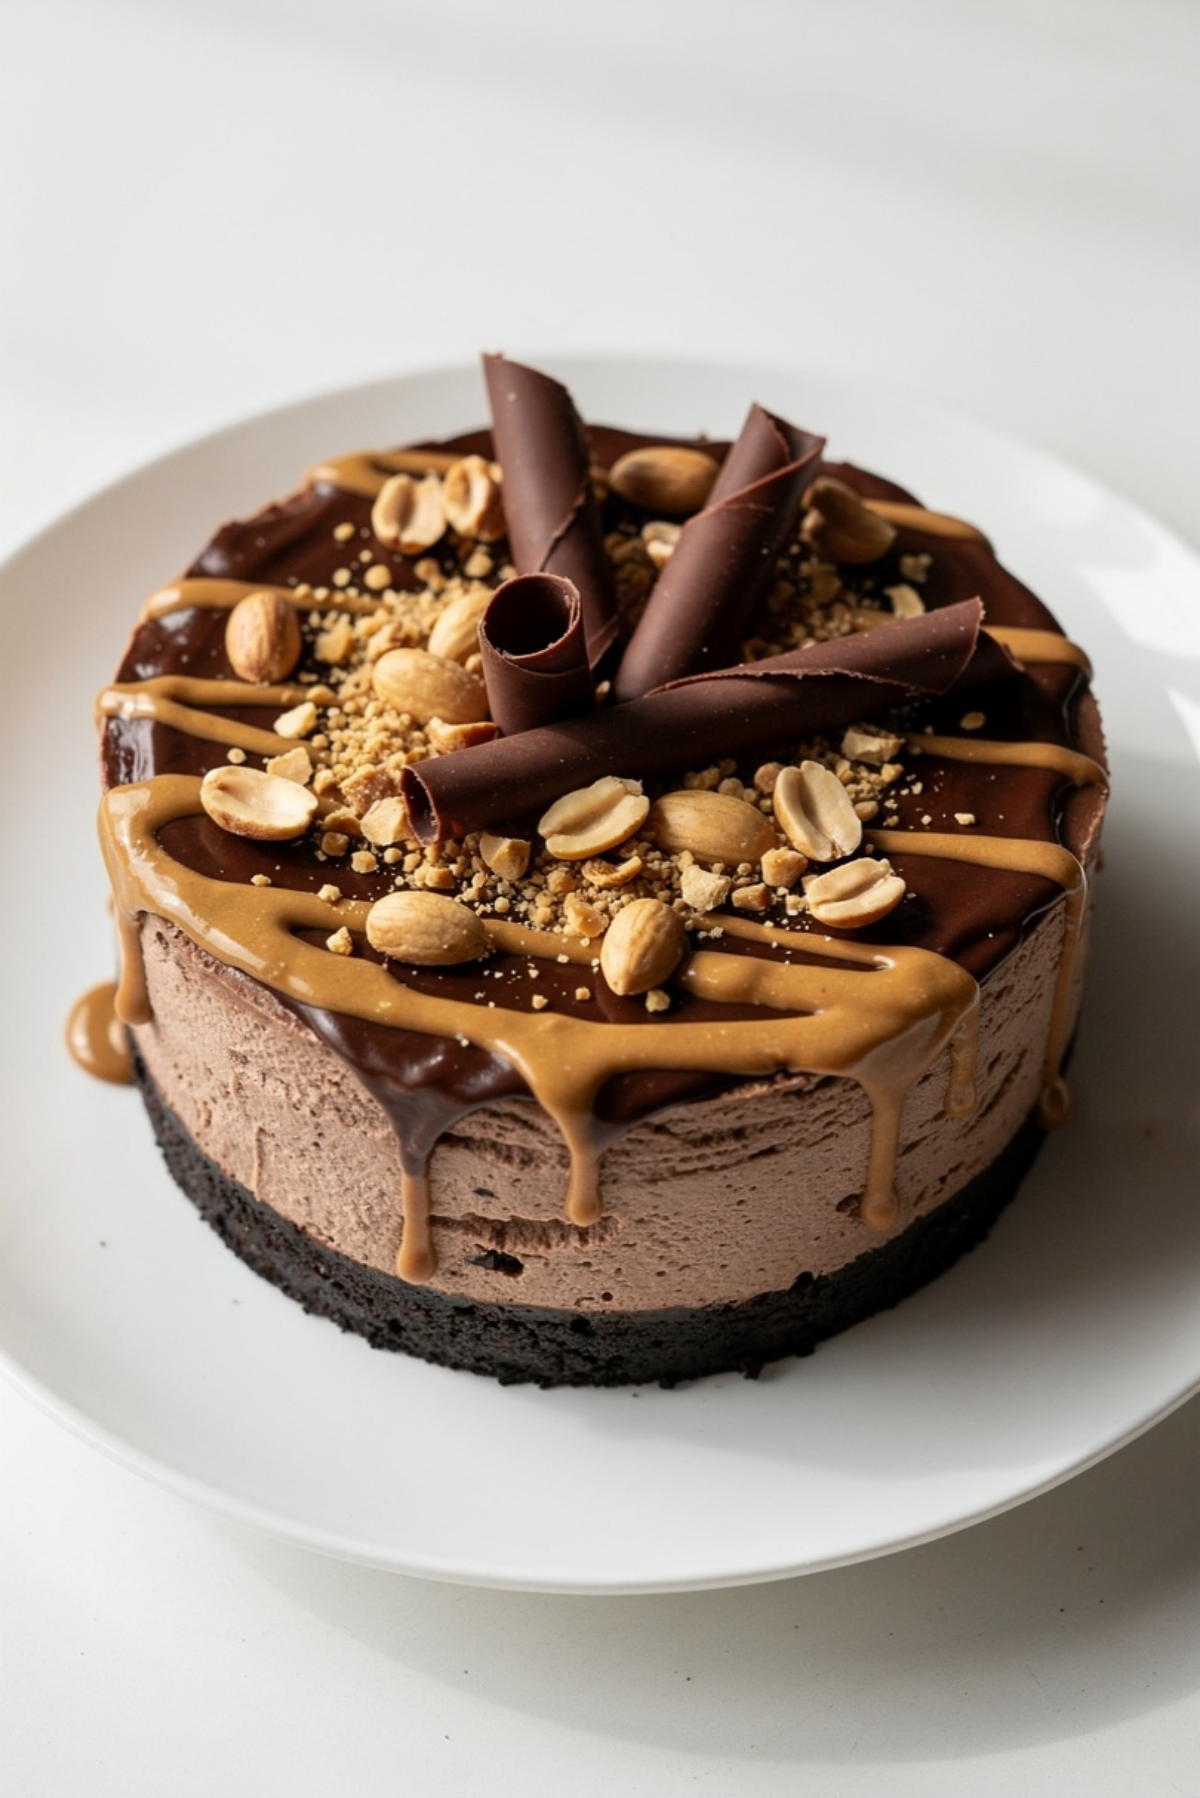
Chocolate Peanut Butter Cheesecake Recipe
There is something about the combination of rich chocolate and creamy peanut butter that instantly feels comforting. The moment you slice into this cheesecake, you get those beautiful silky layers sitting on top of a crunchy chocolate cookie crust, and trust me, you’re going to love this. Every bite melts slowly with deep cocoa flavor balanced by smooth peanut butter richness, making it the kind of dessert people remember long after the plates are empty.
And now that you can already picture that creamy texture and glossy chocolate topping, let’s dive into what makes this dessert such a total game changer for every cheesecake lover.
Why This Decadent Dessert Always Steals the Spotlight
Some desserts are good, and then there are desserts that completely stop conversations at the table. This cheesecake falls into the second category. It is rich without feeling overwhelming, sweet without becoming too heavy, and every layer works perfectly together.
The crunchy chocolate crust adds just enough texture to contrast the creamy filling, while the peanut butter creates that smooth nutty flavor that pairs perfectly with deep chocolate notes. Then comes the silky ganache on top, which ties everything together in the most irresistible way.
Let me tell you, it’s worth every bite.
The Sweet Story Behind Chocolate and Peanut Butter Desserts
Chocolate and peanut butter have been paired together for generations, especially in American desserts where the combination became incredibly popular during the early twentieth century. Peanut butter added affordability and richness to homemade sweets, while chocolate brought indulgence and depth.
Cheesecakes themselves date back centuries, with roots in Europe before becoming a classic dessert in the United States. Over time, bakers began experimenting with flavors, and eventually peanut butter and chocolate found their perfect place inside creamy cheesecake fillings.
Today, this dessert feels both nostalgic and luxurious at the same time, which honestly explains why it remains such a favorite at holidays, birthdays, and celebrations.
Why You’ll Keep Coming Back to This Creamy Cheesecake
This dessert is not only delicious, it’s surprisingly practical too. Once you make it, you’ll see exactly why so many people keep it in their dessert rotation.
Versatile: You can serve it at birthdays, dinner parties, holidays, or even casual weekend gatherings. It fits every occasion beautifully.
Budget-Friendly: Most ingredients are simple pantry and refrigerator staples, which means you do not need anything fancy to create a bakery-style dessert.
Quick and Easy: While cheesecakes look impressive, the actual preparation is very approachable, especially when you follow the steps carefully.
Customizable: You can add chopped chocolate, peanut butter cups, caramel drizzle, or even swap the crust for something different.
Crowd-Pleasing: Chocolate and peanut butter together almost always guarantee empty plates and recipe requests.
Make-Ahead Friendly: Cheesecake actually tastes even better after chilling overnight, making it perfect for planning ahead.
Great for Leftovers: The flavors deepen beautifully after a day or two in the refrigerator.
Pro Tips That Make This Cheesecake Extra Creamy
Before you begin mixing everything together, here are a few small tricks that make a huge difference in the final texture and flavor.
- Use room temperature cream cheese so the filling becomes smooth without lumps.
- Do not overmix once the eggs are added because too much air can cause cracks.
- Bake the cheesecake slowly and gently for the creamiest texture possible.
- Allow the cheesecake to cool gradually before refrigerating.
- Chill for at least 6 hours before slicing so the layers fully set.
Kitchen Tools That Make Everything Easier
A few reliable kitchen tools will help the entire process feel smooth and stress free.
Springform Pan: This makes removing the cheesecake much easier while keeping the sides clean and beautiful.
Mixing Bowls: You’ll need separate bowls for the crust, filling, and ganache.
Electric Mixer: Helps create a silky smooth filling without overworking the batter.
Rubber Spatula: Perfect for scraping every bit of filling from the bowl.
Offset Spatula: Makes spreading the ganache beautifully simple.
Everything You Need For This Rich Cheesecake
The ingredients work together in such a satisfying way. The chocolate brings depth, the peanut butter adds creaminess, and the buttery cookie crust creates the perfect base.
- Chocolate Cookie Crumbs: 2 cups, these create the crunchy chocolate crust foundation.
- Unsalted Butter: 6 tablespoons melted, helps bind the crust together.
- Cream Cheese: 24 ounces softened, creates the creamy cheesecake texture.
- Creamy Peanut Butter: 1 cup, adds rich nutty flavor throughout the filling.
- Granulated Sugar: 1 cup, balances the cocoa and peanut butter flavors.
- Brown Sugar: 1/4 cup, adds subtle caramel warmth.
- Vanilla Extract: 2 teaspoons, enhances all the dessert flavors.
- Large Eggs: 3, help create structure while keeping the filling silky.
- Sour Cream: 3/4 cup, adds smoothness and slight tanginess.
- Semi Sweet Chocolate Chips: 1 cup melted, creates deep chocolate flavor.
- Heavy Cream: 3/4 cup, used for the silky ganache topping.
- Chopped Roasted Peanuts: 1/4 cup, adds crunch and texture on top.
- Chocolate Curls: 1/4 cup, finish the cheesecake beautifully.
Flexible Swaps If You Need Them
Sometimes you need to work with what’s already in your kitchen, and thankfully this recipe is very forgiving.
Chocolate Cookie Crumbs: Graham cracker crumbs or chocolate graham crackers work nicely.
Creamy Peanut Butter: Almond butter can be used for a slightly different nutty flavor.
Sour Cream: Plain Greek yogurt works as an easy substitute.
Semi Sweet Chocolate Chips: Dark chocolate chips create a richer chocolate flavor.
The Ingredients That Truly Make This Dessert Shine
A couple of ingredients really deserve special attention because they completely define the flavor experience.
Creamy Peanut Butter: This gives the filling its smooth, nutty richness while balancing the sweetness perfectly.
Semi Sweet Chocolate: Deep chocolate flavor keeps the dessert from tasting overly sweet and adds luxurious depth.
Let’s Bake This Dreamy Cheesecake Together
Now comes the fun part, and honestly this process feels incredibly rewarding once the kitchen starts smelling like chocolate and warm peanut butter.
1. Preheat Your Equipment:
Preheat your oven to 325 degrees Fahrenheit. Lightly grease a 9 inch springform pan and set it aside.
2. Combine Ingredients:
Mix the chocolate cookie crumbs with melted butter until the texture resembles wet sand. Press firmly into the bottom of the pan.
In a large bowl, beat the cream cheese until smooth. Add peanut butter, granulated sugar, brown sugar, and vanilla extract. Mix until creamy. Add eggs one at a time, mixing gently after each addition. Fold in sour cream and melted chocolate.
3. Prepare Your Cooking Vessel:
Wrap the outside of the springform pan with foil if using a water bath. This helps maintain gentle heat while baking.
4. Assemble the Dish:
Pour the cheesecake filling over the prepared crust and smooth the top with a spatula.
5. Cook to Perfection:
Bake for 55 to 65 minutes until the edges are set but the center still has a slight jiggle. Turn off the oven and let the cheesecake rest inside with the door slightly open for 30 minutes.
6. Finishing Touches:
Heat the heavy cream until warm, then pour over chocolate chips to create ganache. Spread over the chilled cheesecake and top with chopped peanuts and chocolate curls.
7. Serve and Enjoy:
Slice with a warm knife for clean edges and serve chilled for the ultimate creamy texture.
The Irresistible Texture and Flavor Layers
One of the best parts about this cheesecake is the contrast in textures. The crust stays slightly crunchy while the filling remains silky and rich. Then the ganache on top adds smooth chocolate intensity that melts beautifully with every bite.
The peanut butter flavor becomes deeper after chilling overnight, while the chocolate notes grow richer and more balanced. Every layer works together in a way that feels luxurious without becoming too heavy.
Helpful Tricks For Bakery Style Results
Making cheesecake becomes much easier with a few simple habits.
- Use room temperature ingredients for a smoother filling.
- Chill the cheesecake overnight for cleaner slices.
- Wipe the knife between slices for perfect presentation.
- Toast the peanuts lightly for extra flavor.
Mistakes That Can Ruin the Texture
Cheesecake is simple, but a few common mistakes can affect the final result.
- Overmixing the batter can create cracks.
- Skipping the chilling time prevents the filling from setting properly.
- Baking at too high a temperature can dry out the cheesecake.
- Using cold cream cheese creates lumps in the filling.
Nutrition Facts You Should Know
These values are approximate but help give a general idea per serving.
Servings: 12
Calories per serving: 610
Note: These are approximate values.
Timing Everything Perfectly
Planning ahead makes this dessert much easier and more enjoyable.
Prep Time: 30 minutes
Cook Time: 1 hour 5 minutes
Total Time: 1 hour 35 minutes plus chilling time
How to Prep and Store This Cheesecake Like a Pro
One of the best things about cheesecake is how well it holds up over time. You can prepare it a full day ahead, which honestly makes entertaining so much easier.
Store leftovers tightly covered in the refrigerator for up to 5 days. For longer storage, freeze individual slices wrapped carefully in plastic wrap and place them in an airtight container.
To serve frozen slices, simply thaw overnight in the refrigerator.
The Best Ways to Serve This Dessert
This cheesecake pairs beautifully with hot coffee, cold milk, or even fresh berries for a little brightness. You can drizzle extra melted peanut butter on top for an even more indulgent finish.
For dinner parties, serve thin slices because this dessert is wonderfully rich.
Delicious Ways to Transform Leftovers
If you somehow end up with leftovers, there are plenty of fun ways to enjoy them again.
- Blend slices into milkshakes.
- Layer pieces into parfait glasses with whipped cream.
- Freeze small cheesecake bites for mini desserts.
- Crumble leftovers over vanilla ice cream.
Extra Details That Make a Big Difference
Small finishing touches can really elevate the final dessert.
- Let the ganache cool slightly before pouring.
- Use a hot towel around the pan before releasing the springform ring.
- Add chocolate curls just before serving for the prettiest texture.
Make Your Cheesecake Look Bakery Worthy
Presentation matters almost as much as flavor when it comes to cheesecake.
Use a clean cake stand and drizzle extra ganache slowly over the edges for dramatic effect. A few chopped peanuts on top add texture and visual contrast while chocolate curls create that elegant finishing touch.
This one’s a total game changer when served at celebrations.
Fun Variations You Can Try Next Time
Once you master the base recipe, there are so many delicious ways to customize it.
- Add chopped peanut butter cups into the filling for extra texture.
- Swap the chocolate crust for an Oreo crust.
- Use dark chocolate ganache for deeper cocoa flavor.
- Add caramel drizzle on top for sweet buttery richness.
- Stir mini chocolate chips into the cheesecake batter.
FAQ’s
1. Can I make this cheesecake ahead of time?
Yes, and it actually tastes even better after chilling overnight.
2. How do I prevent cracks in the cheesecake?
Avoid overmixing and let the cheesecake cool gradually after baking.
3. Can I freeze this dessert?
Absolutely. Wrap slices tightly and freeze for up to 2 months.
4. Do I need a water bath?
It helps create a smoother texture, but the cheesecake can still turn out beautifully without one.
5. Can I use crunchy peanut butter?
Yes, although creamy peanut butter creates the smoothest filling.
6. How long should the cheesecake chill?
At least 6 hours, but overnight is best.
7. What chocolate works best for ganache?
Semi sweet chocolate creates the best flavor balance.
8. Can I use low fat cream cheese?
Full fat cream cheese gives the richest texture and flavor.
9. Why is my cheesecake too soft?
It likely needs more chilling time to fully set.
10. Can I make mini cheesecakes instead?
Yes, simply divide the batter into muffin tins and reduce the baking time.
Conclusion
Chocolate and peanut butter were truly made for each other, and this cheesecake proves it with every creamy bite. From the crunchy cookie crust to the silky filling and glossy ganache topping, every layer feels comforting, rich, and completely irresistible. Whether you serve it for a celebration or simply because you’re craving something indulgent, this dessert always delivers that wow factor. Trust me, once you make it, people will ask for it again and again.
Print
Chocolate Peanut Butter Cheesecake Recipe
- Prep Time: 30 minutes
- Cook Time: 1 hour 5 minutes
- Total Time: 1 hour 35 minutes plus chilling time
- Yield: 12 servings 1x
- Category: Dessert
- Method: Baking
- Cuisine: American
- Diet: Vegetarian
Description
A rich and creamy chocolate peanut butter cheesecake with a crunchy chocolate cookie crust, silky peanut butter filling, and glossy chocolate ganache topping. Perfect for celebrations, holidays, or whenever you crave an indulgent dessert.
Ingredients
- 2 cups chocolate cookie crumbs
- 6 tablespoons unsalted butter, melted
- 24 ounces cream cheese, softened
- 1 cup creamy peanut butter
- 1 cup granulated sugar
- 1/4 cup brown sugar
- 2 teaspoons vanilla extract
- 3 large eggs
- 3/4 cup sour cream
- 1 cup semi sweet chocolate chips, melted
- 3/4 cup heavy cream
- 1/4 cup chopped roasted peanuts
- 1/4 cup chocolate curls
Instructions
- Preheat the oven to 325 degrees Fahrenheit and lightly grease a 9 inch springform pan.
- Combine the chocolate cookie crumbs and melted butter until evenly mixed, then firmly press the mixture into the bottom of the pan.
- Beat the softened cream cheese until smooth. Add peanut butter, granulated sugar, brown sugar, and vanilla extract, then mix until creamy.
- Add the eggs one at a time, mixing gently after each addition. Fold in the sour cream and melted chocolate until fully combined.
- Pour the filling over the prepared crust and smooth the top.
- Bake for 55 to 65 minutes until the edges are set and the center slightly jiggles.
- Turn off the oven and let the cheesecake cool inside with the door slightly open for 30 minutes.
- Chill the cheesecake for at least 6 hours or overnight.
- Heat the heavy cream until warm and pour it over the chocolate chips to create ganache. Stir until smooth.
- Spread the ganache over the chilled cheesecake and top with chopped peanuts and chocolate curls before serving.
Notes
- Use room temperature cream cheese for the smoothest texture.
- Do not overmix after adding the eggs to help prevent cracks.
- For clean slices, dip the knife in warm water and wipe between cuts.
- Chilling overnight gives the best flavor and texture.
Nutrition
- Serving Size: 1 slice
- Calories: 610
- Sugar: 33g
- Sodium: 360mg
- Fat: 45g
- Saturated Fat: 22g
- Unsaturated Fat: 18g
- Trans Fat: 0g
- Carbohydrates: 42g
- Fiber: 3g
- Protein: 11g
- Cholesterol: 135mg
Keywords: chocolate peanut butter cheesecake, creamy cheesecake dessert, chocolate cheesecake recipe, peanut butter dessert, baked cheesecake