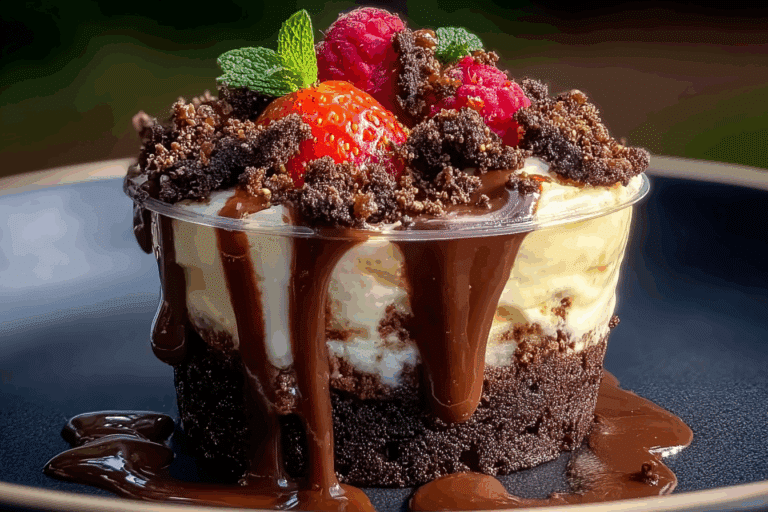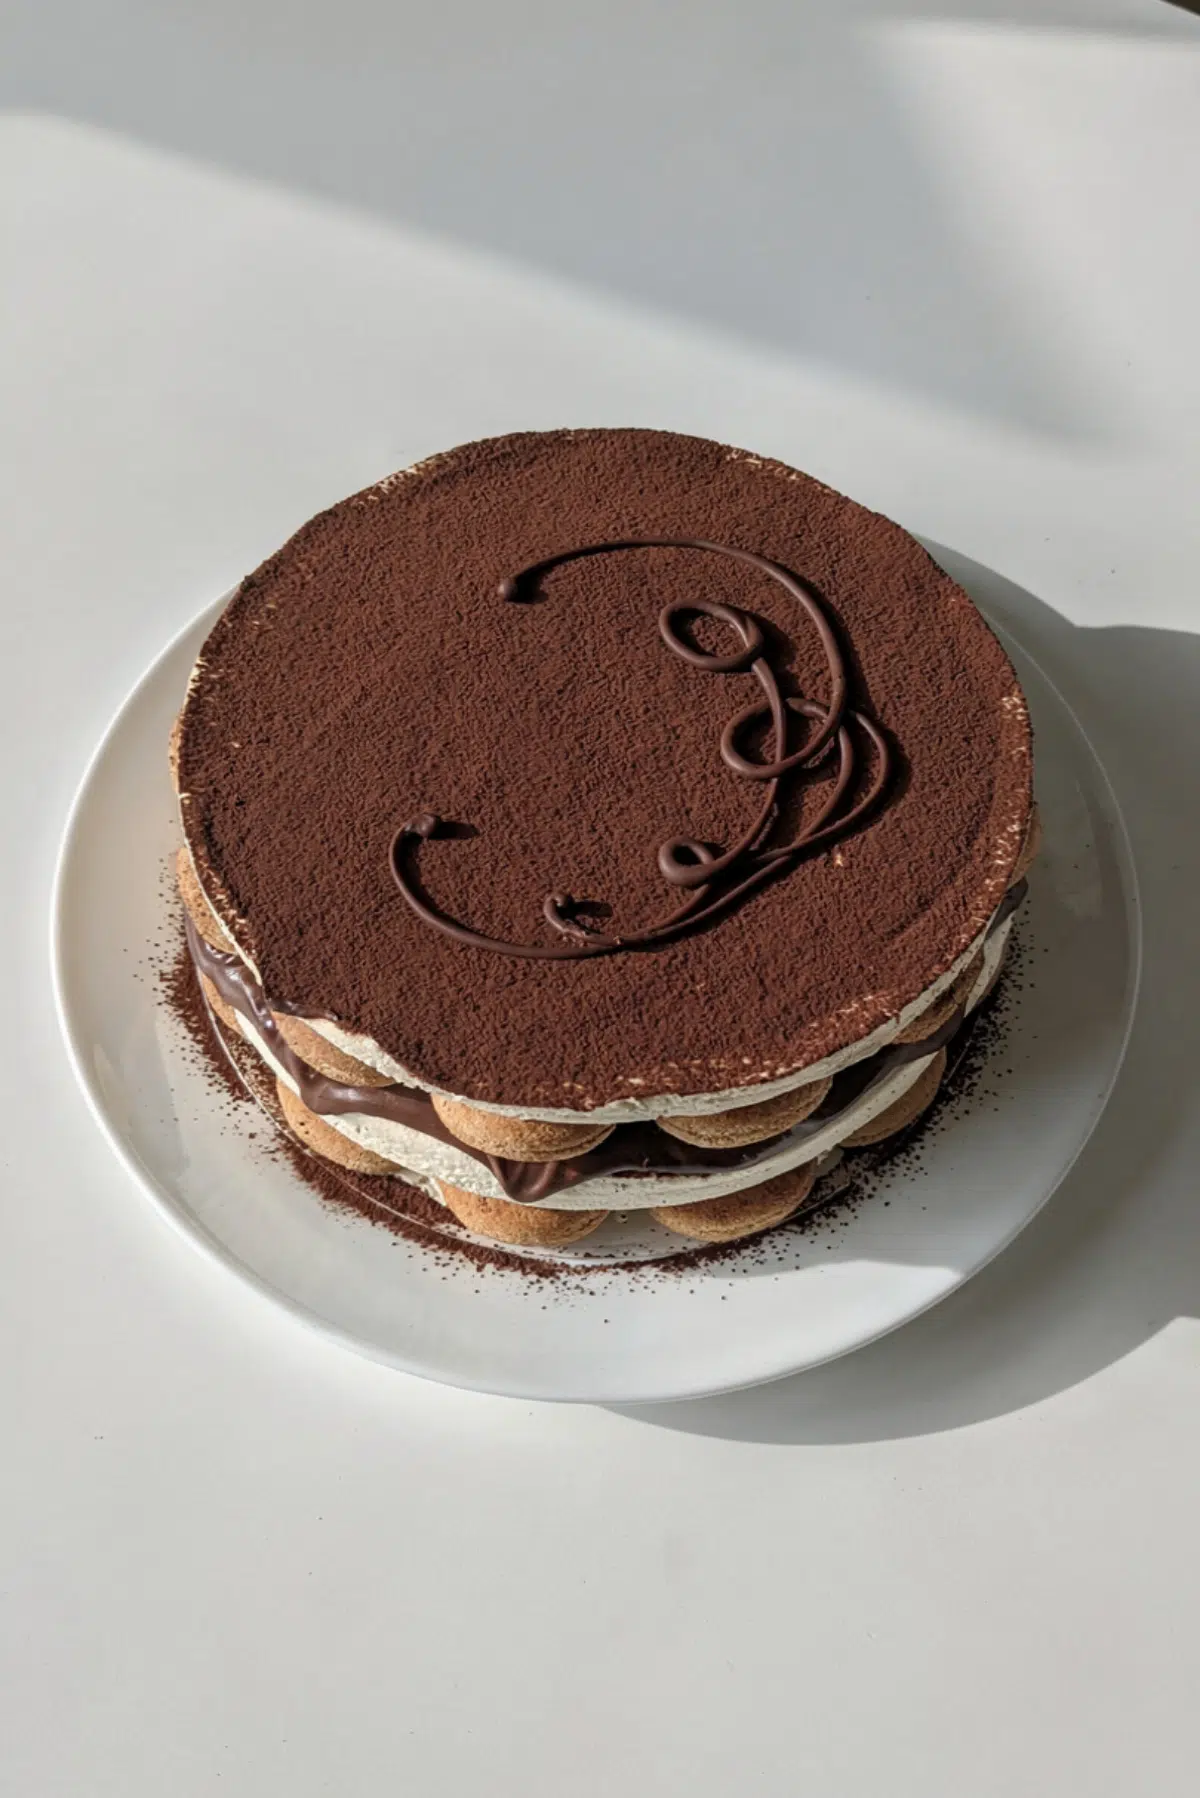
Nutella Tiramisu Cake
There is something magical about the moment you slice into a dessert and see those soft, creamy layers reveal themselves. This one brings together the deep comfort of coffee, the silky richness of mascarpone, and that unmistakable chocolate hazelnut flavor we all secretly crave. Trust me, you are going to love this, it is indulgent, smooth, and just the kind of treat that feels like a reward after a long day.
A dessert that feels like a hug in every bite
You know those desserts that instantly make people pause after the first bite? This is one of them. The combination of airy cream and soaked biscuits creates a melt-in-your-mouth texture, while the chocolate spread adds a luscious depth that feels almost luxurious.
It is the kind of dessert you bring out when you want to impress without stressing. Each layer builds flavor gently, and when it all comes together, it feels balanced, rich but not overwhelming, sweet but not heavy. And now let’s move into where this beauty actually comes from.
A little story behind this Italian-inspired favorite
This dessert takes inspiration from the classic :contentReference[oaicite:0]{index=0}, a beloved Italian creation that literally means “pick me up.” Traditionally made with coffee, mascarpone, and cocoa, it has been adapted in countless ways across the world.
Adding chocolate hazelnut spread is a modern twist that feels right at home. It keeps the soul of the original while adding a richer, slightly nutty sweetness that makes each bite even more comforting. And now that we know its roots, let’s talk about why this version works so beautifully.
Why this dessert never disappoints
Right from the first spoonful, you will notice how everything just works together. And here is exactly why:
Versatile: You can serve it at dinner parties, birthdays, or even as a weekend treat, it always fits the occasion.
Budget-Friendly: Most ingredients are simple and easy to find, which makes it accessible without sacrificing flavor.
Quick and Easy: No complicated baking steps here, just layering and chilling, which makes it beginner-friendly.
Customizable: You can adjust sweetness, coffee strength, or even layer thickness to suit your taste.
Crowd-Pleasing: Chocolate and cream are always a winning combination, especially when paired with coffee.
Make-Ahead Friendly: It actually tastes better after resting, which means less stress when hosting.
Great for Leftovers: The flavors deepen overnight, making the next day even more delicious.
And now, let’s take it a step further with some insider advice to get it just right.
Little secrets that make a big difference
Before diving into the process, here are a few tips that can elevate your results:
- Use strong coffee that has cooled completely, this prevents soggy layers while keeping flavor bold
- Do not overmix the mascarpone, keep it smooth and light
- Chill long enough, patience here gives you cleaner slices and better texture
- Dust cocoa just before serving for the freshest finish
Now that you are feeling confident, let’s gather the tools you will need.
Tools that make the process smooth
Having the right tools keeps everything simple and enjoyable:
Mixing Bowl: For whipping cream and blending the filling smoothly
Electric Mixer: Helps achieve that airy, fluffy texture quickly
Spatula: Perfect for gentle folding and layering
Baking Dish or Pan: Holds everything neatly while the layers set
Sifter: For that fine cocoa dusting on top
And now comes the fun part, the ingredients.
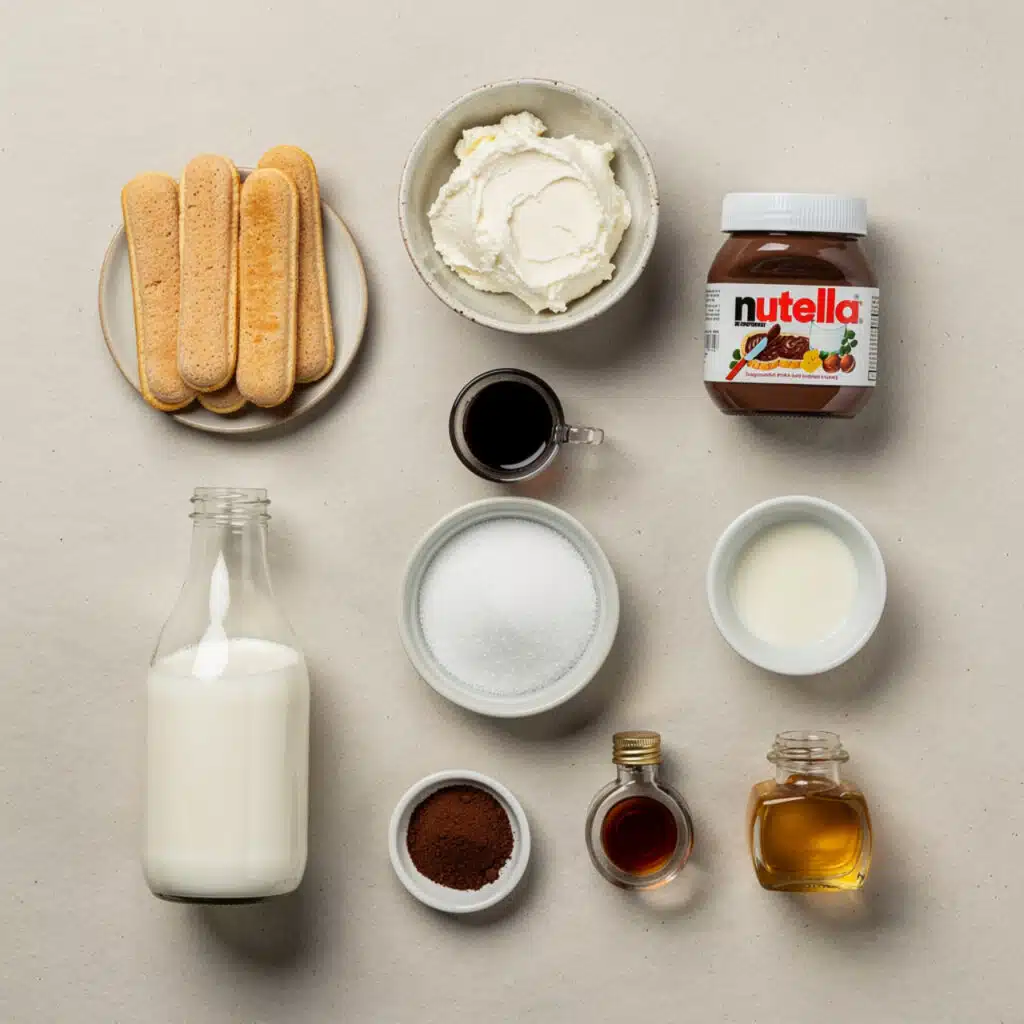
Ingredients that come together beautifully
Each ingredient plays its own role in creating that creamy, layered perfection.
- Ladyfingers: 200 grams, these absorb the coffee and create the soft structure
- Mascarpone Cheese: 250 grams, gives the dessert its creamy richness
- Nutella: 200 grams, adds chocolate hazelnut depth and sweetness
- Strong Brewed Coffee: 240 ml, brings bold flavor and balances sweetness
- Granulated Sugar: 50 grams, lightly sweetens the cream
- Cocoa Powder: 2 tablespoons, for that classic finish
- Heavy Cream: 240 ml, whipped for a light and airy texture
- Vanilla Extract: 1 teaspoon, enhances overall flavor
And just in case you want to tweak things, here are a few easy swaps.
Simple swaps if you want to get creative
Sometimes you want to adapt, and that is totally fine.
Mascarpone Cheese: Cream cheese, slightly tangier but still creamy
Nutella: Any chocolate hazelnut spread alternative
Ladyfingers: Sponge cake slices if needed
Granulated Sugar: Powdered sugar for smoother blending
Now let’s highlight the stars of the show.
The ingredients that steal the spotlight
Mascarpone Cheese: This is what gives the dessert its signature creamy and luxurious texture
Nutella: It adds richness and a nutty sweetness that makes every bite irresistible
And now, let’s finally get into the process where everything comes together.
Let’s build this dreamy dessert step by step
This is where the magic happens, and honestly, it is easier than it looks.
- Preheat Your Equipment: No oven needed, just prepare a clean workspace and chill your mixing bowl if possible
- Combine Ingredients: Whip the heavy cream with sugar and vanilla until soft peaks form, then gently fold in mascarpone until smooth
- Prepare Your Cooking Vessel: Choose a dish and lightly spread a thin layer of cream at the bottom
- Assemble the Dish: Dip each ladyfinger briefly in coffee and layer them, spread cream mixture, then add a layer of Nutella, repeat layers
- Cook to Perfection: No baking required, instead cover and refrigerate for at least 6 hours
- Finishing Touches: Dust cocoa powder evenly on top just before serving
- Serve and Enjoy: Slice and enjoy that creamy, layered goodness
A balance of textures and flavors
Each bite gives you soft soaked biscuits, creamy filling, and that smooth chocolate layer. The slight bitterness from cocoa and coffee balances the sweetness perfectly, making it rich but never overwhelming. Let me tell you, it is worth every bite.
Helpful tips to get it just right
- Chill overnight for best flavor development
- Do not soak ladyfingers too long, just a quick dip
- Use high-quality cocoa for better aroma
What to watch out for while making it
- Over-soaking biscuits can make the dessert too mushy
- Overmixing cream can deflate the texture
- Skipping chill time will affect structure
A quick look at the nutrition
Servings: 8
Calories per serving: 420
Note: These are approximate values.
Timing everything perfectly
Prep Time: 25 minutes
Cook Time: 0 minutes
Total Time: 25 minutes plus chilling time
Make-ahead and storage ideas
You can prepare this dessert a day in advance, which actually improves flavor. Store it covered in the fridge for up to 3 days. Freezing is possible, just thaw slowly in the fridge before serving.
Serving ideas to make it shine
Serve chilled with a light dust of cocoa and maybe a few chocolate shavings. A cup of coffee on the side makes it even better.
Turn leftovers into something new
Leftover slices can be turned into parfaits by layering them in glasses, or even blended slightly for a creamy dessert cup.
Extra tips for even better results
Keep ingredients cold while preparing, it helps maintain texture and structure.
Make it look as good as it tastes
Use a clean knife for slicing and wipe between cuts for perfect layers. A neat cocoa dusting on top adds that classic finish.
Fun variations to try next time
- Add crushed hazelnuts between layers for crunch
- Use flavored coffee for a twist
- Add a thin layer of chocolate ganache
- Swap cocoa for grated dark chocolate
FAQ’s
Q1: Can I make it without coffee?
Yes, you can use milk or a mild chocolate drink instead.
Q2: How long should it chill?
At least 6 hours, overnight is best.
Q3: Can I freeze it?
Yes, just thaw slowly before serving.
Q4: What if I do not have mascarpone?
Cream cheese works as a substitute.
Q5: Is it very sweet?
It is balanced, but you can reduce sugar slightly.
Q6: Can I make it in individual cups?
Absolutely, it looks great that way.
Q7: Why are my layers too soft?
Likely over-soaked ladyfingers.
Q8: Can I add nuts?
Yes, hazelnuts pair beautifully.
Q9: How long does it last?
Up to 3 days refrigerated.
Q10: Can I skip cocoa powder?
You can, but it adds a nice finish.
Conclusion
This dessert is one of those recipes that feels both simple and special at the same time. It comes together without stress, yet delivers something that looks and tastes impressive. Once you try it, it might just become your go-to for any occasion. So go ahead, give it a try and enjoy every creamy, chocolatey bite.
Print
Nutella Tiramisu Cake
- Prep Time: 25 minutes
- Cook Time: 0 minutes
- Total Time: 25 minutes plus chilling time
- Yield: 8 servings 1x
- Category: Dessert
- Method: No-bake
- Cuisine: Italian-inspired
- Diet: Vegetarian
Description
A rich and creamy layered dessert combining coffee-soaked ladyfingers, mascarpone cream, and chocolate hazelnut spread, finished with a dusting of cocoa powder.
Ingredients
- 200 grams ladyfingers
- 250 grams mascarpone cheese
- 200 grams Nutella
- 240 ml strong brewed coffee
- 50 grams granulated sugar
- 2 tablespoons cocoa powder
- 240 ml heavy cream
- 1 teaspoon vanilla extract
Instructions
- Prepare a clean workspace and chill a mixing bowl if possible.
- Whip the heavy cream with granulated sugar and vanilla extract until soft peaks form, then gently fold in mascarpone cheese until smooth.
- Lightly spread a thin layer of the cream mixture at the bottom of a baking dish.
- Dip each ladyfinger briefly in strong brewed coffee and arrange a layer in the dish, spread cream mixture, then add a layer of Nutella. Repeat layers.
- Cover and refrigerate for at least 6 hours to set.
- Dust cocoa powder evenly on top just before serving.
- Slice and serve chilled.
Notes
- Chill overnight for best flavor and texture.
- Do not soak ladyfingers too long to avoid sogginess.
- Use high-quality cocoa powder for a richer finish.
Nutrition
- Serving Size: 1 slice
- Calories: 420
- Sugar: 22g
- Sodium: 85mg
- Fat: 28g
- Saturated Fat: 16g
- Unsaturated Fat: 10g
- Trans Fat: 0g
- Carbohydrates: 36g
- Fiber: 2g
- Protein: 6g
- Cholesterol: 75mg
Keywords: nutella tiramisu cake, no bake dessert, chocolate tiramisu, easy layered dessert, mascarpone dessert