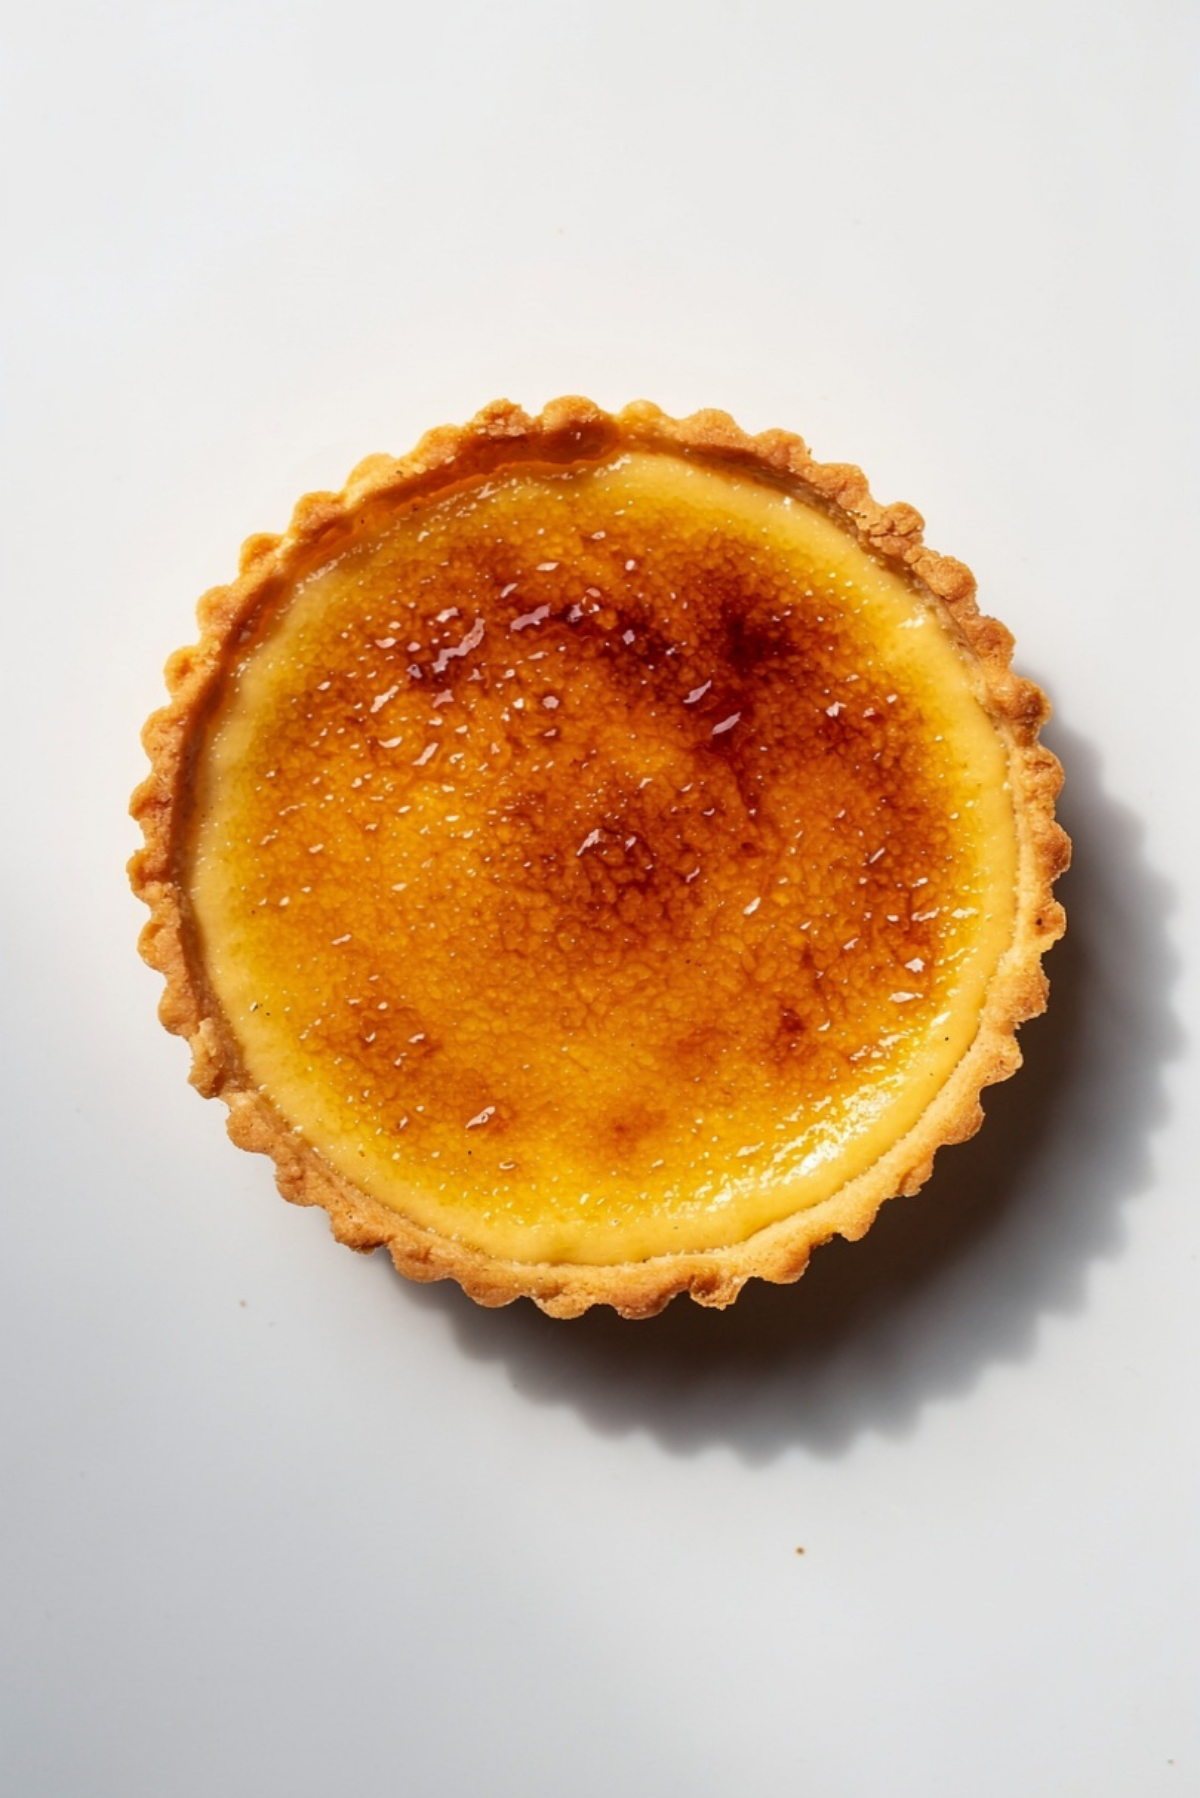
Elegant Crème Brûlée Tart
There is something quietly magical about bringing a tart to the table when its top is glassy, golden, and just begging for the first gentle crack of a spoon. This Elegant Crème Brûlée Tart has that little bakery-window sparkle, with a buttery crust, a silky vanilla custard center, and a caramelized sugar topping that gives way with the most satisfying snap.
It feels fancy, yes, but not fussy. The kind of dessert you make when you want the room to go a little quiet after the first bite. Trust me, you’re going to love this, especially if you adore the creamy comfort of classic custard but want it dressed up in a crisp tart shell.
Why This Dessert Feels Fancy Without Making You Fuss
What makes this tart so special is the way it balances comfort and elegance in one neat slice. You get the familiar vanilla warmth of crème brûlée, but the buttery pastry crust makes it feel more complete, almost like custard met a French tart and decided to stay for dessert.
And now let’s lean into the charm of it, because this one’s a total game-changer for dinner parties, birthdays, holidays, or those quiet weekends when you simply want something beautiful cooling on the counter.
A Little French-Inspired Sweetness on the Table
Crème brûlée is one of those desserts that instantly makes people think of French cafés, polished spoons, and that famous caramelized top. The name means burnt cream, which sounds simple, but the result is anything but plain. It is creamy, fragrant, and finished with a thin layer of sugar that turns into amber glass under heat.
The tart version takes that beloved custard and gives it a new home inside crisp pastry. It still carries that classic French spirit, but it feels a little more modern and sliceable. Instead of serving individual ramekins, you get one gorgeous tart that can be shared at the center of the table.
Why You’ll Come Back to This Recipe Again
Once you make it, you will see why this dessert earns a permanent spot in your baking notebook. It has that rare mix of impressive presentation and cozy flavor, which makes it feel special without being stressful.
Versatile: Serve it after a formal meal, bring it to a family gathering, or make it as a weekend treat. It fits almost any sweet occasion.
Budget-Friendly: The ingredients are simple pantry and fridge staples like flour, butter, eggs, cream, sugar, and vanilla. Nothing feels wasteful or overcomplicated.
Quick and Easy: The tart looks elegant, but each step is very manageable. Most of the time is gentle chilling, baking, and cooling.
Customizable: You can flavor the custard with citrus zest, espresso, or a hint of spice. The base stays reliable while still giving you room to play.
Crowd-Pleasing: Creamy vanilla custard, crisp crust, and caramelized sugar are hard to resist. Let me tell you, it’s worth every bite.
Make-Ahead Friendly: The tart can be baked and chilled ahead, then brûléed right before serving. That final sugar crack feels freshly made every time.
Great for Leftovers: Slices keep beautifully in the fridge, especially before the sugar topping is torched. The crust stays tender and the custard remains smooth.
Chef Notes for a Silky, Shiny Finish
Before we start whisking and baking, let me share the little details that make the difference. Custard is gentle food, and it rewards a patient hand.
- Keep the cream warm, not boiling: Hot cream can scramble egg yolks if added too aggressively. Warm it until steamy, then whisk it in slowly.
- Chill the dough before baking: Cold dough helps the crust hold its shape and bake up crisp instead of shrinking too much.
- Strain the custard: This simple step removes tiny egg bits and makes the filling luxuriously smooth.
- Bake until just set: The center should have a soft wobble. It will firm as it cools.
- Brûlée right before serving: The sugar topping is best when crisp, fresh, and lightly warm from the torch.
Tools That Make the Process Smooth
Now that the little secrets are on the counter, let’s gather the tools. You do not need a professional kitchen, just a few reliable basics.
9-inch tart pan with removable bottom: This helps the tart release cleanly and gives you those pretty fluted edges.
Mixing bowls: You will need them for the dough and custard, and a medium bowl is perfect for whisking the egg yolks.
Pastry cutter or fingertips: Either works for rubbing cold butter into the flour until the mixture looks sandy.
Rolling pin: A lightly floured rolling pin helps shape the chilled dough evenly.
Parchment paper and pie weights: These keep the crust flat during blind baking.
Fine-mesh sieve: Straining the custard gives it that smooth, bakery-style texture.
Kitchen torch: This creates the crisp caramelized sugar top. If you do not have one, use a broiler carefully and watch it closely.
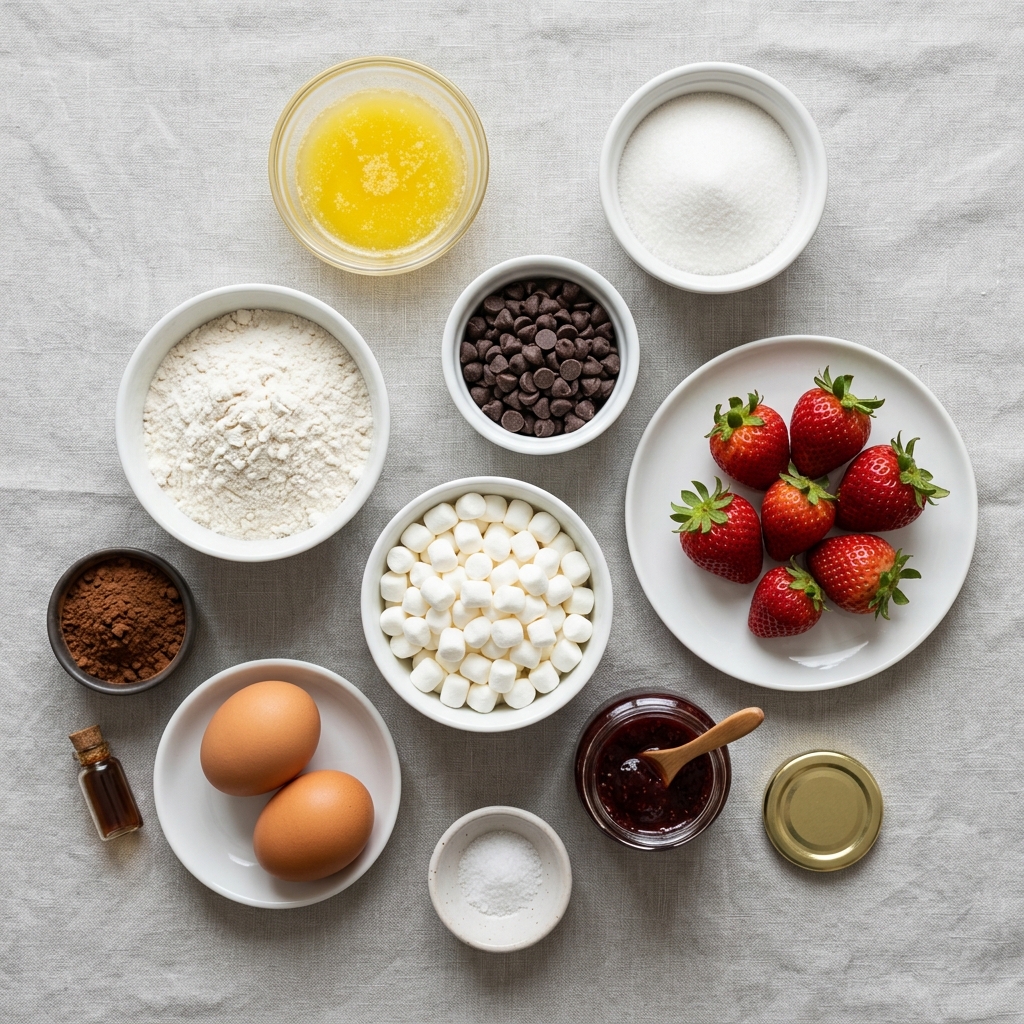
Ingredients You’ll Need for a Creamy Tart With a Crackly Top
The beauty of this dessert is how a short list of ingredients turns into something that feels polished and luxurious. Each one has a clear role, from the buttery shell to the vanilla-scented custard.
- All-purpose flour: 1 1/4 cups, forms the base of the tart shell and gives it structure.
- Powdered sugar: 1/4 cup, sweetens the crust gently and keeps the texture tender.
- Fine salt: 1/4 teaspoon, balances the sweetness and sharpens the buttery flavor.
- Unsalted butter: 1/2 cup cold and cubed, creates a rich, crisp, delicate tart shell.
- Large egg yolk: 1, helps bind the pastry dough and adds richness.
- Ice water: 1 to 2 tablespoons, brings the dough together without making it sticky.
- Heavy cream: 2 cups, creates the creamy custard base with a smooth, lush texture.
- Granulated sugar: 1/2 cup for the custard, sweetens the filling without overpowering the vanilla.
- Large egg yolks: 5, thicken the custard and give it that classic crème brûlée richness.
- Vanilla bean paste: 2 teaspoons, brings deep vanilla aroma and beautiful specks throughout the custard.
- Fine salt: 1/8 teaspoon, rounds out the custard flavor.
- Granulated sugar: 3 tablespoons for topping, melts into the crisp caramelized shell before serving.
Easy Swaps When Your Pantry Needs a Little Help
And now, because real kitchens are never perfect, here are a few flexible substitutions that still keep the tart delicious.
Vanilla bean paste: Pure vanilla extract. Use the same amount for a simpler but still lovely vanilla flavor.
Heavy cream: Half-and-half. The custard will be lighter and slightly less rich, but still smooth.
Powdered sugar: Granulated sugar. The crust may be a touch less tender, but it will still work.
Unsalted butter: Salted butter. Reduce the salt in the crust to a tiny pinch.
Kitchen torch: Oven broiler. Chill the tart very well first, then broil briefly and watch every second.
The Ingredients That Make It Shine
A dessert like this does not need a long list to stand out. The magic is in the way a few key ingredients show up boldly.
Heavy Cream: This is what gives the custard its velvety body. It bakes into a filling that feels smooth, rich, and soft without becoming heavy.
Vanilla Bean Paste: The vanilla is the soul of the tart. It adds warmth, fragrance, and those tiny specks that make every slice look like it came from a pastry shop.
Let’s Bake It Step by Step
Here are the steps you’re going to follow, and each one builds naturally into the next. We start with a crisp shell, pour in a smooth custard, then finish with that golden sugar crack that makes everyone smile.
- Preheat Your Equipment: Preheat the oven to 375°F. Place a rack in the center of the oven so the tart shell bakes evenly.
- Combine Ingredients: In a mixing bowl, stir together the flour, powdered sugar, and 1/4 teaspoon fine salt. Add the cold cubed butter and rub it into the flour mixture until it looks like coarse crumbs. Mix in 1 egg yolk, then add 1 tablespoon ice water. Add the second tablespoon only if the dough feels too dry.
- Prepare Your Cooking Vessel: Press the dough into a disk, wrap it, and chill for 30 minutes. Roll it out on a lightly floured surface, then fit it into a 9-inch tart pan with a removable bottom. Trim the edges neatly, prick the bottom with a fork, line with parchment, and fill with pie weights.
- Assemble the Dish: Blind bake the crust for 15 minutes, then remove the parchment and weights. Bake for another 8 to 10 minutes until lightly golden. Lower the oven to 300°F. Warm the heavy cream in a saucepan until steaming. In a bowl, whisk 5 egg yolks with 1/2 cup granulated sugar, vanilla bean paste, and 1/8 teaspoon fine salt. Slowly whisk the warm cream into the yolk mixture, then strain the custard through a fine-mesh sieve.
- Cook to Perfection: Pour the custard into the warm tart shell. Bake at 300°F for 28 to 32 minutes, until the edges are set and the center still has a gentle wobble. Let the tart cool at room temperature, then chill for at least 3 hours.
- Finishing Touches: Just before serving, sprinkle 3 tablespoons granulated sugar evenly over the chilled custard. Use a kitchen torch to melt and caramelize the sugar until glossy and amber. Let it sit for 2 minutes so the top hardens.
- Serve and Enjoy: Slice with a sharp knife, wiping the blade between cuts for clean edges. Serve chilled, with that crisp caramel top cracking into the creamy vanilla custard underneath.
How the Texture and Flavor Build
The first thing you notice is the top. It is thin, crisp, and caramel-sweet, with a slightly toasty flavor that keeps the custard from tasting too soft or too sweet. Beneath that, the vanilla filling is silky and cool, almost like it melts on your tongue.
Then the crust comes in with buttery crunch. That contrast is what makes the dessert so memorable. Smooth custard, crisp sugar, tender pastry, and warm vanilla all working together in one slice. It tastes delicate, but it also feels deeply satisfying.
Cooking Tips for a Tart That Behaves Beautifully
By this point, the dessert is already feeling special, but these small habits help it turn out even better. Think of them as the calm little reminders every baker needs.
- Use cold butter for the crust: Cold butter creates a flakier, more delicate shell.
- Do not rush the chilling: Chilling the baked tart helps the custard set cleanly.
- Sprinkle sugar evenly: An even sugar layer brûlées better and avoids thick burnt spots.
- Wipe the knife between slices: This keeps every slice neat and pretty.
Mistakes to Skip for the Best Finish
Even a beautiful tart can be forgiving, but a few common mistakes can make the process trickier. Here is what to watch for.
- Overheating the cream: If the cream boils hard, let it cool slightly before whisking it into the eggs.
- Skipping the sieve: Straining gives the filling its smooth, polished texture.
- Overbaking the custard: If the center is fully firm in the oven, it may turn grainy after chilling.
- Caramelizing too early: The sugar topping softens in the fridge, so torch it right before serving.
Nutrition Facts Per Slice
Servings: 10
Calories per serving: 365
Note: These are approximate values.
Timing for a Calm Baking Day
Prep Time: 35 minutes
Cook Time: 55 minutes
Total Time: 1 hour 30 minutes
Make-Ahead and Storage Tips
This dessert is wonderfully friendly for planning ahead. You can bake and chill the tart earlier in the day, or even the night before, then brûlée the top just before serving.
For storage, keep the tart covered in the refrigerator for up to 3 days. If you have already caramelized the top, the sugar will soften over time, but the flavor will still be lovely. For the crispest finish, store it without the sugar topping and torch it fresh.
Freezing is not the best choice because custard can turn watery once thawed. If you need to prep ahead, freeze only the baked tart shell, then add and bake the custard later. Reheating is not needed, since this dessert is meant to be served chilled.
How to Serve It Beautifully
This tart loves simple pairings. Serve each slice on a plain white plate so the golden top and creamy filling really stand out. A few fresh raspberries or sliced strawberries on the side add color and a little brightness.
It also pairs beautifully with coffee, black tea, or a vanilla latte. For a dinner party, bring it to the table whole, torch the top in front of everyone if you feel dramatic, then slice it once the sugar has hardened. That little crackle moment is half the fun.
Fresh Ways to Enjoy Leftover Slices
Leftovers are honestly a treat, especially when you know how to give them a second life. A chilled slice can become a sweet afternoon snack with coffee, or you can cut it into small squares and serve them like mini dessert bites.
You can also crumble leftover tart into small dessert cups with berries, turning it into a quick custard parfait. The crust adds buttery texture, while the custard brings that soft vanilla richness. It is not traditional, but it is delicious.
Extra Little Details That Help
For the cleanest look, let the tart chill fully before adding the sugar topping. A cold custard surface makes brûléeing easier and helps the sugar set faster.
When sprinkling the sugar, tilt the tart gently to help it spread evenly. You want a thin, even layer rather than little piles. Thin sugar melts into a delicate shell, while thick sugar can taste bitter before it fully caramelizes.
Make It a Showstopper at the Table
Presentation is where this dessert really earns applause. Keep the tart simple and glossy, with no heavy decoration on top because the caramelized sugar is already beautiful.
For a bakery-style finish, dust the serving plates lightly with powdered sugar, add a few berries beside each slice, and place the tart slightly off-center on the plate. If you want a little extra sparkle, torch the top until it has a mix of golden and deeper amber spots. It should look natural, not too perfect.
Variations to Try Next Time
Once you have the classic version down, you can have fun with gentle flavor twists. Keep the same method and adjust the flavoring carefully.
- Citrus Vanilla Tart: Add 1 teaspoon finely grated orange zest to the cream while warming it, then strain before baking.
- Espresso Custard Tart: Stir 1 teaspoon instant espresso powder into the warm cream for a coffeehouse-style dessert.
- Chocolate Crust Version: Replace 2 tablespoons of flour with unsweetened cocoa powder for a darker, richer shell.
- Cardamom Vanilla Tart: Add 1/4 teaspoon ground cardamom to the custard for a soft floral spice note.
- Berry-Topped Slices: Serve each slice with fresh raspberries or strawberries on the side for a bright, juicy contrast.
FAQ’s
Q1: Can I make this tart the day before?
A1: Yes, and it is actually a great idea. Bake and chill the tart the day before, then add and torch the sugar topping right before serving.
Q2: Can I use store-bought tart crust?
A2: Yes, you can use a prepared tart shell if you are short on time. Just make sure it is fully baked before adding the custard.
Q3: Why is my custard grainy?
A3: It was likely overbaked or the warm cream was added too quickly to the eggs. Whisk slowly, strain the custard, and bake only until the center gently wobbles.
Q4: Can I brûlée the topping without a torch?
A4: Yes, use the broiler carefully. Chill the tart very well first, place it close to the broiler, and watch closely because sugar can burn fast.
Q5: How do I know when the custard is done?
A5: The edges should look set, while the center should jiggle slightly when the pan is gently moved. It will continue setting as it cools.
Q6: Can I make mini tartlets with this recipe?
A6: Yes, divide the dough and custard into smaller tart pans. Reduce the baking time and start checking the custard earlier.
Q7: Should the tart be served warm or cold?
A7: Serve it chilled. The custard needs time in the fridge to set properly, while the freshly torched sugar gives a lovely warm crispness on top.
Q8: Can I use vanilla extract instead of vanilla bean paste?
A8: Yes, use 2 teaspoons pure vanilla extract. The flavor will still be lovely, though you will not get the little vanilla specks.
Q9: Why did my crust shrink?
A9: The dough may not have chilled long enough, or it may have been stretched when placed in the pan. Chill it well and press it in gently.
Q10: How long does the sugar topping stay crisp?
A10: It is best within the first hour after torching. Over time, moisture from the custard softens the caramelized sugar.
Conclusion
Elegant Crème Brûlée Tart is the kind of dessert that feels like a small celebration from the first crack of caramelized sugar to the last buttery crumb. It is creamy, crisp, fragrant with vanilla, and just dramatic enough to make the table feel special.
So make it when you want something beautiful but comforting, polished but still homemade. This one has that quiet wow factor, and once you taste that silky custard under the golden sugar shell, you will understand exactly why it is worth every bite.
Print
Elegant Crème Brûlée Tart
- Prep Time: 35 minutes
- Cook Time: 55 minutes
- Total Time: 1 hour 30 minutes
- Yield: 10 servings 1x
- Category: Dessert
- Method: Baked
- Cuisine: French-inspired
- Diet: Vegetarian
Description
A refined tart with a buttery pastry shell, silky vanilla custard filling, and a crisp caramelized sugar topping.
Ingredients
- 1 1/4 cups all-purpose flour
- 1/4 cup powdered sugar
- 1/4 teaspoon fine salt
- 1/2 cup unsalted butter, cold and cubed
- 1 large egg yolk, for the crust
- 1 to 2 tablespoons ice water
- 2 cups heavy cream
- 1/2 cup granulated sugar, for the custard
- 5 large egg yolks, for the custard
- 2 teaspoons vanilla bean paste
- 1/8 teaspoon fine salt
- 3 tablespoons granulated sugar, for topping
Instructions
- Preheat the oven to 375°F and place a rack in the center.
- In a mixing bowl, combine the flour, powdered sugar, and 1/4 teaspoon fine salt.
- Add the cold cubed butter and rub it into the dry ingredients until the mixture looks like coarse crumbs.
- Mix in 1 large egg yolk, then add 1 tablespoon ice water. Add the second tablespoon only if needed.
- Shape the dough into a disk, wrap it, and chill for 30 minutes.
- Roll the dough out, fit it into a 9-inch tart pan with a removable bottom, trim the edges, and prick the base with a fork.
- Line the crust with parchment paper, fill with pie weights, and blind bake for 15 minutes.
- Remove the parchment and weights, then bake for another 8 to 10 minutes until lightly golden.
- Lower the oven temperature to 300°F.
- Warm the heavy cream in a saucepan until steaming, but do not boil.
- In a bowl, whisk 5 egg yolks with 1/2 cup granulated sugar, vanilla bean paste, and 1/8 teaspoon fine salt.
- Slowly whisk the warm cream into the egg mixture, then strain through a fine-mesh sieve.
- Pour the custard into the warm tart shell and bake for 28 to 32 minutes, until the edges are set and the center gently wobbles.
- Cool at room temperature, then chill for at least 3 hours.
- Before serving, sprinkle 3 tablespoons granulated sugar evenly over the custard.
- Use a kitchen torch to caramelize the sugar until glossy and amber, then let it harden for 2 minutes before slicing.
Notes
- Strain the custard for the smoothest texture.
- Do not overbake, the center should still have a soft wobble.
- Caramelize the sugar topping right before serving for the best crackly finish.
- Wipe the knife between slices for clean presentation.
Nutrition
- Serving Size: 1 slice
- Calories: 365
- Sugar: 18g
- Sodium: 105mg
- Fat: 26g
- Saturated Fat: 16g
- Unsaturated Fat: 8g
- Trans Fat: 0g
- Carbohydrates: 29g
- Fiber: 1g
- Protein: 5g
- Cholesterol: 205mg
Keywords: crème brûlée tart, vanilla custard tart, caramelized sugar tart, French dessert, elegant tart recipe