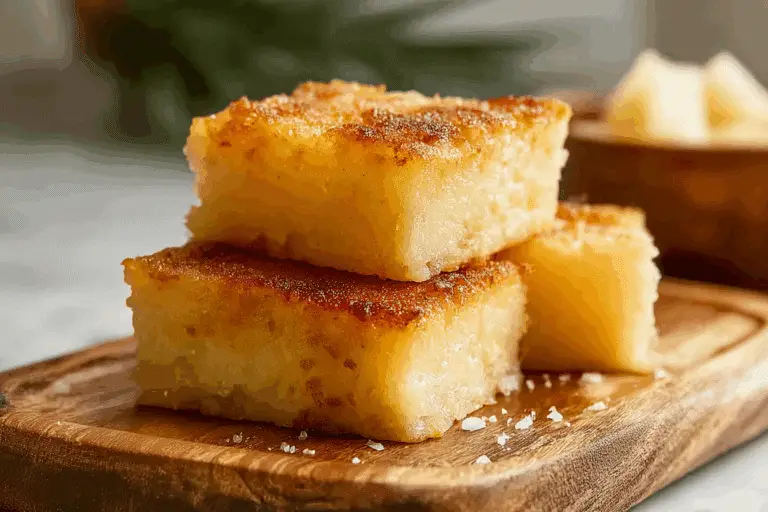
Honey Garlic Chicken Rice Cups
There is something ridiculously satisfying about food that feels playful and comforting at the same time, and that is exactly what happens here. You get crispy-edged rice cups, glossy bites of garlicky chicken, and that sweet savory finish that makes you reach for one more before you even sit down. Trust me, you’re going to love this, because every bite lands somewhere between weeknight dinner and party food in the best possible way.
Why These Little Cups Deserve a Spot in Your Dinner Rotation
Some recipes are good because they are easy, and some are good because they taste amazing. These little cups somehow manage to do both. The rice turns golden around the edges, the chicken stays juicy, and the sauce wraps everything in that sticky, shiny glaze that feels like a total treat without making the whole process complicated.
They are also just fun to serve. You can plate them for dinner, slide them onto a snack board, or pack a couple for lunch the next day. This one’s a total game-changer when you want something familiar but a little more interesting than the usual bowl of rice and chicken.
A Cozy Mashup of Takeout Flavor and Muffin-Tin Magic
The flavor story here leans into a classic honey, garlic, and soy combination, which has deep roots in the kind of sweet savory sauces people love in home-style Asian-inspired cooking. That balance of salt, sweetness, and aromatic garlic shows up in countless comforting dinner recipes because it works so well with tender chicken and fluffy rice.
The fun twist is the rice cup shape. Muffin-tin meals have been popular for years because they turn simple ingredients into something that feels fresh and clever. So while this dish is not a traditional classic from one single region, it definitely borrows from beloved pantry flavors and gives them a playful baked finish that feels right at home on a modern family table.
Reasons This One Always Works
Before we get into the details, let me just say this is the kind of dish that makes you feel a little extra proud when you pull it out of the oven. It looks impressive, but the method is wonderfully straightforward.
Versatile: These can work as a main dish, party appetizer, lunchbox option, or meal-prep favorite. They fit into almost any part of the week without much effort.
Budget-Friendly: The ingredient list is built from everyday staples like cooked rice, eggs, chicken thighs, honey, soy sauce, and garlic. Nothing fancy, just smart pantry cooking that tastes bigger than it costs.
Quick and Easy: Once the rice is cooked, the rest moves fast. The chicken cooks quickly, the sauce comes together in minutes, and the oven does the final work.
Customizable: You can swap cheeses, change the garnish, or slip in a little heat with red pepper flakes or sriracha. It is easy to make it fit your taste.
Crowd-Pleasing: Sweet savory glazed chicken and crispy rice edges are hard to resist. Kids love the shape, adults love the flavor, and nobody complains about seconds.
Make-Ahead Friendly: You can cook the rice ahead, prep the chicken in advance, and assemble everything when you are ready. That makes busy evenings feel a lot easier.
Great for Leftovers: These reheat beautifully, especially in the oven or air fryer. The edges perk back up and the flavors settle in even more.
Little Tricks That Make a Big Difference
Now let’s dive into the kind of small details that take these from good to seriously good.
- Use chilled cooked rice if possible, because it holds together better and gives the cups a firmer shape.
- Finely chop the chicken so it fits neatly into the cups and gives you a little bit of glaze in every bite.
- Let the sauce simmer just until glossy and slightly thick, because it will continue to cling as it cools.
- Grease the muffin tin generously, especially around the edges, so the rice cups release cleanly.
- Let the baked cups rest for about 5 minutes before lifting them out, which helps them stay intact.
The Kitchen Tools That Make It Easy
The best part here is that you do not need a long list of equipment. A few basic tools are all it takes to pull this together smoothly.
Medium saucepan: Perfect for warming or freshly cooking the rice if you are starting from scratch.
Large skillet: This is where the chicken gets browned and coated in that glossy honey garlic sauce.
Mixing bowl: You will use this to combine the rice, eggs, cheese, and green onions for the cup base.
12-cup muffin tin: This gives the dish its signature shape and helps the rice bake up with crisp edges.
Measuring cups and spoons: Helpful for keeping the sauce balanced, especially the honey and soy sauce ratio.
Silicone spatula or spoon: Great for stirring the sticky sauce and pressing the rice into the muffin cups.
Everything You Need for That Sweet Savory Bite
The ingredient list is simple, but each piece has a job to do. That is part of what makes the final result taste so complete.
- Cooked jasmine rice: 3 cups, cooled, this forms the base of the cups and bakes up tender in the middle with lightly crisp edges.
- Large eggs: 2, beaten, these help bind the rice mixture so the cups hold their shape.
- Shredded mozzarella cheese: 1 cup, this melts through the rice and gives the cups a soft, savory richness.
- Green onions: 1/4 cup, thinly sliced, divided, these add freshness to both the rice base and the final garnish.
- Boneless skinless chicken thighs: 1 pound, cut into small bite-size pieces, these stay juicy and flavorful under a sticky glaze.
- Olive oil: 1 tablespoon, this helps the chicken brown nicely in the skillet.
- Garlic: 4 cloves, minced, this brings that deep aromatic backbone that makes the sauce smell incredible.
- Honey: 1/4 cup, this gives the glaze its signature sweetness and glossy finish.
- Low-sodium soy sauce: 3 tablespoons, this balances the sweetness with savory depth.
- Rice vinegar: 1 tablespoon, this brightens the glaze so it does not feel too heavy.
- Ketchup: 1 tablespoon, this adds a tiny bit of body and rounds out the sauce beautifully.
- Cornstarch: 1 teaspoon, this helps thicken the glaze so it clings to the chicken.
- Water: 2 tablespoons, this loosens the sauce just enough before it simmers down.
- Salt: 1/2 teaspoon, divided, this seasons both the rice mixture and the chicken.
- Black pepper: 1/4 teaspoon, this adds a little warmth without overpowering the sweetness.
- Sesame seeds: 1 teaspoon, for garnish, these add a subtle nutty finish.
Easy Swaps When You Need Them
Even though the original version is hard to beat, there is plenty of room to make it work with what you already have.
Jasmine rice: Cooked long-grain white rice or cooked brown rice.
Mozzarella cheese: Monterey Jack, mild cheddar, or shredded provolone.
Chicken thighs: Diced chicken tenderloins or finely chopped cooked rotisserie chicken.
Rice vinegar: Apple cider vinegar or fresh lemon juice.
Low-sodium soy sauce: Tamari, if you need a gluten-free swap and the rest of your ingredients fit that need.
Green onions: Finely chopped chives or a small amount of minced shallot.
The Ingredients That Really Make This Shine
A couple of ingredients do more than just show up here, they completely shape the personality of the dish.
Honey: This is what gives the glaze that irresistible sticky sheen and soft sweetness. It caramelizes lightly as it cooks, which makes every bite feel a little glossy and luxurious.
Garlic: Fresh minced garlic brings the punchy aroma that makes the kitchen smell incredible. It keeps the sauce from feeling one-note and gives the sweetness some real depth.
Let’s Get These Rice Cups Into the Oven
And now let’s dive into the part everyone waits for, the actual cooking. The process is simple, and once you get moving it all comes together in a very natural rhythm.
- Preheat Your Equipment: Preheat the oven to 375°F and lightly grease a 12-cup muffin tin. This gives the cups the best chance of baking evenly and releasing neatly once they are done.
- Combine Ingredients: In a large mixing bowl, stir together the cooled cooked rice, beaten eggs, mozzarella, 2 tablespoons of the sliced green onions, 1/4 teaspoon of the salt, and a pinch of black pepper until everything is evenly mixed.
- Prepare Your Cooking Vessel: Spoon the rice mixture evenly into the muffin cups, then press it into the bottom and slightly up the sides of each cup with the back of a spoon. This creates a little nest for the chicken filling.
- Assemble the Dish: Bake the rice cups for 18 to 20 minutes, until they are set and lightly golden at the edges. While they bake, heat the olive oil in a skillet over medium-high heat, add the chicken with the remaining salt and pepper, and cook for 5 to 6 minutes until cooked through. Stir in the garlic and cook for 30 seconds. In a small bowl, whisk together the honey, soy sauce, rice vinegar, ketchup, cornstarch, and water, then pour it into the skillet.
- Cook to Perfection: Let the sauce simmer for 2 to 3 minutes, stirring often, until it thickens into a glossy glaze that coats the chicken. Once the rice cups come out of the oven, spoon the honey garlic chicken evenly into each one.
- Finishing Touches: Sprinkle the tops with sesame seeds and the remaining green onions. Let the cups rest in the pan for about 5 minutes so they firm up before removing.
- Serve and Enjoy: Carefully lift the cups out with a small spoon or offset spatula and serve warm. Let me tell you, it’s worth every bite.
The Texture and Flavor Moment You Can Look Forward To
What makes these so memorable is the contrast. The rice cups have tender centers with lightly crisped edges, almost like the best part of baked rice. Then the chicken comes in juicy and glossy, coated in a sauce that is sweet first, savory right after, and full of warm garlic flavor.
The cheese in the rice base does not make the cups overly cheesy, it just gives them a mellow richness and helps everything feel cohesive. Add the green onions and sesame seeds on top, and suddenly you have creamy, sticky, crisp, fresh, and savory all happening at once.
Helpful Tips for the Best Batch
A few easy habits can make the whole thing even smoother, especially if this is your first time making rice cups.
- Use cold rice: It is less sticky in a messy way and much easier to press into neat muffin cups.
- Cut the chicken small: Smaller pieces fit better into the cups and make every bite balanced.
- Do not rush the rest time: Giving the cups a few minutes in the pan helps them set and come out cleanly.
- Grease the pan well: This is especially important around the upper edges where the rice can cling.
What Can Trip You Up, and How to Fix It
Every recipe has a few tiny pitfalls, but thankfully these are easy to avoid once you know what to watch for.
- Packing the rice too loosely: If the mixture is not pressed firmly into the tin, the cups may fall apart. Press with the back of a spoon so they hold together.
- Using very hot fresh rice: Warm rice can make the mixture too soft and harder to shape. Let it cool first.
- Overcooking the sauce: If the glaze reduces too much, it can turn overly thick. Add a splash of water if needed to loosen it back up.
- Skipping the muffin tin grease: This can make removal frustrating. Be generous and get into every cup.
A Quick Look at the Nutrition
These numbers are approximate, but they give you a helpful picture of what to expect per serving.
Servings: 4
Calories per serving: 430
Note: These are approximate values.
The Timing, So You Can Plan Your Evening
This is one of those meals that feels a little special without taking over your whole kitchen.
Prep Time: 20 minutes
Cook Time: 25 minutes
Total Time: 45 minutes
Make-Ahead and Storage Tips That Actually Help
If you like having a plan before dinner gets hectic, this one is very easy to prep ahead. You can cook the rice a day in advance and keep it chilled in the refrigerator. You can also chop the chicken and whisk the sauce ingredients together ahead of time, which makes assembly much faster.
For storage, place cooled cups in an airtight container and refrigerate for up to 3 days. For freezing, arrange them on a tray until firm, then transfer to a freezer-safe container for up to 2 months. Reheat in a 350°F oven or air fryer until hot, which helps bring back those slightly crisp edges better than the microwave.
How to Serve These So They Feel Extra Special
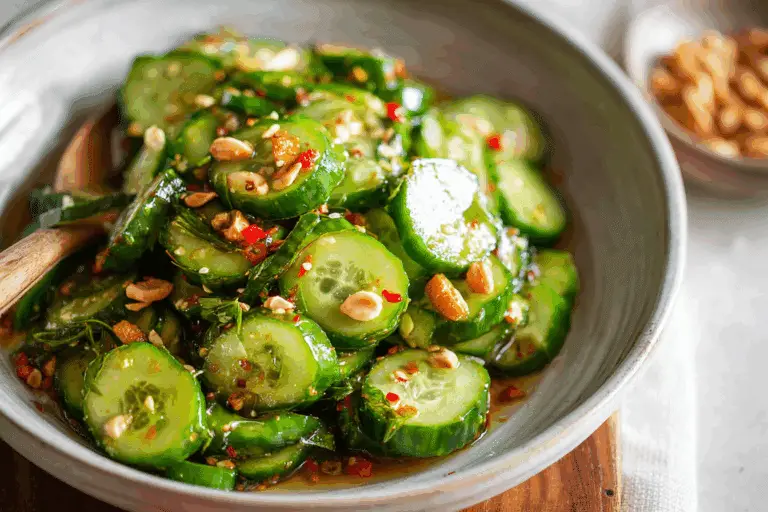
These are wonderful on their own, but they also play nicely with a few simple sides. A crisp cucumber salad, steamed broccoli, or snap peas make a fresh contrast to the sticky glaze. You can also serve them with extra sliced green onions, a drizzle of sriracha, or a little extra soy sauce on the side if your table likes bold flavors.
For a party spread, pile them onto a platter with toothpicks and let everyone grab their own. They look polished with very little effort, which is always a win.
Smart and Tasty Ways to Use the Leftovers
Leftovers here are never boring, which honestly makes this dish even more lovable. Chop up a couple of reheated cups and toss them into a lunch bowl with shredded cabbage and extra green onion. You can also break them apart and tuck the pieces into lettuce wraps for a quick next-day meal.
Another favorite move is slicing the cups in half and reheating them in a skillet until the bottoms get crisp again. Top with a fried egg and suddenly lunch feels very exciting.
A Few Extra Notes Before You Cook
Sometimes the smallest touches are what make a dish feel polished. A tiny squeeze of lime at the table can brighten the glaze beautifully. A little pinch of red pepper flakes can add gentle heat if you want a sweet spicy balance.
And if you are cooking for kids or anyone who likes milder flavors, keep the glaze just as it is. It is sweet, savory, and super approachable without being flat.
How to Make Them Look Restaurant-Worthy
Presentation is easy here because the shape does most of the work for you. Arrange the cups on a white platter or wooden board so the golden rice edges really stand out. Add a final sprinkle of green onions and sesame seeds right before serving for color and texture.
A little shine goes a long way too, so spoon any extra glaze from the skillet over the tops just before they hit the table. That glossy finish makes them look incredibly inviting.
Variations to Keep Things Interesting
Once you make these once, it is easy to start imagining all the ways you can tweak them.
- Add broccoli: Stir 1/2 cup very finely chopped steamed broccoli into the chicken mixture for extra color and a more complete meal.
- Make them spicy: Add 1 to 2 teaspoons of sriracha to the sauce for a sweet heat version.
- Try brown rice: Use cooked brown rice for a nuttier flavor and slightly heartier texture.
- Use Monterey Jack: Swap the mozzarella for Monterey Jack if you want a richer melt in the rice base.
- Finish with herbs: Add a little chopped cilantro for a brighter, fresher finish.
FAQ’s
### 1. Can I use leftover rice for this?
Yes, and it actually works really well. Chilled leftover rice is easier to shape and helps the cups hold together better.
### 2. Can I make these with chicken tenderloins instead of thighs?
Absolutely. Just cut them into very small pieces and keep an eye on the cook time so they do not dry out.
### 3. Do I need to use cheese in the rice cups?
The cheese helps with flavor and structure, so I recommend it. That said, you can reduce it slightly if you want a lighter base.
### 4. Can I make these ahead for meal prep?
Yes, they are excellent for meal prep. Store them in the fridge and reheat in the oven or air fryer for the best texture.
### 5. What kind of rice works best?
Cooked jasmine rice is a great choice because it is soft and fragrant, but long-grain white rice also works well.
### 6. Can I freeze them after baking?
Yes. Let them cool completely first, then freeze in a well-sealed container. Reheat from thawed or straight from frozen.
### 7. How do I keep the cups from sticking to the pan?
Grease the muffin tin thoroughly and let the cups rest for a few minutes after baking before trying to remove them.
### 8. Is the sauce very sweet?
It is balanced more than sugary. The soy sauce and garlic keep the honey from taking over.
### 9. Can I double the recipe?
Yes, very easily. Just use two muffin tins or bake in batches so the cups have enough space.
### 10. What should I serve with them?
Something fresh and crisp works beautifully, like cucumber salad, steamed vegetables, or a crunchy slaw.
Conclusion
These little cups are cozy, flavorful, and way more fun than the average dinner. Between the golden rice edges, the glossy garlicky chicken, and the easy make-ahead appeal, they check a lot of boxes without feeling boring for a second. Whether you serve them for a family dinner, pack them up for lunches, or set them out for friends, they bring that sweet savory comfort in a form that feels a little extra special. Trust me, once you make them, they are going to earn a regular spot in your kitchen.
Print
Honey Garlic Chicken Rice Cups
- Prep Time: 20 minutes
- Cook Time: 25 minutes
- Total Time: 45 minutes
- Yield: 8 rice cups 1x
- Category: Dinner
- Method: Baking and Stovetop
- Cuisine: Asian-Inspired
- Diet: Low Lactose
Description
Crispy-edged rice cups filled with juicy chicken coated in a sticky honey garlic glaze, then finished with green onions and sesame seeds. They are fun to serve, easy to prep ahead, and perfect for dinner, meal prep, or party bites.
Ingredients
- 3 cups cooked jasmine rice, cooled
- 2 large eggs, beaten
- 1 cup shredded mozzarella cheese
- 1/4 cup green onions, thinly sliced, divided
- 1 pound boneless skinless chicken thighs, cut into small bite-size pieces
- 1 tablespoon olive oil
- 4 cloves garlic, minced
- 1/4 cup honey
- 3 tablespoons low-sodium soy sauce
- 1 tablespoon rice vinegar
- 1 tablespoon ketchup
- 1 teaspoon cornstarch
- 2 tablespoons water
- 1/2 teaspoon salt, divided
- 1/4 teaspoon black pepper
- 1 teaspoon sesame seeds
Instructions
- Preheat the oven to 375°F and lightly grease a 12-cup muffin tin.
- In a large bowl, combine the cooled cooked rice, beaten eggs, mozzarella cheese, 2 tablespoons of the green onions, 1/4 teaspoon of the salt, and the black pepper.
- Spoon the rice mixture evenly into the muffin cups and press it into the bottom and slightly up the sides of each cup.
- Bake for 18 to 20 minutes, until set and lightly golden around the edges.
- While the rice cups bake, heat the olive oil in a large skillet over medium-high heat. Add the chicken and the remaining 1/4 teaspoon salt, then cook for 5 to 6 minutes until the chicken is cooked through.
- Add the minced garlic and cook for 30 seconds.
- In a small bowl, whisk together the honey, soy sauce, rice vinegar, ketchup, cornstarch, and water. Pour into the skillet and simmer for 2 to 3 minutes, stirring often, until thick and glossy.
- Remove the rice cups from the oven and spoon the honey garlic chicken evenly into each cup.
- Sprinkle with sesame seeds and the remaining green onions. Let rest for 5 minutes before removing from the pan and serving warm.
Notes
- Cold leftover rice works best because it holds together more easily in the muffin tin.
- Grease the muffin tin well so the rice cups release cleanly after baking.
- Reheat leftovers in the oven or air fryer for the best texture.
- Add 1 to 2 teaspoons of sriracha to the sauce if you want a spicy version.
Nutrition
- Serving Size: 2 rice cups
- Calories: 430
- Sugar: 13g
- Sodium: 760mg
- Fat: 16g
- Saturated Fat: 5g
- Unsaturated Fat: 9g
- Trans Fat: 0g
- Carbohydrates: 42g
- Fiber: 1g
- Protein: 28g
- Cholesterol: 145mg
Keywords: honey garlic chicken rice cups, chicken rice cups, muffin tin chicken dinner, sticky honey garlic chicken, baked rice cups