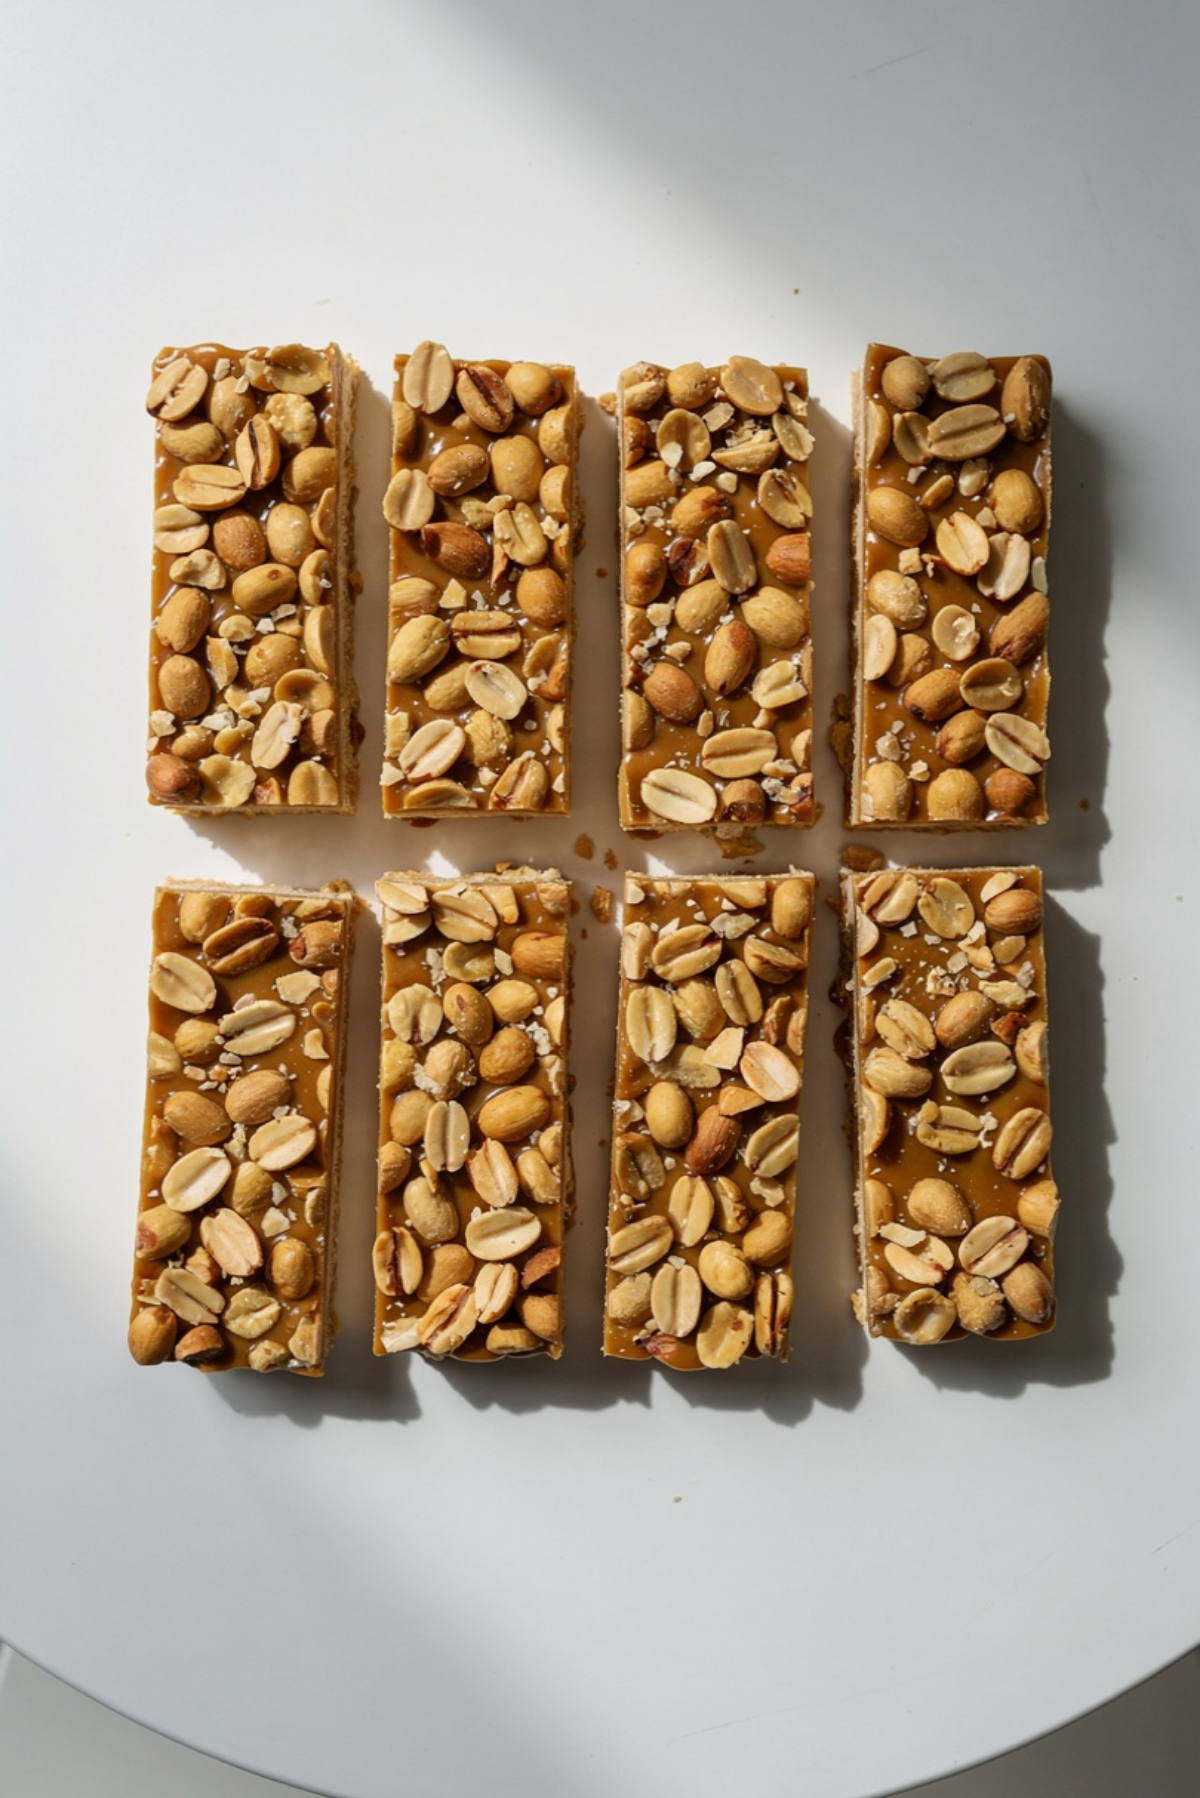
Easy PayDay Candy Bars
There is something so fun about making a candy bar at home, especially when it tastes like something you would grab from a wrapper, only softer, fresher, and a little more special. These Easy PayDay Candy Bars bring together creamy peanut butter sweetness, fluffy marshmallow texture, buttery caramel notes, and that salty peanut crunch that makes every bite feel nostalgic.
The best part is how simple the whole thing feels once you get going. You melt, stir, press, chill, and suddenly you have chewy peanut-packed bars sitting in your kitchen like you planned a candy shop moment all along. Trust me, you’re going to love this.
A Sweet Little Treat That Feels Like a Candy Counter Favorite
What makes this recipe so easy to love is the contrast. The center is soft and chewy, almost like a peanut butter nougat, while the outside gets packed with roasted salted peanuts. It has that salty-sweet balance that keeps you reaching for just one more square.
And now let’s dive into the little story behind why this candy feels so familiar. It is not fussy or fancy, but it has that old-fashioned charm that makes people smile before they even take a bite.
The Candy Bar Inspiration Behind Every Chewy Bite
PayDay-style bars are known for being different from chocolate-coated candy bars. Instead of chocolate, the magic comes from peanuts, caramel-like sweetness, and a chewy center that lets the roasted nut flavor shine. That is why this homemade version feels so satisfying, because it keeps the focus on buttery sweetness and salty crunch.
This kind of candy has always had a lunchbox, road trip, and movie night feeling to it. It is practical, rich, and playful all at once. Let me tell you, it’s worth every bite.
Why This Homemade Candy Bar Works Every Time
Once the mixture melts together, it sets into a chewy, sliceable bar with very little effort. Here is why it earns a spot in the easy dessert pile.
Versatile: These bars work for parties, lunch treats, bake sales, or a quick sweet bite after dinner. You can cut them small for candy pieces or larger for bakery-style bars.
Budget-Friendly: The ingredients are simple pantry-friendly staples. A batch makes plenty, which is great when you want a homemade treat without spending too much.
Quick and Easy: Most of the work happens in one saucepan. After that, the fridge does the heavy lifting.
Customizable: You can adjust the peanut level, add a drizzle of melted chocolate, or use crunchy peanut butter for extra texture. This one’s a total game-changer when you want flexibility.
Crowd-Pleasing: Sweet, salty, chewy, and crunchy is a combination people rarely turn down. These disappear fast from dessert trays.
Make-Ahead Friendly: They need chilling time, so making them ahead actually helps the texture. The bars slice cleaner once fully set.
Great for Leftovers: Leftover pieces store beautifully in the fridge. They stay chewy, nutty, and ready for snacking.
Chef Tips for the Chewiest Candy Bar Texture
Before you start melting everything together, a few small tricks help the bars set just right. Candy does not need to feel scary here, but timing and gentle heat matter.
- Use low heat: Keep the mixture gentle so the peanut butter chips melt smoothly without scorching.
- Stir constantly: The marshmallow creme and condensed milk blend best when you keep them moving.
- Line the pan well: Parchment paper makes lifting and slicing much easier.
- Press the peanuts firmly: This helps the top layer stick instead of falling off when sliced.
- Chill fully: Give the bars enough time to firm up before cutting for neat edges.
Simple Tools You’ll Want Nearby
This recipe does not need fancy equipment, which is part of its charm. Gather the basics first, and the process feels calm and easy.
Medium Saucepan: Used to melt the butter, peanut butter chips, condensed milk, and marshmallow creme into a smooth filling.
Rubber Spatula: Helps stir the mixture gently and scrape every bit from the pan.
8-Inch Square Pan: Gives the bars a thick, candy-bar-style shape.
Parchment Paper: Makes removing the chilled slab much easier.
Measuring Cups and Spoons: Keeps the balance of sweetness, salt, and chewiness consistent.
Sharp Knife: Helps slice the chilled candy cleanly into bars.
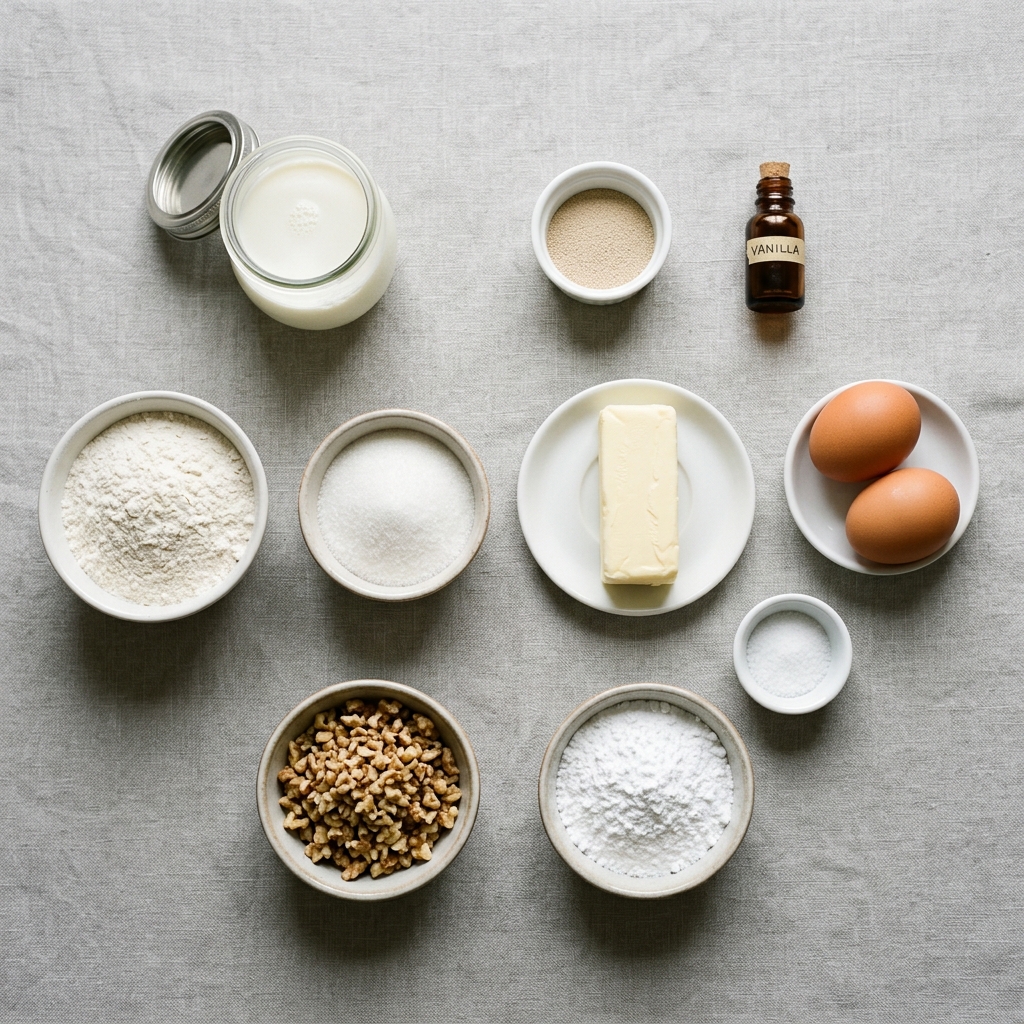
Ingredients You Will Need for Easy PayDay Candy Bars
Now we get to the good part, the ingredients. Each one has a clear job, and together they create that chewy, salty, nutty candy-shop bite.
- Salted Dry-Roasted Peanuts: 3 cups, divided. These create the crunchy top and bottom layers and bring that signature salty bite.
- Unsalted Butter: 3 tablespoons. Butter adds richness and helps the filling melt into a smooth texture.
- Peanut Butter Chips: 2 cups. These give the center its sweet peanut flavor and creamy structure.
- Sweetened Condensed Milk: 1 can, 14 ounces. This adds sweetness, chewiness, and a caramel-like richness.
- Marshmallow Creme: 2 cups. This creates the soft nougat-style texture that makes the bars tender.
- Vanilla Extract: 1 teaspoon. Vanilla rounds out the sweetness and adds a warm bakery-style aroma.
- Fine Sea Salt: 1/4 teaspoon. A small pinch sharpens the peanut flavor and keeps the sweetness balanced.
Easy Ingredient Swaps That Still Taste Amazing
Sometimes the pantry is almost ready but not quite. Here are a few simple swaps that keep the candy delicious.
Salted Dry-Roasted Peanuts: Use lightly salted roasted peanuts if you prefer a softer salt level.
Unsalted Butter: Use salted butter and skip the fine sea salt.
Peanut Butter Chips: Use butterscotch chips for a sweeter caramel-style twist.
Marshmallow Creme: Use marshmallow fluff if that is what your store carries.
Vanilla Extract: Use maple extract for a warmer, cozy flavor.
The Ingredients That Make the Magic Happen
Every ingredient matters, but two really carry the personality of these bars. Once you understand them, the recipe makes even more sense.
Salted Peanuts: They are the crunch, the contrast, and the reason the bars do not taste overly sweet. Their roasted flavor makes the filling feel deeper and richer.
Marshmallow Creme: This gives the candy its soft chew. It keeps the center tender, creamy, and sliceable after chilling.
Let’s Make the Candy Bars Step by Step
Now that everything is ready, this is where the kitchen starts to smell sweet and nutty. Here are the steps you’re going to follow, and each one builds toward that chewy candy bar texture.
- Preheat Your Equipment: No oven is needed for this recipe. Line an 8-inch square pan with parchment paper, leaving some overhang so you can lift the candy out later.
- Combine Ingredients: Add the butter, peanut butter chips, sweetened condensed milk, marshmallow creme, vanilla extract, and fine sea salt to a medium saucepan.
- Prepare Your Cooking Vessel: Place 1 1/2 cups of salted dry-roasted peanuts evenly across the bottom of the lined pan. Spread them into a snug layer so the filling has something crunchy to settle into.
- Assemble the Dish: Warm the saucepan over low heat, stirring constantly, until the mixture is smooth and glossy. Pour it over the peanut layer, then spread it gently with a spatula.
- Cook to Perfection: Sprinkle the remaining 1 1/2 cups peanuts over the warm filling. Press them lightly into the top so they stick without sinking too far.
- Finishing Touches: Chill the pan for at least 2 hours, or until the candy is firm enough to lift and slice cleanly.
- Serve and Enjoy: Lift the slab from the pan using the parchment paper. Slice into 16 bars and serve chilled or slightly softened at room temperature.
How the Flavor and Texture Come Together
The first thing you notice is the crunch. Those roasted peanuts hit right away, then the center gives way to a soft, creamy chew that tastes like peanut butter, vanilla, and mellow caramel sweetness all tucked together.
As the bars chill, the filling firms without turning hard. That is the sweet spot. You get a candy bar that holds its shape but still bends slightly when you bite into it. Salty, sweet, chewy, crunchy, and honestly, a little addictive.
Helpful Cooking Tips for Better Homemade Candy
Once you make these once, you will see how simple they are. Still, these little tips make them even better.
- Keep the heat low: High heat can make the mixture grainy or scorched.
- Use fresh peanuts: Stale peanuts can make the whole batch taste flat.
- Press gently: Press the top peanuts just enough to stick, not so hard that the filling squishes out.
- Slice cold: Chilled bars cut cleaner and hold their shape better.
Candy Bar Mistakes to Skip
This is an easy recipe, but a few common mistakes can change the texture. Nothing dramatic, just little things to watch.
- Do not boil the filling: Boiling can make the center too stiff or uneven.
- Do not skip parchment paper: The candy can stick firmly to the pan without it.
- Do not cut too soon: Warm candy will smear and lose its shape.
- Do not use unsalted peanuts only: The salty balance is what makes these taste like candy bars, not just sweet peanut squares.
Nutrition Facts for Each Sweet Square
Servings: 16 bars
Calories per serving: 295
Note: These are approximate values.
Prep and Chill Time
Prep Time: 15 minutes
Cook Time: 2 hours
Total Time: 2 hours 15 minutes
Make-Ahead and Storage Tips
These bars are perfect for making ahead because chilling helps them set beautifully. You can prepare the full batch the day before serving, then slice once firm.
Store the bars in an airtight container in the refrigerator for up to 1 week. Place parchment between layers so they do not stick together. For longer storage, freeze them for up to 2 months. Let frozen bars thaw in the fridge, then rest at room temperature for a few minutes before serving.
How to Serve These Peanut Candy Bars
Serve them chilled for the firmest chew, or let them sit out for 5 to 10 minutes if you like a softer bite. They are great on dessert boards with cookies, brownies, and fruit.
For parties, cut them into small squares and place them in mini cupcake liners. For a cozy treat, serve one with hot coffee, cold milk, or a vanilla latte.
Fun Ways to Use Leftover Bars
Leftovers are rare, but when they happen, you can turn them into something new. Chop a bar into small pieces and sprinkle it over vanilla ice cream for a salty-sweet sundae.
You can also fold chopped pieces into cookie dough, mix them into brownie batter, or use them as a topping for a peanut butter milkshake. Tiny candy bits make everything feel a little more fun.
Extra Little Tips for the Best Batch
For the cleanest slices, use a sharp knife and wipe it between cuts. If the bars feel too firm straight from the fridge, let them sit at room temperature for a few minutes.
A tiny sprinkle of flaky salt on top can make the flavor pop, but keep it light because the peanuts already bring saltiness. And now, once you have the basics down, you can dress them up without losing that homemade candy charm.
Make It a Showstopper for Parties
Presentation is easy with these because the peanut coating already looks beautiful. Cut the bars into even rectangles, then stack them slightly off-center on a white platter so the golden peanuts stand out.
For gifting, wrap each piece in parchment and tie with simple kitchen twine. It gives them that sweet homemade candy-shop look without needing anything fancy.
Variations to Try Next Time
- Chocolate Drizzle: Drizzle melted semi-sweet chocolate over the chilled bars for a richer dessert look.
- Butterscotch Twist: Replace half the peanut butter chips with butterscotch chips for a deeper caramel flavor.
- Extra Crunchy Bars: Use crunchy peanut butter chips if available, or stir in 1/4 cup finely chopped peanuts into the filling.
- Maple Peanut Bars: Swap vanilla extract for maple extract for a cozy fall-style flavor.
- Mini Candy Bites: Press the mixture into a larger pan and cut into small squares for bite-size party treats.
FAQ’s
Q1: Can I make these without an oven?
A1: Yes, this is a no-bake recipe. The only cooking happens on the stovetop, then the bars chill until firm.
Q2: Can I use regular peanuts instead of dry-roasted peanuts?
A2: Yes, but dry-roasted peanuts give the best crunch and flavor. If using regular roasted peanuts, make sure they are fresh and salted.
Q3: Why did my filling turn grainy?
A3: The heat was probably too high. Melt the mixture slowly over low heat and stir constantly for the smoothest texture.
Q4: Can I use marshmallows instead of marshmallow creme?
A4: Marshmallow creme gives the best soft texture. Melted marshmallows can work, but the center may set a little firmer.
Q5: How long do the bars need to chill?
A5: At least 2 hours is best. If your kitchen is warm, they may need a little longer to slice cleanly.
Q6: Can I freeze them?
A6: Yes, freeze them in an airtight container with parchment between layers for up to 2 months.
Q7: Do they taste exactly like the store-bought candy bar?
A7: They have the same salty peanut and chewy sweet style, but the homemade version tastes softer, fresher, and a little creamier.
Q8: Can I make them less sweet?
A8: You can use extra salted peanuts or cut the bars into smaller portions. The condensed milk and chips are needed for structure, so reducing them too much may affect the texture.
Q9: Can I double the recipe?
A9: Yes, double the ingredients and use a 9 by 13-inch pan. The bars may need extra chilling time.
Q10: What is the best way to cut neat bars?
A10: Chill them fully, lift the slab out with parchment, and use a sharp knife. Wipe the knife between cuts for cleaner edges.
Conclusion
Easy PayDay Candy Bars are the kind of homemade treat that feels playful, cozy, and seriously satisfying. They have that salty peanut crunch, that soft chewy center, and just enough sweetness to make every bite feel like a little reward.
Make them for a party, tuck them into lunchboxes, or keep a chilled batch ready for the week. However you serve them, they bring that homemade candy magic in the easiest way.
Print
Easy PayDay Candy Bars
- Prep Time: 15 minutes
- Cook Time: 2 hours
- Total Time: 2 hours 15 minutes
- Yield: 16 bars 1x
- Category: Dessert
- Method: No-Bake
- Cuisine: American
- Diet: Vegetarian
Description
Chewy homemade peanut candy bars made with salted peanuts, peanut butter chips, sweetened condensed milk, marshmallow creme, and vanilla for a salty-sweet no-bake treat.
Ingredients
- 3 cups salted dry-roasted peanuts, divided
- 3 tablespoons unsalted butter
- 2 cups peanut butter chips
- 1 can sweetened condensed milk, 14 ounces
- 2 cups marshmallow creme
- 1 teaspoon vanilla extract
- 1/4 teaspoon fine sea salt
Instructions
- Line an 8-inch square pan with parchment paper, leaving overhang for easy lifting.
- Spread 1 1/2 cups salted dry-roasted peanuts evenly across the bottom of the prepared pan.
- Add butter, peanut butter chips, sweetened condensed milk, marshmallow creme, vanilla extract, and fine sea salt to a medium saucepan.
- Warm over low heat, stirring constantly, until the mixture is smooth and glossy.
- Pour the warm filling over the peanut layer and spread it gently with a spatula.
- Sprinkle the remaining 1 1/2 cups peanuts evenly over the top.
- Press the peanuts lightly into the filling so they stick.
- Chill for at least 2 hours, or until firm.
- Lift the candy from the pan using the parchment paper.
- Slice into 16 bars and serve chilled or slightly softened at room temperature.
Notes
- Use low heat so the filling stays smooth and does not scorch.
- Fresh salted peanuts give the best crunchy texture and balanced flavor.
- For cleaner slices, chill fully and wipe the knife between cuts.
- Store bars in the refrigerator with parchment between layers.
Nutrition
- Serving Size: 1 bar
- Calories: 295
- Sugar: 26g
- Sodium: 210mg
- Fat: 17g
- Saturated Fat: 6g
- Unsaturated Fat: 10g
- Trans Fat: 0g
- Carbohydrates: 31g
- Fiber: 2g
- Protein: 8g
- Cholesterol: 12mg
Keywords: homemade candy bars, peanut candy bars, no bake dessert, salted peanut bars, chewy peanut bars