Boston Cream Pie Cheesecake Recipe
There is something incredibly comforting about a dessert that combines two classics into one unforgettable bite. This Boston Cream Pie Cheesecake brings together fluffy vanilla cake, rich cheesecake filling, silky pastry cream, and glossy chocolate ganache in the most irresistible way possible. Every slice feels rich and creamy while still having that nostalgic bakery-style flavor that instantly makes people smile. Trust me, you’re going to love this because every forkful melts together into pure dessert heaven.
And now that you’re already imagining that creamy center and shiny chocolate topping, let’s dive deeper into what makes this dessert such a total game-changer for celebrations, holidays, or honestly just a random weekend when you want something extra special.
Why This Creamy Dessert Always Steals the Spotlight
Some desserts are good, and then there are desserts that make everyone pause after the first bite. This cheesecake does exactly that. The combination of smooth vanilla cheesecake with soft cake layers creates a texture that feels luxurious without being too heavy. Then comes the pastry cream, which adds that classic Boston cream pie flavor people know and love.
The glossy chocolate ganache on top ties everything together beautifully. It adds just enough richness while balancing the sweetness underneath. Let me tell you, it’s worth every bite.
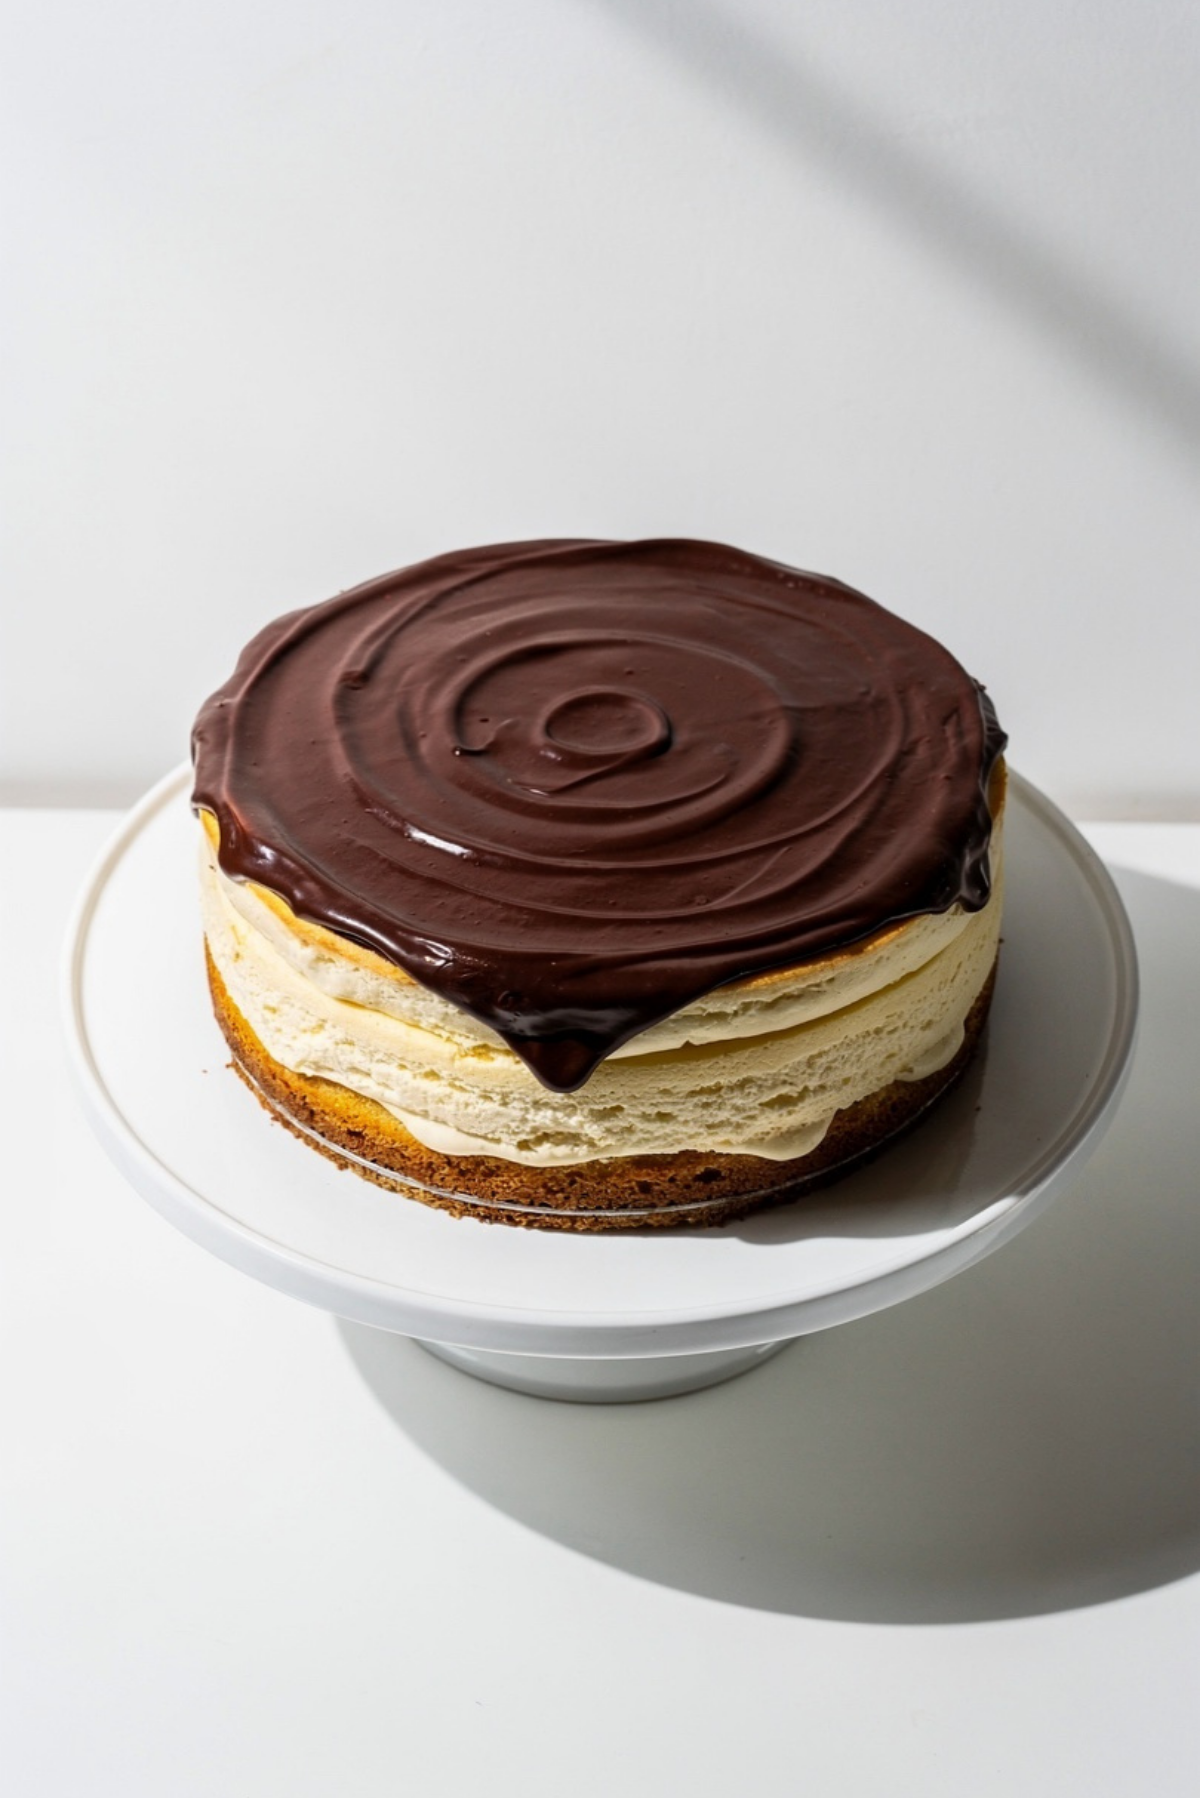
What also makes this recipe so special is how impressive it looks once sliced. Those beautiful layers create a bakery-quality dessert right in your own kitchen, and surprisingly, the process is much easier than it looks.
The Sweet Story Behind Boston Cream Pie Inspiration
Before this dessert became a cheesecake masterpiece, Boston cream pie itself was already a beloved American classic. Interestingly, despite the name, it is actually a cake and not a pie. The original dessert dates back to the 1800s and became famous for its combination of sponge cake, custard filling, and chocolate topping.
Over time, bakers started creating playful variations inspired by those same flavors. Cheesecake turned out to be the perfect match because its creamy texture blends beautifully with pastry cream and chocolate ganache.
Now this version combines everything people adore about both desserts into one decadent creation that feels comforting, elegant, and nostalgic all at once.
What Makes This Recipe So Reliable and Irresistible
This dessert has quickly become a favorite because it delivers big flavor while still being approachable for home bakers.
Versatile: This cheesecake works beautifully for birthdays, dinner parties, holidays, or even casual family gatherings because everyone instantly recognizes those familiar flavors.
Budget-Friendly: Most ingredients are simple pantry and refrigerator staples, which means you do not need specialty items to create something bakery-worthy.
Quick and Easy: While it looks elaborate, each component comes together step by step in a very manageable way.
Customizable: You can adjust the chocolate intensity, use different toppings, or even add espresso flavor for a deeper twist.
Crowd-Pleasing: Creamy cheesecake, fluffy cake, and chocolate ganache are almost impossible to resist together.
Make-Ahead Friendly: This dessert actually tastes even better after chilling overnight, which makes entertaining so much easier.
Great for Leftovers: The flavors continue developing in the refrigerator, making the next-day slices even more delicious.
Pro Baker Secrets That Make a Huge Difference
Once you understand a few simple tricks, this cheesecake becomes surprisingly stress-free.
- Room Temperature Ingredients: Cold cream cheese can create lumps, so let everything sit out before mixing.
- Avoid Overmixing: Too much air in the batter can lead to cracks while baking.
- Use a Water Bath: This helps the cheesecake bake evenly and keeps the texture silky smooth.
- Cool Gradually: Sudden temperature changes can cause cracking, so patience really matters here.
- Chill Overnight: The texture becomes firmer, creamier, and easier to slice cleanly.
Kitchen Tools That Help Everything Come Together Smoothly
Before getting started, gathering the right tools makes the process feel much easier and more enjoyable.
Springform Pan: Essential for cleanly releasing the cheesecake without damaging the layers.
Mixing Bowls: You will need several bowls for the cheesecake batter, pastry cream, and ganache.
Electric Mixer: Helps create that smooth creamy cheesecake texture.
Saucepan: Perfect for cooking the pastry cream gently without scorching.
Whisk: Important for creating lump-free pastry cream.
Offset Spatula: Makes spreading the ganache beautifully smooth and glossy.
Ingredients That Build Every Delicious Layer
The magic of this dessert comes from how each ingredient works together to create creamy, fluffy, rich perfection. Every layer has its own role, and together they create something unforgettable.
- Cream Cheese: 24 ounces softened cream cheese, creates the rich creamy cheesecake base.
- Granulated Sugar: 1 1/4 cups sugar, sweetens the filling while balancing the tanginess.
- Vanilla Extract: 2 teaspoons vanilla extract, adds warmth and classic bakery flavor.
- Eggs: 4 large eggs, help create a smooth and stable cheesecake texture.
- Sour Cream: 1 cup sour cream, keeps the cheesecake silky and creamy.
- All-Purpose Flour: 2 tablespoons flour, lightly stabilizes the cheesecake filling.
- Vanilla Cake Layers: 2 thin baked vanilla cake layers, add softness and classic Boston cream pie texture.
- Whole Milk: 2 cups whole milk, forms the base of the pastry cream.
- Egg Yolks: 4 large egg yolks, thicken the pastry cream beautifully.
- Cornstarch: 3 tablespoons cornstarch, helps create a smooth custard consistency.
- Unsalted Butter: 2 tablespoons butter, adds richness to the pastry cream.
- Semi-Sweet Chocolate: 8 ounces semi-sweet chocolate, creates the rich ganache topping.
- Heavy Cream: 1 cup heavy cream, melts into the chocolate for silky ganache.
Easy Ingredient Swaps You Can Try
Sometimes you need flexibility, and thankfully this dessert adapts beautifully.
Sour Cream: Greek yogurt works well as a substitute.
Semi-Sweet Chocolate: Dark chocolate creates a richer, more intense topping.
Whole Milk: Half-and-half can make the pastry cream even richer.
Vanilla Extract: Vanilla bean paste adds deeper bakery-style flavor.
All-Purpose Flour: Cornstarch can be used for a gluten-free alternative.
The Ingredients That Truly Shine Here
Some ingredients completely transform this dessert from good to unforgettable.
Cream Cheese: This is the heart of the cheesecake layer, creating that rich velvety texture everyone loves.
Semi-Sweet Chocolate: The ganache adds a glossy finish and balances the sweetness with deep chocolate flavor.
Let’s Build This Stunning Dessert Step by Step
Now comes the fun part where all those beautiful layers finally come together. The process feels incredibly rewarding once you see the finished cheesecake chilling in the refrigerator.
- Preheat Your Equipment: Preheat your oven to 325°F and prepare a springform pan by lightly greasing it and wrapping the outside with foil for the water bath.
- Combine Ingredients: Beat the softened cream cheese and sugar until smooth. Add vanilla extract, sour cream, flour, and eggs one at a time until fully incorporated.
- Prepare Your Cooking Vessel: Place one thin vanilla cake layer into the bottom of the springform pan. Pour half of the cheesecake batter over it.
- Assemble the Dish: Add the second cake layer, then pour the remaining cheesecake batter on top. Smooth the surface gently.
- Cook to Perfection: Place the pan in a water bath and bake for about 75 minutes until the center is slightly jiggly. Let the cheesecake cool gradually before chilling.
- Finishing Touches: Prepare the pastry cream by whisking milk, egg yolks, sugar, and cornstarch in a saucepan until thickened. Spread over the chilled cheesecake. Pour warm ganache over the top and smooth evenly.
- Serve and Enjoy: Chill thoroughly before slicing. Serve cold for the creamiest texture and cleanest layers.
The Texture and Flavor Combination Is Absolutely Incredible
Every layer brings something different to the experience. The cheesecake itself is smooth, creamy, and slightly tangy. The cake layers add softness and structure while the pastry cream creates that silky custard richness people instantly recognize.
Then comes the chocolate ganache, which adds glossy decadence and a deep cocoa flavor that balances the sweetness perfectly. Together, the textures feel rich yet surprisingly light at the same time.
Helpful Tricks That Make Baking Easier
A few small details can completely change the outcome of your cheesecake.
- Let the cheesecake chill overnight for the best flavor and texture.
- Wipe your knife clean between slices for beautiful presentation.
- Use full-fat cream cheese for the richest consistency.
- Allow the ganache to cool slightly before pouring so it spreads evenly.
Mistakes You Definitely Want to Avoid
Even experienced bakers can run into little issues, but these tips help prevent them.
- Do not overmix the batter because too much air can cause cracks.
- Avoid opening the oven repeatedly during baking.
- Never skip the chilling time because the layers need time to set properly.
- Do not pour very hot ganache directly onto the cheesecake.
Nutrition Information Worth Knowing
Servings: 12
Calories per serving: 620
Note: These are approximate values.
Timing Everything Perfectly
Planning ahead makes this dessert much more relaxing to prepare.
Prep Time: 45 minutes
Cook Time: 1 hour 15 minutes
Total Time: 2 hours plus chilling time
Make-Ahead Tips That Save Time Later
One of the best things about this cheesecake is how well it fits into busy schedules. You can prepare the cheesecake a full day ahead, which actually improves the flavor and texture.
Store it covered in the refrigerator for up to 5 days. Individual slices also freeze beautifully when wrapped tightly. For the best texture, thaw overnight in the refrigerator before serving.
Serving Ideas That Make It Feel Extra Special
This dessert already feels luxurious, but a few serving ideas can make it even more memorable.
Serve slices with fresh strawberries, raspberries, or a little whipped cream for balance. Coffee also pairs beautifully because the bitterness complements the sweet creamy layers perfectly.
For dinner parties, add a light dusting of cocoa powder or chocolate curls right before serving.
Creative Ways to Transform Leftovers
If you somehow have leftovers, there are some fun ways to reinvent them.
Turn slices into mini parfaits layered with whipped cream. Blend pieces into milkshakes for an indulgent dessert drink. You can even freeze small cheesecake cubes and dip them in melted chocolate for bite-sized treats.
Extra Tips That Make Everything Better
Little details really elevate the final result.
Use high-quality vanilla extract because the flavor stands out beautifully here. Chill your mixing bowl before whipping cream if adding whipped topping. And always slice with a warm knife for cleaner layers.
Presentation Tricks for a Truly Stunning Finish
This dessert already looks impressive, but presentation makes it even more eye-catching.
Use a glossy ganache finish and allow it to drip slightly over the edges naturally. Add a few chocolate curls or a light dusting of powdered sugar right before serving. A clean white cake stand also helps those beautiful layers stand out even more.
Fun Variations You Can Experiment With
There are so many creative directions you can take this cheesecake.
- Add espresso powder to the ganache for mocha flavor.
- Use dark chocolate instead of semi-sweet for a richer finish.
- Add fresh strawberries between the layers for fruity brightness.
- Swap vanilla cake layers for chocolate sponge cake.
- Add a caramel drizzle over the ganache for extra decadence.
FAQ’s
Q1: Can I make this cheesecake ahead of time?
Yes, and honestly it tastes even better after chilling overnight.
Q2: Why did my cheesecake crack?
Usually this happens from overmixing or sudden temperature changes.
Q3: Can I freeze slices?
Absolutely. Wrap slices tightly and freeze for up to 2 months.
Q4: Do I need a water bath?
It is highly recommended because it helps create a smoother texture.
Q5: Can I use store-bought cake layers?
Yes, thin store-bought vanilla cake layers work perfectly.
Q6: How long should it chill before serving?
At least 6 hours, although overnight is best.
Q7: Can I use milk chocolate instead?
You can, but the dessert will taste noticeably sweeter.
Q8: What is the best way to slice cheesecake cleanly?
Use a warm knife and wipe it clean between slices.
Q9: Can I make this gluten-free?
Yes, simply use gluten-free cake layers and cornstarch instead of flour.
Q10: How should leftovers be stored?
Keep the cheesecake covered in the refrigerator for up to 5 days.
Conclusion
This Boston Cream Pie Cheesecake truly brings together the best of two beloved desserts into one unforgettable creation. From the creamy cheesecake filling to the silky pastry cream and glossy chocolate topping, every layer feels rich, comforting, and completely worth the effort. Whether you make it for a celebration or simply because you deserve something amazing, this one’s guaranteed to impress everyone at the table. Trust me, once you try that first creamy bite, you’ll already be thinking about making it again.
Print
Boston Cream Pie Cheesecake Recipe
- Prep Time: 45 minutes
- Cook Time: 1 hour 15 minutes
- Total Time: 2 hours plus chilling time
- Yield: 12 servings 1x
- Category: Dessert
- Method: Baking
- Cuisine: American
- Diet: Vegetarian
Description
A rich and creamy Boston Cream Pie Cheesecake layered with vanilla cake, silky pastry cream, smooth cheesecake filling, and glossy chocolate ganache.
Ingredients
- 24 ounces cream cheese, softened
- 1 1/4 cups granulated sugar
- 2 teaspoons vanilla extract
- 4 large eggs
- 1 cup sour cream
- 2 tablespoons all-purpose flour
- 2 thin vanilla cake layers
- 2 cups whole milk
- 4 large egg yolks
- 3 tablespoons cornstarch
- 2 tablespoons unsalted butter
- 8 ounces semi-sweet chocolate
- 1 cup heavy cream
Instructions
- Preheat oven to 325°F and prepare a springform pan by greasing it lightly and wrapping the outside with foil.
- Beat cream cheese and sugar until smooth. Add vanilla extract, sour cream, flour, and eggs one at a time until combined.
- Place one vanilla cake layer into the bottom of the springform pan and pour half of the cheesecake batter over it.
- Add the second cake layer and pour the remaining cheesecake batter on top. Smooth the surface.
- Place the pan into a water bath and bake for 75 minutes until the center is slightly jiggly. Cool gradually and chill completely.
- Prepare the pastry cream by whisking milk, egg yolks, sugar, and cornstarch in a saucepan over medium heat until thickened. Stir in butter and cool slightly.
- Spread pastry cream over the chilled cheesecake.
- Heat heavy cream until warm and pour over semi-sweet chocolate. Stir until smooth and glossy.
- Pour ganache over the cheesecake and spread evenly.
- Chill thoroughly before slicing and serving.
Notes
- Allow all refrigerated ingredients to come to room temperature before mixing.
- Chill the cheesecake overnight for the best texture and flavor.
- Use a warm knife for cleaner slices.
- Store leftovers covered in the refrigerator for up to 5 days.
Nutrition
- Serving Size: 1 slice
- Calories: 620
- Sugar: 36g
- Sodium: 320mg
- Fat: 42g
- Saturated Fat: 24g
- Unsaturated Fat: 14g
- Trans Fat: 0.5g
- Carbohydrates: 48g
- Fiber: 2g
- Protein: 10g
- Cholesterol: 170mg
Keywords: Boston cream pie cheesecake, layered cheesecake, chocolate ganache cheesecake, vanilla cheesecake dessert, creamy cheesecake recipe