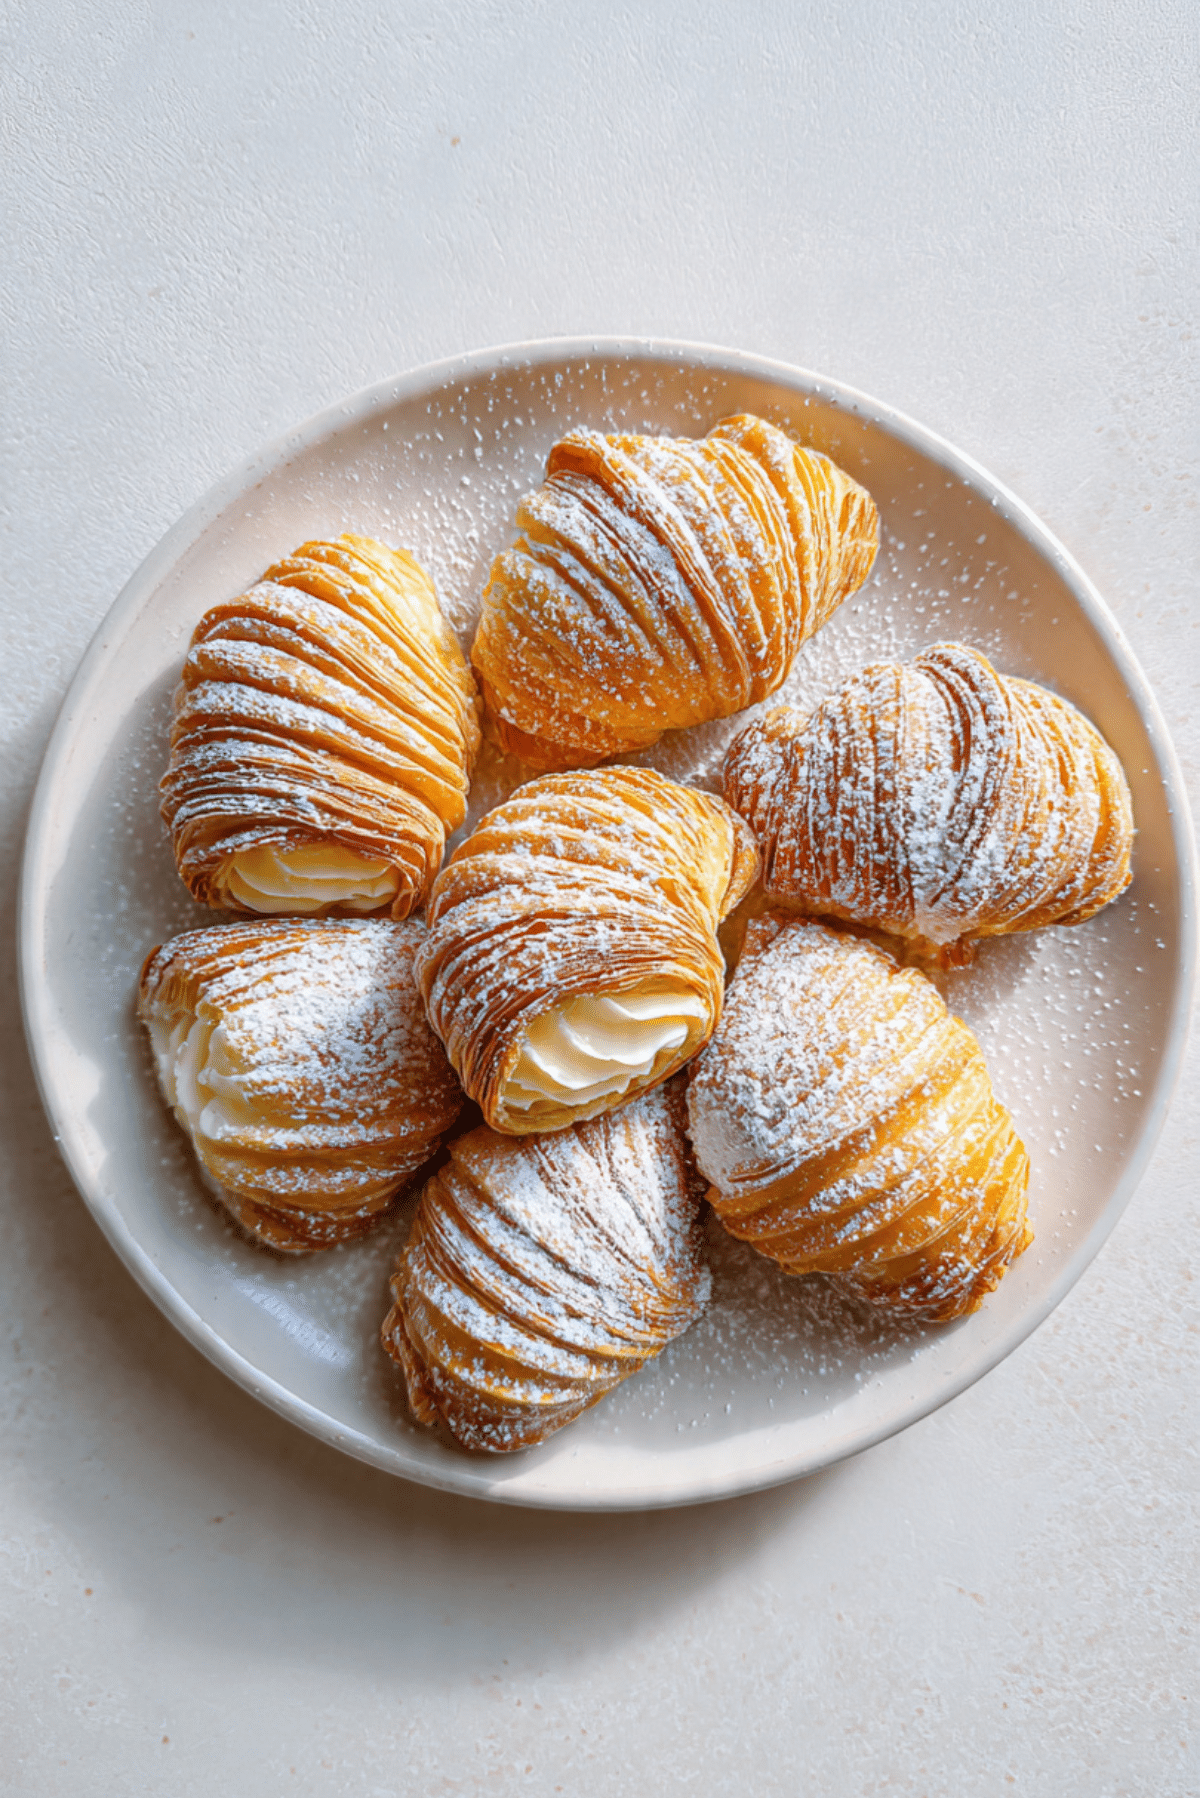
Sfogliatelle
There is something magical about biting into a freshly baked sfogliatelle. The crisp, golden layers shatter delicately with the first bite, revealing a fragrant ricotta filling scented with citrus and vanilla. It is one of those pastries that feels both rustic and elegant at the same time. The contrast between the flaky shell and the creamy interior is simply unforgettable.
Trust me, you are going to love this. This one is a total game changer for anyone who enjoys classic European pastries. And now that you are here, let me guide you through the story and the steps that make this iconic Italian pastry so special.
Why This Italian Pastry Wins Hearts Everywhere
The moment these pastries come out of the oven, the kitchen fills with a warm aroma of butter, toasted pastry, and bright citrus. Each bite offers a delicate crunch followed by a creamy, lightly sweet filling that melts beautifully on the tongue.
What makes this pastry so beloved is the balance of textures. The outside is crisp and layered, while the inside remains soft and rich. It feels indulgent without being heavy, which makes it perfect for breakfast, dessert, or an afternoon coffee break.
And the best part, making them at home is far more achievable than many people think.
A Taste of Naples, Where This Pastry Was Born
To truly appreciate this pastry, it helps to know where it came from. Sfogliatelle originated in the Campania region of Italy, particularly in Naples, where pastry chefs perfected its delicate layered shell.
The name itself means “little leaves,” which perfectly describes the many thin layers that fan out like delicate petals once baked. Traditionally, these pastries were prepared in monasteries and later became a staple in Neapolitan bakeries.
Today they are a symbol of Italian pastry craftsmanship. Walk through the streets of Naples in the morning and you will find bakeries displaying trays of freshly baked sfogliatelle, their golden shells catching the morning light.
Reasons This Recipe Is So Loved and Reliable
Before we dive deeper into the baking process, let me tell you why this version works beautifully every time.
Versatile:
These pastries can be served warm for breakfast, as a dessert, or alongside espresso for a perfect afternoon treat.
Budget-Friendly:
The ingredients are simple pantry staples like flour, milk, sugar, and ricotta, which makes the recipe accessible without expensive specialty items.
Quick and Easy:
While shaping takes a little patience, the filling and baking process are straightforward and beginner friendly.
Customizable:
You can adjust the citrus notes or sweetness, or even experiment with different fillings.
Crowd-Pleasing:
Their unique shape and crispy layers make them visually impressive and incredibly satisfying to eat.
Make-Ahead Friendly:
The filling can easily be prepared ahead of time and stored in the refrigerator until ready to use.
Great for Leftovers:
If any remain the next day, they reheat beautifully in the oven and regain their crisp texture.
Professional Tips for Perfect Pastry Layers
Before starting, here are a few insider secrets that help achieve those beautiful layers.
- Roll the dough very thin. Thin layers create the signature crispy texture.
- Use softened butter generously between layers to help them separate while baking.
- Chill the dough briefly if it becomes difficult to handle.
- Do not overfill the pastry shells. A moderate amount keeps the shape intact while baking.
These small details make a huge difference in the final result.
Kitchen Tools That Make the Process Easier
A few simple tools help make preparation smooth and enjoyable.
Rolling Pin:
Essential for creating thin pastry layers that bake into crisp sheets.
Mixing Bowls:
Used for preparing the ricotta filling and combining ingredients.
Pastry Brush:
Helps distribute butter evenly between dough layers.
Baking Sheet:
Provides stable heat for even baking.
Parchment Paper:
Prevents sticking and keeps the delicate pastries intact.
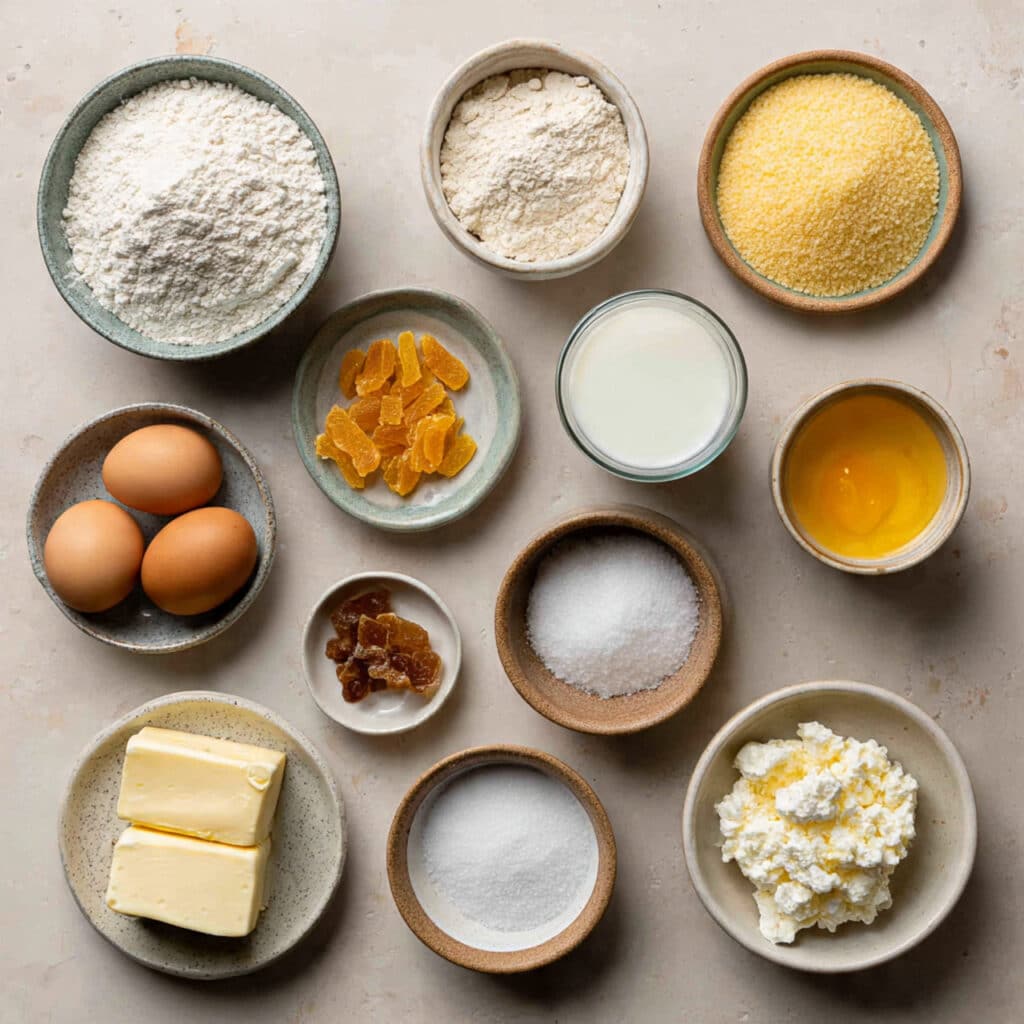
Ingredients That Build This Classic Pastry
Now let us take a look at the ingredients that bring this pastry together.
- All Purpose Flour: 2 cups. Provides the structure for the layered pastry dough.
- Semolina Flour: ½ cup. Adds texture and helps create the distinctive crisp shell.
- Granulated Sugar: ½ cup. Sweetens the filling and balances the citrus notes.
- Whole Milk: 1 cup. Used to create a soft semolina base for the filling.
- Ricotta Cheese: 1 cup. The creamy heart of the filling with a mild sweetness.
- Unsalted Butter: ½ cup, softened. Brushed between dough layers to create flakiness.
- Eggs: 2 large. Help bind the filling and add richness.
- Orange Zest: 1 teaspoon. Brings bright citrus aroma to the filling.
- Lemon Zest: 1 teaspoon. Adds freshness and balance.
- Vanilla Extract: 1 teaspoon. Enhances the sweetness and aroma.
- Candied Orange Peel: ¼ cup, finely chopped. Provides texture and bursts of citrus flavor.
- Powdered Sugar: 2 tablespoons. Used for finishing and presentation.
Ingredient Swaps That Still Work Beautifully
Sometimes you may want to adjust the recipe slightly. Here are a few simple substitutions.
Ricotta Cheese: Mascarpone or well strained cottage cheese.
Whole Milk: Almond milk or oat milk.
Granulated Sugar: Coconut sugar or maple sugar.
Candied Orange Peel: Finely chopped dried apricots.
Spotlight on the Star Ingredients
Some ingredients truly define the character of this pastry.
Ricotta Cheese:
This creamy cheese provides a soft and delicate filling that contrasts beautifully with the crisp shell.
Semolina Flour:
Semolina adds subtle texture and structure to the filling while giving the pastry its traditional character.
Step Into the Kitchen and Let’s Start Baking
Now comes the fun part. Here are the steps you are going to follow.
-
Preheat Your Equipment:
Preheat the oven to 375°F, 190°C. Line a baking sheet with parchment paper. -
Combine Ingredients:
In a saucepan, cook semolina flour with milk until thick. Allow it to cool, then mix with ricotta, sugar, eggs, vanilla, citrus zest, and candied orange peel. -
Prepare Your Cooking Vessel:
Place parchment paper on a baking sheet and lightly grease it with butter. -
Assemble the Dish:
Roll the dough into a thin log, slice portions, and gently shape each piece into a small shell. Fill each with the ricotta mixture. -
Cook to Perfection:
Bake for 25 minutes until the pastry becomes golden and crisp. -
Finishing Touches:
Allow the pastries to cool slightly, then dust lightly with powdered sugar. -
Serve and Enjoy:
Serve warm while the layers remain crisp and the filling soft and fragrant.
Texture and Flavor That Make Each Bite Special
The first bite delivers a delicate crackle as the layers break apart. Then the creamy filling appears, rich with ricotta and bright citrus aromas. The sweetness is balanced and not overpowering, allowing the natural dairy and citrus notes to shine.
The contrast between crisp pastry and soft filling is exactly what makes this pastry unforgettable.
Helpful Baking Tips for Best Results
A few extra tricks can make your baking even smoother.
- Chill the dough if it becomes too soft while shaping.
- Use high quality ricotta for a smoother filling.
- Dust powdered sugar just before serving for the best look.
Common Mistakes and How to Avoid Them
Even experienced bakers sometimes encounter small challenges.
- Overfilling the pastries can cause them to burst. Use moderate filling.
- Thick dough layers reduce crispness. Roll the dough thin.
- Baking at too low temperature prevents proper browning.
Nutritional Overview
Servings: 8
Calories per serving: 290
Note: These values are approximate.
Time Needed to Prepare This Pastry
Prep Time: 35 minutes
Cook Time: 25 minutes
Total Time: 60 minutes
Preparing Ahead and Storing Properly
If you like planning ahead, this pastry is quite flexible.
You can prepare the filling one day in advance and store it in the refrigerator. The dough can also be prepared earlier and kept chilled until shaping.
Once baked, store leftovers in an airtight container in the refrigerator for up to two days. Reheat briefly in the oven to restore crispness.
Freezing is also possible. Freeze unbaked pastries and bake directly from frozen with a few extra minutes of cooking time.
Delicious Ways to Serve These Pastries
Serve them warm with espresso, cappuccino, or strong black coffee. The crisp pastry pairs beautifully with a creamy drink.
They also make an elegant dessert when paired with fresh berries or a light citrus glaze.
Creative Ways to Use Leftover Pastries
If you happen to have leftovers, there are some fun ways to enjoy them again.
Crumble them over vanilla yogurt for a quick dessert. Warm them slightly and serve with fresh fruit. Or slice them and use them as a topping for ice cream.
Extra Tips for Flavor and Simplicity
Use fresh citrus zest rather than bottled flavorings for the best aroma. Always strain ricotta if it seems watery, as this keeps the filling thick and creamy.
Let the pastries cool slightly before serving so the layers stay crisp.
Turn Your Pastries Into a Stunning Dessert
Presentation makes a big difference. Arrange them on a simple white platter and dust lightly with powdered sugar.
Add a few fresh orange slices nearby for color. It instantly turns a simple pastry into a bakery style centerpiece.
Flavor Variations Worth Trying
There are many fun ways to customize the filling.
Chocolate Variation:
Add small chocolate chips to the ricotta filling.
Pistachio Version:
Mix finely chopped pistachios into the filling.
Almond Citrus:
Replace vanilla with almond extract for a nutty flavor.
Honey Sweetened:
Swap part of the sugar with mild honey.
FAQ’s
Q1: Can I prepare the filling ahead of time?
Yes. The filling can be refrigerated for up to one day before assembling the pastries.
Q2: Why is my pastry not crispy enough?
This usually happens if the dough layers are too thick or if the oven temperature is too low.
Q3: Can I freeze these pastries?
Yes. They freeze well either before baking or after baking.
Q4: Can I use low fat ricotta?
You can, but full fat ricotta produces a richer filling.
Q5: How do I keep the layers separated?
Brushing butter between the layers helps them separate during baking.
Q6: Can I skip the candied orange peel?
Yes. You can simply increase the citrus zest.
Q7: What if my dough tears?
Patch it gently with another small piece of dough and continue shaping.
Q8: Can I make smaller pastries?
Absolutely. Just reduce the baking time slightly.
Q9: Are they served warm or cold?
They are best served slightly warm.
Q10: Can I add spices to the filling?
Yes. A small pinch of cinnamon works beautifully.
Conclusion
If you love pastries with crisp layers and creamy fillings, this recipe is truly worth making. The balance of texture and flavor creates something that feels special with every bite.
Take your time shaping the layers, enjoy the process, and soon your kitchen will smell just like a traditional Italian bakery. And let me tell you, once you taste that first warm pastry, it will feel completely worth it.
Print
Sfogliatelle
- Prep Time: 35 minutes
- Cook Time: 25 minutes
- Total Time: 60 minutes
- Yield: 8 pastries 1x
- Category: Dessert
- Method: Baking
- Cuisine: Italian
- Diet: Vegetarian
Description
Crispy layered Italian pastry shells filled with a creamy ricotta and citrus mixture. These classic sfogliatelle deliver a delicate crunch followed by a smooth, fragrant filling that makes every bite irresistible.
Ingredients
- 2 cups all purpose flour
- 1/2 cup semolina flour
- 1/2 cup granulated sugar
- 1 cup whole milk
- 1 cup ricotta cheese
- 1/2 cup unsalted butter, softened
- 2 large eggs
- 1 teaspoon orange zest
- 1 teaspoon lemon zest
- 1 teaspoon vanilla extract
- 1/4 cup candied orange peel, finely chopped
- 2 tablespoons powdered sugar
Instructions
- Preheat the oven to 375°F (190°C) and line a baking sheet with parchment paper.
- In a saucepan, cook the semolina flour with the milk over medium heat until thick. Allow the mixture to cool slightly.
- In a mixing bowl, combine the cooled semolina mixture with ricotta cheese, granulated sugar, eggs, vanilla extract, orange zest, lemon zest, and chopped candied orange peel. Mix until smooth and well blended.
- Prepare the baking sheet by lightly greasing the parchment paper with a small amount of butter.
- Roll the dough into a long log, slice small portions, and gently shape each piece into a small shell.
- Fill each shell with the ricotta mixture, taking care not to overfill.
- Arrange the filled pastries on the prepared baking sheet.
- Bake for about 25 minutes until the pastry becomes golden and crisp.
- Remove from the oven and allow them to cool slightly.
- Dust lightly with powdered sugar before serving.
Notes
- Use high quality ricotta cheese for a smoother and richer filling.
- Do not overfill the pastries to prevent them from bursting while baking.
- If the dough becomes too soft while shaping, chill it briefly before continuing.
- Dust powdered sugar just before serving for the best presentation.
Nutrition
- Serving Size: 1 pastry
- Calories: 290
- Sugar: 16g
- Sodium: 120mg
- Fat: 14g
- Saturated Fat: 8g
- Unsaturated Fat: 5g
- Trans Fat: 0g
- Carbohydrates: 34g
- Fiber: 1g
- Protein: 7g
- Cholesterol: 65mg
Keywords: sfogliatelle, italian pastry, ricotta pastry, crispy italian dessert, neapolitan pastry