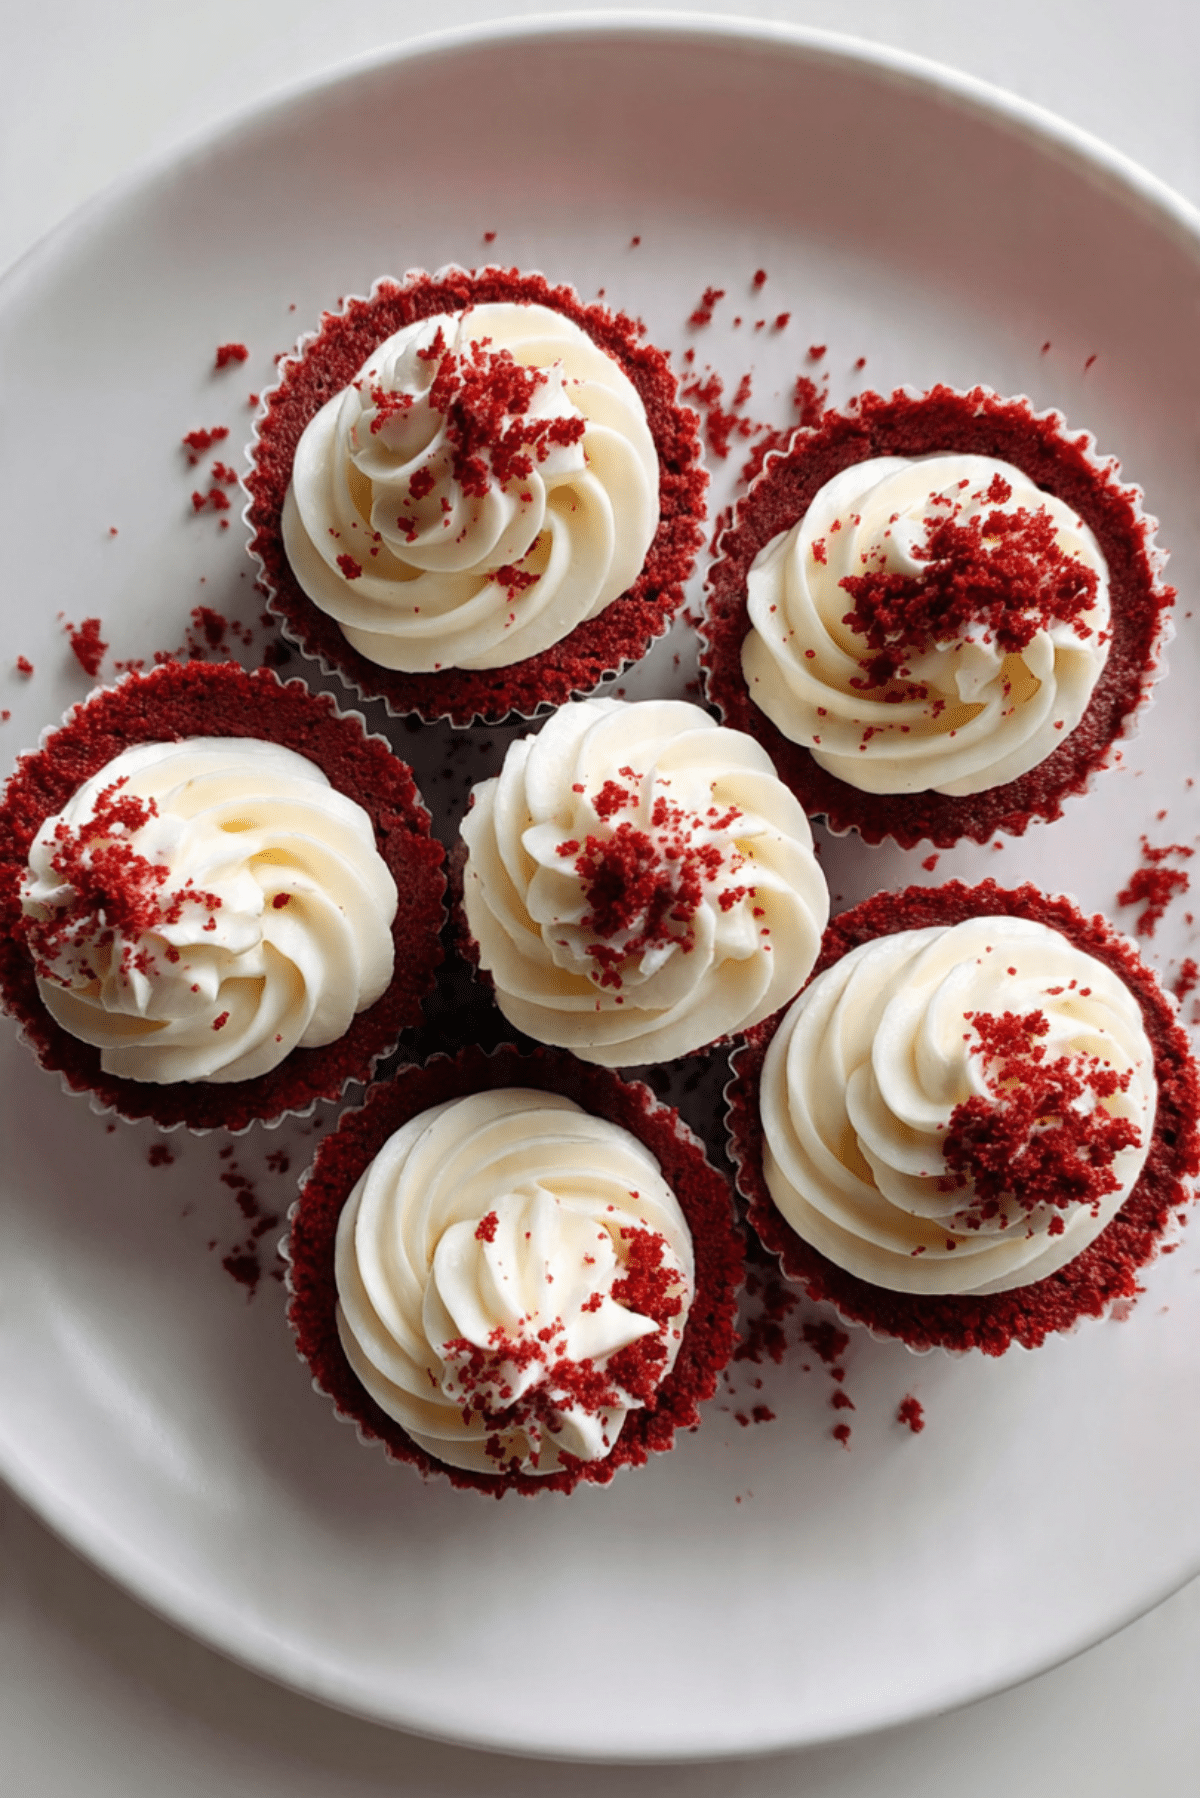
Red Velvet Mini Cheesecakes
There’s something so charming about desserts in miniature form, and these Red Velvet Mini Cheesecakes are no exception. From the velvety smooth filling to the crunchy chocolate crust and the dreamy whipped cream topping, every bite feels like a celebration. Whether you’re preparing for a holiday party, a romantic date night, or just treating yourself on a cozy evening in, these tiny treats pack big flavor in every silky, rich mouthful.
Behind the Recipe
This recipe was born from a craving for something indulgent, but not too heavy. I remember wanting a slice of cheesecake and a slice of red velvet cake at the same time. So I thought, why not combine them? And better yet, why not make them mini for that perfect little portion? The result was love at first bite. The combination of creamy cheesecake and the bold, cocoa-kissed flavor of red velvet, all resting on a crisp cookie crust, makes this one of my go-to desserts for special occasions.
Recipe Origin or Trivia
Red velvet cake has roots in the early 1900s, gaining popularity through the iconic Waldorf Astoria Hotel in New York. Its striking red hue was once the result of a chemical reaction between natural cocoa and acidic ingredients. Over time, food coloring took over, intensifying that rich, ruby color we recognize today. Marrying red velvet with cheesecake is a more modern invention, but it’s one that’s gained massive popularity for its balance of tang, creaminess, and decadence.
Why You’ll Love Red Velvet Mini Cheesecakes
Trust me, you’re going to love this. These bite-sized beauties are more than just adorable — they deliver serious flavor and texture.
Versatile: Perfect for parties, gifts, or personal treats. Serve them chilled or at room temp.
Budget-Friendly: Uses pantry staples and common ingredients.
Quick and Easy: Simple steps and minimal prep make this a no-fuss dessert.
Customizable: Add a swirl of chocolate ganache or a drizzle of caramel to change it up.
Crowd-Pleasing: Everyone loves cheesecake and red velvet, so combining them is always a hit.
Make-Ahead Friendly: They chill beautifully and taste even better the next day.
Great for Leftovers: Store well and make a sweet snack anytime.
Chef’s Pro Tips for Perfect Results
Making cheesecake can be a bit intimidating, but these tips will help you nail it every time.
- Room Temperature Cream Cheese: Make sure it’s fully softened to avoid lumps.
- Don’t Overmix the Batter: Mix just until smooth to keep the texture creamy and avoid air bubbles.
- Use a Muffin Tin with Liners: They help the cheesecakes release easily and give a polished look.
- Cool Gradually: Let them sit in the oven with the door cracked open to prevent cracks.
- Chill Overnight: The flavors deepen and the texture firms up perfectly by the next day.
Kitchen Tools You’ll Need
These tools make the process smooth and stress-free.
Muffin Tin: Standard 12-cup size for perfect minis.
Mixing Bowls: You’ll need at least two — one for crust and one for filling.
Electric Mixer: Handheld or stand mixer for a smooth batter.
Rubber Spatula: To scrape down sides and fold gently.
Measuring Cups and Spoons: Precision is key in baking.
Cupcake Liners: Help keep shape and make serving easy.
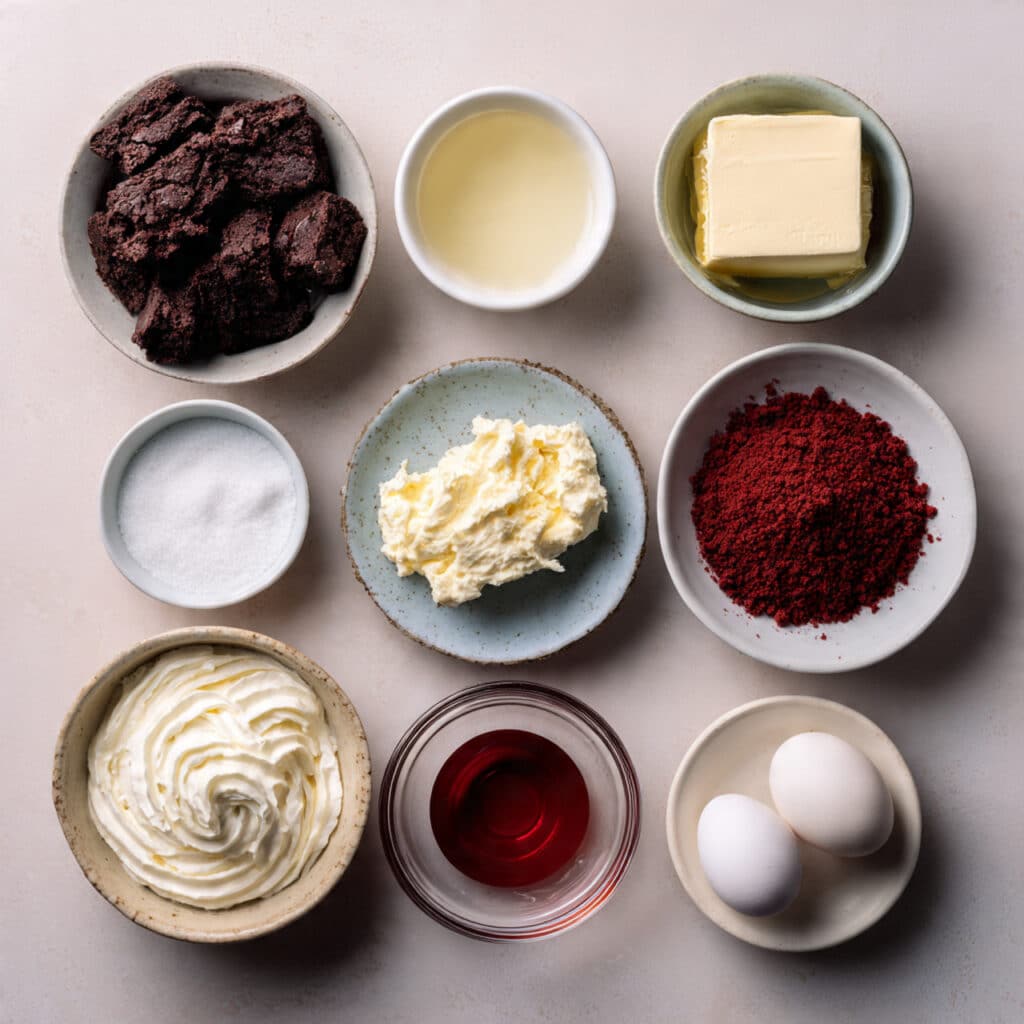
Ingredients in Red Velvet Mini Cheesecakes
Each ingredient plays a role in bringing that creamy, chocolatey, tangy magic together.
- Crushed Chocolate Cookies: 1 cup — forms the crunchy, chocolatey crust foundation.
- Melted Butter: 4 tablespoons — binds the cookie crumbs into a firm crust.
- Cream Cheese: 16 ounces, softened — the rich, creamy base of the filling.
- Granulated Sugar: 3/4 cup — adds sweetness to balance the tang.
- Sour Cream: 1/3 cup — brings that signature tang and lightens the texture.
- Red Food Coloring: 1 tablespoon — gives the cheesecakes their bold, signature hue.
- Cocoa Powder: 2 tablespoons — adds a deep, subtle chocolate flavor.
- Vanilla Extract: 1 teaspoon — enhances and balances the flavors.
- Eggs: 2 large — help set the filling into a creamy, firm texture.
- Whipped Cream: For topping — light and fluffy contrast to the rich filling.
- Red Velvet Cake Crumbs: Optional — perfect for garnishing with extra texture and color.
Ingredient Substitutions
Need a quick swap? These alternatives work great in a pinch.
Chocolate Cookies: Use graham crackers with a spoon of cocoa powder.
Sour Cream: Greek yogurt makes a great stand-in.
Red Food Coloring: Beet juice or natural food colorings can be used for a more natural touch.
Whipped Cream: Coconut whipped topping for a dairy-free version.
Vanilla Extract: Almond extract adds a fun twist.
Ingredient Spotlight
Cream Cheese: The hero of any cheesecake, it gives richness, tang, and that signature dense yet creamy texture.
Cocoa Powder: Just a touch deepens the flavor and brings the red velvet identity to life without overpowering the filling.
Instructions for Making Red Velvet Mini Cheesecakes
Making these little stunners is a breeze once you get into the groove. Here’s how the magic happens:
-
Preheat Your Equipment:
Preheat the oven to 325°F (163°C) and line a muffin tin with 12 paper liners. -
Combine Ingredients:
In a bowl, mix the crushed chocolate cookies and melted butter until well combined. In another bowl, beat cream cheese and sugar until smooth. Add sour cream, cocoa powder, red food coloring, and vanilla. Mix until combined. Add eggs one at a time, mixing gently. -
Prepare Your Cooking Vessel:
Spoon about 1 tablespoon of crust mixture into each liner. Press firmly to create an even base. -
Assemble the Dish:
Pour the cheesecake batter evenly into each cup over the crusts, filling nearly to the top. -
Cook to Perfection:
Bake for 18 to 20 minutes or until centers are just set. Turn off oven, crack the door, and let them cool inside for 10 minutes. -
Finishing Touches:
Remove from oven, let cool to room temperature, then chill in the fridge for at least 4 hours or overnight. -
Serve and Enjoy:
Top with a swirl of whipped cream and a sprinkle of red velvet crumbs before serving.
Texture & Flavor Secrets
These cheesecakes hit every note — creamy and tangy in the center, chocolatey and crunchy at the base, with a light and airy topping. The subtle bitterness of the cocoa balances the sweetness, while the sour cream adds complexity. That little pop of red velvet crumb on top? It brings texture and charm.
Cooking Tips & Tricks
A few helpful tips can make these even better:
- Use a cookie scoop for even batter distribution.
- Don’t skip the chill time — it’s key for the texture.
- Wipe your knife between slices for clean cuts if slicing for serving.
What to Avoid
Avoid these common pitfalls to keep your cheesecakes looking and tasting amazing.
- Overbaking: They should jiggle slightly in the center when done.
- Skipping the cooling step: Prevents cracks and ensures even texture.
- Using cold ingredients: Always start with room temperature for smoother blending.
Nutrition Facts
Servings: 12
Calories per serving: 290
Note: These are approximate values.
Preparation Time
Prep Time: 20 minutes
Cook Time: 20 minutes
Total Time: 40 minutes (plus chilling time)
Make-Ahead and Storage Tips
These mini cheesecakes are actually better when made ahead! Prepare them the day before for perfect texture and flavor. Store in an airtight container in the fridge for up to 5 days. You can freeze them individually and thaw in the fridge overnight. Add whipped cream topping just before serving for best results.
How to Serve Red Velvet Mini Cheesecakes
Serve chilled, topped with a rosette of whipped cream and a sprinkle of crumbs. Pair with a cup of strong coffee, a glass of milk, or even a scoop of vanilla ice cream. Arrange them on a tiered tray for parties or plate individually for a touch of elegance.
Creative Leftover Transformations
Have extras? Here’s how to give them new life:
- Cheesecake Parfait: Crumble and layer with berries and cream in a glass.
- Frozen Cheesecake Bites: Dip in chocolate and freeze for bite-sized treats.
- Dessert Trifle: Layer with brownies, whipped cream, and fruit in a trifle dish.
Additional Tips
- Let them sit out for 10 minutes before serving for the best texture.
- Use a piping bag for whipped cream to get a clean, elegant swirl.
- Add a pinch of sea salt to the crust for extra flavor depth.
Make It a Showstopper
Presentation makes all the difference. Use gold foil cupcake liners for a glam touch. Garnish with a tiny mint leaf or heart-shaped sprinkle on top. Serve on a white platter with scattered red rose petals for a Valentine’s vibe.
Variations to Try
- Chocolate Ganache Topping: Pour a thin layer of ganache before chilling.
- Swirled Cheesecakes: Add a swirl of vanilla batter for contrast.
- Peppermint Twist: Add a drop of peppermint extract for holiday flair.
- Nut Crust: Swap the cookies for crushed pecans and brown sugar.
- Mini Mason Jar Version: Layer crust and filling in small jars for portable desserts.
FAQ’s
Q1: Can I make these without red food coloring?
Yes, they’ll still taste amazing. The color is for visual appeal only.
Q2: How long do they last in the fridge?
Up to 5 days, tightly covered.
Q3: Can I freeze these?
Absolutely. Freeze without toppings and thaw overnight in the fridge.
Q4: What can I use instead of sour cream?
Plain Greek yogurt works wonderfully.
Q5: Do I need a water bath?
Nope. These minis bake evenly without one.
Q6: Can I use a different crust?
Yes, graham cracker or vanilla wafer crumbs are great alternatives.
Q7: How do I know when they’re done?
They should jiggle slightly in the center and be firm around the edges.
Q8: Can I make this recipe in a regular cake pan?
You could try an 8-inch pan, but baking time will be longer and texture may vary.
Q9: What piping tip do you recommend for topping?
A large star tip like Wilton 1M gives a beautiful swirl.
Q10: Do I need to spray the cupcake liners?
Not necessary if using paper liners, but a quick mist helps if you’re skipping them.
Conclusion
Red Velvet Mini Cheesecakes bring together the elegance of red velvet and the indulgence of cheesecake in one perfect bite. These little beauties are eye-catching, delicious, and so simple to make. Whether you’re baking for a special celebration or just because, this recipe is sure to bring smiles all around. Give them a try — they’re worth every bite.
Print
Red Velvet Mini Cheesecakes
- Prep Time: 20 minutes
- Cook Time: 20 minutes
- Total Time: 40 minutes (plus chilling time)
- Yield: 12 mini cheesecakes 1x
- Category: Dessert
- Method: Baking
- Cuisine: American
- Diet: Vegetarian
Description
Rich, creamy, and perfectly portioned, these Red Velvet Mini Cheesecakes feature a chocolate cookie crust, vibrant red velvet filling, and a swirl of whipped cream for an irresistible treat.
Ingredients
- 1 cup crushed chocolate cookies
- 4 tablespoons melted butter
- 16 ounces cream cheese, softened
- 3/4 cup granulated sugar
- 1/3 cup sour cream
- 1 tablespoon red food coloring
- 2 tablespoons cocoa powder
- 1 teaspoon vanilla extract
- 2 large eggs
- Whipped cream, for topping
- Red velvet cake crumbs, for garnish (optional)
Instructions
- Preheat the oven to 325°F (163°C) and line a muffin tin with 12 paper liners.
- Mix crushed chocolate cookies and melted butter in a bowl until fully combined.
- Press about 1 tablespoon of the cookie mixture into the bottom of each liner to form a crust.
- In a separate bowl, beat cream cheese and granulated sugar until smooth.
- Add sour cream, cocoa powder, red food coloring, and vanilla extract. Mix until just combined.
- Add eggs one at a time, mixing gently until incorporated.
- Pour the filling evenly over each crust, filling nearly to the top.
- Bake for 18–20 minutes or until centers are just set. Turn off oven, crack the door, and cool for 10 minutes inside the oven.
- Let cool to room temperature, then refrigerate for at least 4 hours or overnight.
- Top with whipped cream and red velvet crumbs before serving.
Notes
- Use room temperature ingredients for a smooth, lump-free batter.
- Chilling overnight improves texture and flavor.
- Line the muffin tin to prevent sticking and ensure easy removal.
Nutrition
- Serving Size: 1 mini cheesecake
- Calories: 290
- Sugar: 18g
- Sodium: 190mg
- Fat: 20g
- Saturated Fat: 12g
- Unsaturated Fat: 6g
- Trans Fat: 0g
- Carbohydrates: 24g
- Fiber: 1g
- Protein: 4g
- Cholesterol: 70mg
Keywords: red velvet mini cheesecakes, individual cheesecakes, easy mini cheesecake recipe