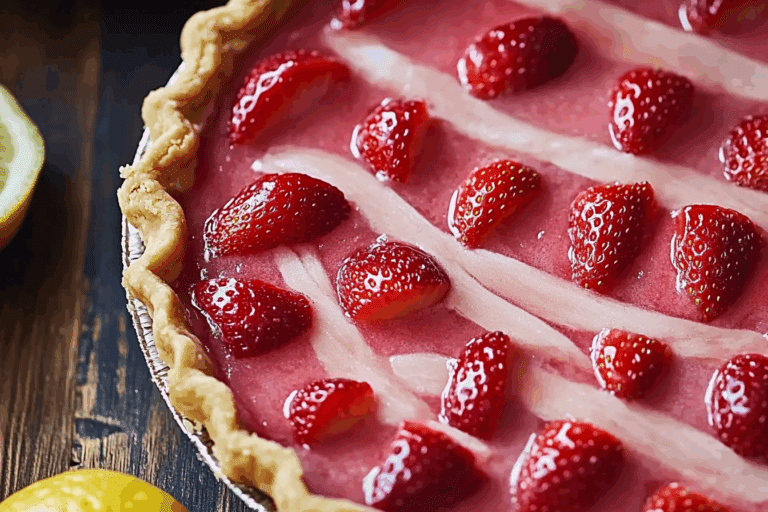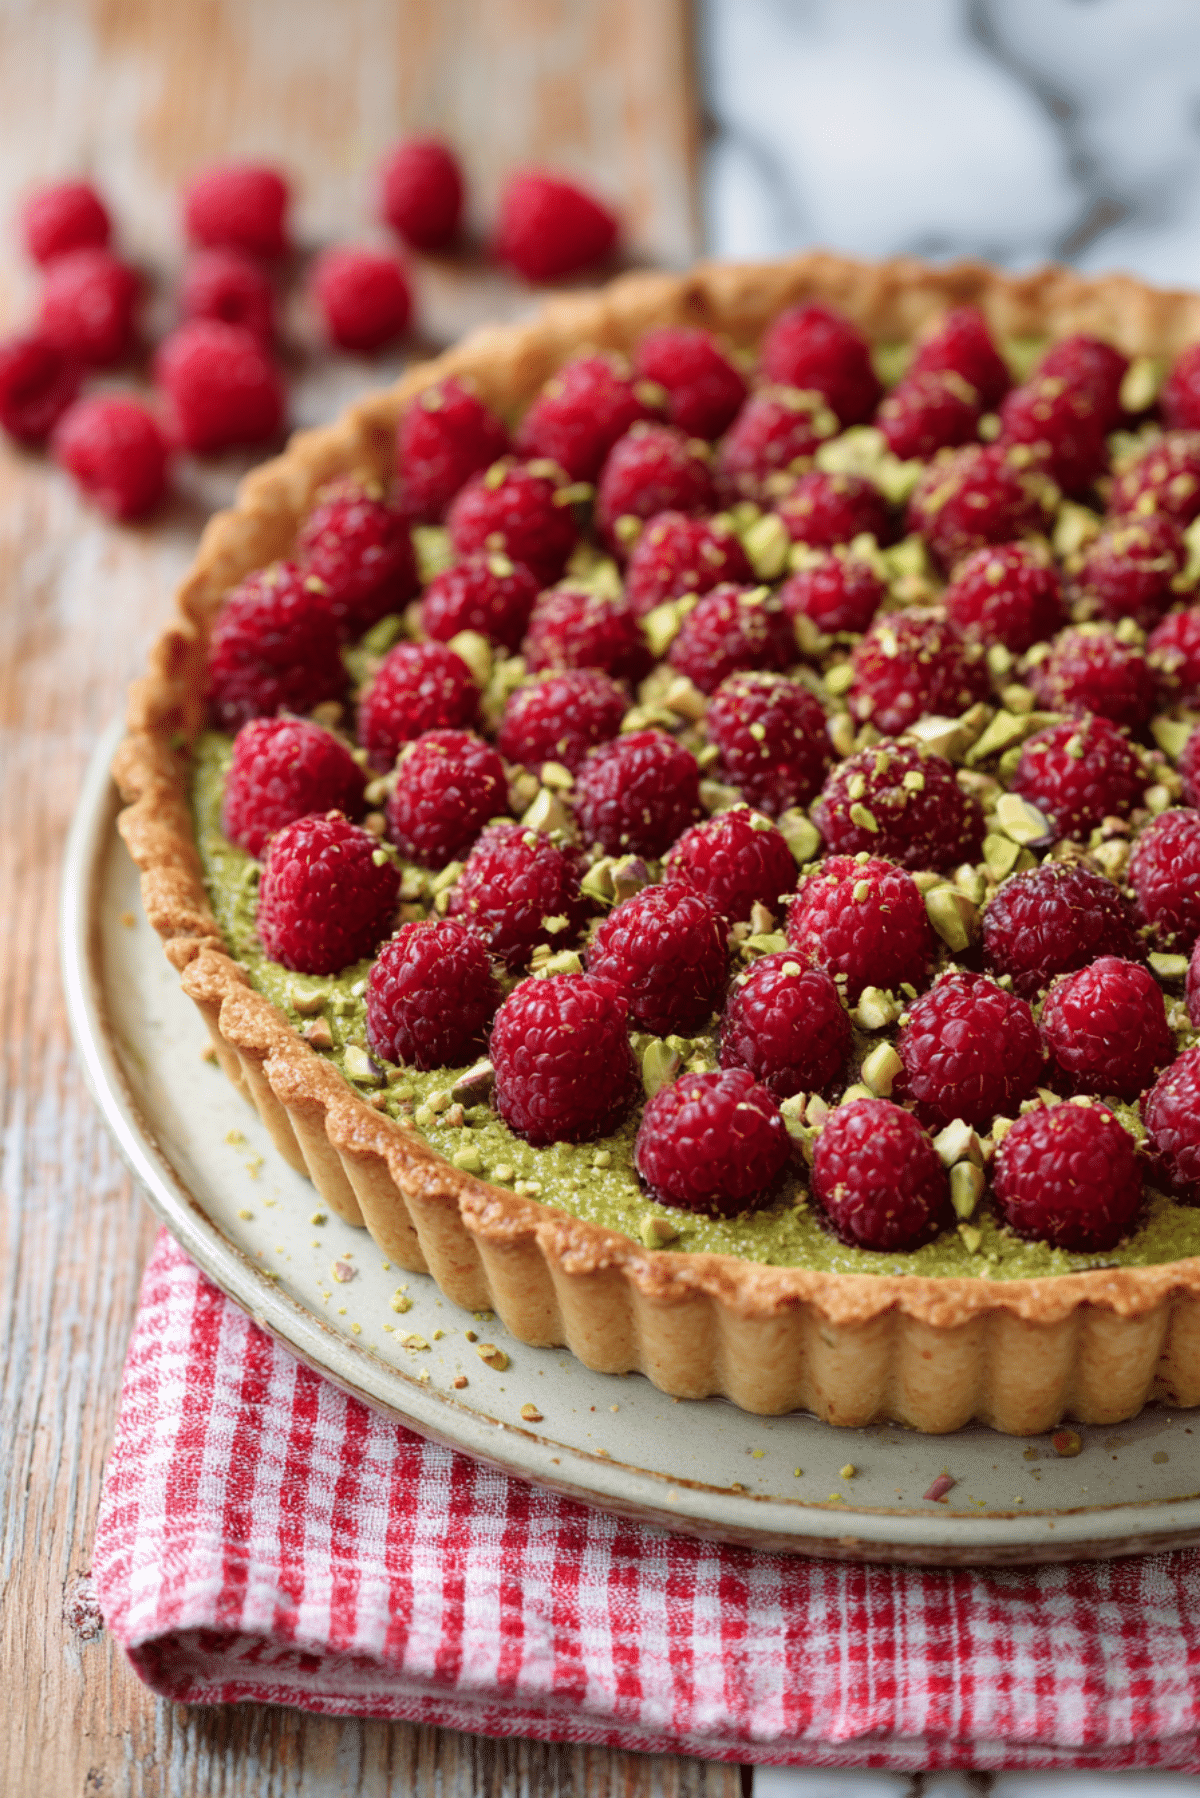
Raspberry Pistachio Frangipane Tart
There’s something truly special about the harmony between juicy raspberries and the rich, nutty essence of pistachios. This Raspberry Pistachio Frangipane Tart brings that contrast to life in the most beautiful way. With its golden flaky crust, vibrant green frangipane filling, and bursts of bright red berries, this tart is both eye-catching and deeply satisfying. From the first slice to the last bite, it feels like a sweet memory unfolding on your plate.
Behind the Recipe
The first time I made this tart, it was a chilly Sunday afternoon with soft jazz playing and the smell of vanilla hanging in the air. I had leftover pistachios and a box of raspberries that were just begging to be used. A classic frangipane seemed like the perfect bridge between the two, and the result was pure magic. It’s one of those desserts that feel a little luxurious without being complicated. Each time I bake it, I’m taken back to that quiet moment of unexpected inspiration.
Recipe Origin or Trivia
Frangipane, a rich almond cream base used in many French tarts, dates back to 16th-century Italy and France. While traditionally almond-based, creative spins like this pistachio version have gained popularity for their vibrant flavor and color. Combining pistachio frangipane with raspberries is a modern patisserie twist often found in high-end bakeries and French cafés. It’s a delightful way to celebrate seasonal fruits while nodding to European pastry traditions.
Why You’ll Love Raspberry Pistachio Frangipane Tart
Warm, sweet, and lightly nutty, this tart checks all the right boxes for a show-stopping dessert or an elegant brunch centerpiece.
Versatile: Perfect for dessert, tea time, or even a sweet brunch dish.
Budget-Friendly: Uses pantry staples and seasonal fruits, so it’s easy on the wallet.
Quick and Easy: The filling comes together in minutes and the tart bakes without fuss.
Customizable: Swap raspberries for blackberries or try a mix of berries.
Crowd-Pleasing: The stunning look and vibrant flavor combo are always a hit.
Make-Ahead Friendly: Can be baked a day in advance and still taste amazing.
Great for Leftovers: Keeps beautifully and tastes even better the next day.
Chef’s Pro Tips for Perfect Results
Creating this tart is straightforward, but a few insider tricks can make it absolutely unforgettable.
- Toast the pistachios before grinding them for deeper flavor.
- Use cold butter when making your tart crust for maximum flakiness.
- Chill your tart dough before baking to prevent shrinkage.
- Don’t overbake the tart or the frangipane will dry out—look for a golden top.
- Brush warm jam over the berries after baking for that glossy finish.
Kitchen Tools You’ll Need
A few trusty tools will make your tart-making experience smooth and enjoyable.
Tart Pan with Removable Bottom: Helps release the tart cleanly.
Food Processor: To blend the pistachio frangipane smoothly.
Mixing Bowls: For combining your ingredients with ease.
Offset Spatula: Perfect for spreading the frangipane evenly.
Pastry Brush: To glaze the tart with jam after baking.
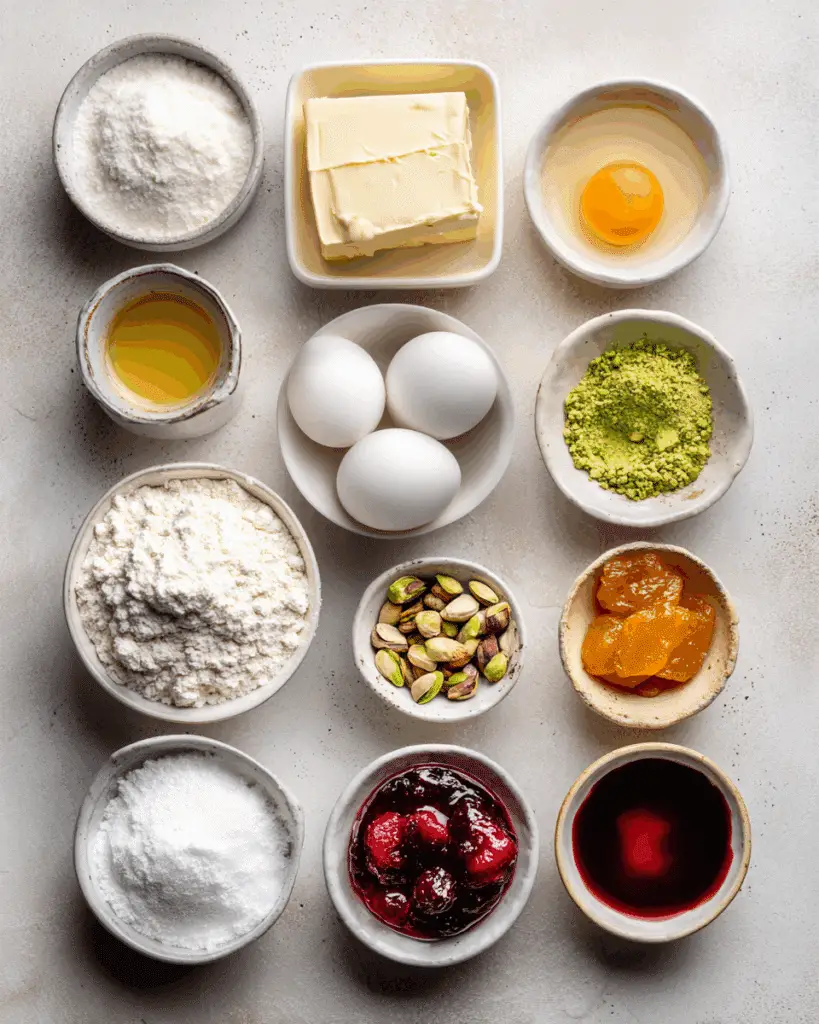
Ingredients in Raspberry Pistachio Frangipane Tart
This tart sings with texture and color thanks to a beautiful blend of ingredients. Here’s what you’ll need:
- All-purpose flour: 1 1/4 cups. Forms the base of a sturdy yet tender crust.
- Unsalted butter: 1/2 cup, cold and cubed. Creates a flaky, buttery pastry.
- Powdered sugar: 1/4 cup. Sweetens the tart crust subtly.
- Egg yolk: 1. Helps bind the crust together.
- Ice water: 2-3 tablespoons. Adds just enough moisture to bring the dough together.
- Shelled pistachios: 3/4 cup. Ground into the frangipane for a nutty richness.
- Granulated sugar: 1/2 cup. Sweetens the frangipane perfectly.
- Unsalted butter: 6 tablespoons, softened. Creates a creamy frangipane base.
- Large egg: 1. Binds the filling and adds richness.
- All-purpose flour: 2 tablespoons. Thickens the frangipane gently.
- Vanilla extract: 1 teaspoon. Adds warmth and depth to the flavor.
- Fresh raspberries: 1 1/2 cups. Juicy, tart bursts of flavor to balance the sweetness.
- Apricot jam: 2 tablespoons. For brushing over the tart to give a shiny finish.
Ingredient Substitutions
If you need to swap something, here are some kitchen-friendly alternatives.
All-purpose flour: Gluten-free flour blend.
Pistachios: Almonds or hazelnuts.
Granulated sugar: Coconut sugar or maple sugar.
Fresh raspberries: Frozen raspberries (thawed and drained).
Apricot jam: Any light-colored jam like peach or apple jelly.
Ingredient Spotlight
Pistachios: Their naturally vibrant green color and distinct, buttery flavor elevate the tart and make the frangipane feel extra luxurious.
Raspberries: Their tartness contrasts beautifully with the rich, nutty filling, and they add that pop of bright, ruby red on top.
Instructions for Making Raspberry Pistachio Frangipane Tart
Let’s roll up our sleeves and start baking. The process is relaxing and oh-so-rewarding.
-
Preheat Your Equipment:
Preheat your oven to 350°F (175°C). Set a rack in the middle of the oven. -
Combine Ingredients:
In a food processor, combine flour, powdered sugar, and butter. Pulse until crumbly. Add egg yolk and ice water, pulsing just until a dough forms. Wrap and chill for 30 minutes. -
Prepare Your Cooking Vessel:
Roll out the chilled dough and press it into a 9-inch tart pan. Trim excess and prick the base with a fork. Chill again for 10 minutes, then blind bake for 15 minutes. Remove weights and bake for 5 more minutes until golden. -
Assemble the Dish:
In the same food processor, blend pistachios and sugar until fine. Add softened butter, egg, flour, and vanilla. Blend until smooth. Spread frangipane into the tart shell, then top with fresh raspberries. -
Cook to Perfection:
Bake for 30–35 minutes until the filling is puffed and golden. Check the edges and cover with foil if browning too quickly. -
Finishing Touches:
While the tart is still warm, brush the raspberries gently with warmed apricot jam for a beautiful shine. -
Serve and Enjoy:
Let the tart cool completely before slicing. Serve with a dollop of whipped cream or enjoy it just as it is.
Texture & Flavor Secrets
The flaky crust crumbles gently under the fork, while the pistachio frangipane offers a rich, slightly chewy bite. Juicy raspberries add bursts of brightness, and the glossy jam finish adds just a touch of sticky sweetness. The balance of sweet, tart, and nutty is what keeps everyone coming back for seconds.
Cooking Tips & Tricks
Let’s make your baking day even better with a few extra pointers.
- Always chill your dough before baking to keep the shape sharp.
- Don’t overfill the tart shell or it may overflow in the oven.
- Warm the jam slightly for easier brushing over the berries.
What to Avoid
Here’s how to sidestep common tart-making mishaps.
- Don’t skip blind baking or the crust might turn soggy.
- Avoid overmixing the frangipane or it can become dense.
- Don’t use wet or frozen berries without draining—moisture will affect the bake.
Nutrition Facts
Servings: 8
Calories per serving: 360
Note: These are approximate values.
Preparation Time
Prep Time: 25 minutes
Cook Time: 35 minutes
Total Time: 1 hour
Make-Ahead and Storage Tips
This tart holds up beautifully when made in advance. You can prepare the crust and even the frangipane filling a day ahead and store them separately. Once baked, the tart stays fresh in the fridge for up to 3 days. If you’d like to freeze it, wrap it tightly and store for up to 1 month. Reheat gently in the oven to restore its crispness.
How to Serve Raspberry Pistachio Frangipane Tart
Serve slices at room temperature with a dusting of powdered sugar or a swirl of whipped cream. For a fancier touch, add a drizzle of raspberry coulis or pair with a scoop of vanilla bean ice cream. A warm cup of Earl Grey or a chilled glass of almond milk makes the perfect pairing.
Creative Leftover Transformations
Turn any leftover slices into a next-day delight.
- Cube and layer with yogurt for a parfait.
- Crumble over vanilla ice cream as a fancy topping.
- Toast a slice lightly and spread with mascarpone for a decadent breakfast.
Additional Tips
Little details can elevate your tart from great to unforgettable.
- Let the tart cool fully before slicing to get clean cuts.
- Use a serrated knife for best results when cutting through berries.
- Always taste your pistachios before using—rancid nuts can ruin the flavor.
Make It a Showstopper
To wow your guests, garnish the tart with finely chopped pistachios around the edges and a few fresh mint leaves in the center. Serve on a decorative cake stand or slate board with gold dessert forks. A light dusting of powdered sugar or edible flowers adds a final flourish.
Variations to Try
Let your creativity guide you with these fun twists.
- Mixed Berry Tart: Combine raspberries with blueberries and blackberries.
- Almond Frangipane: Swap pistachios for blanched almonds for a classic touch.
- Chocolate Swirl: Add a few dollops of dark chocolate ganache before baking.
- Gluten-Free Version: Use a gluten-free flour blend in both crust and filling.
- Citrus Zest: Add orange or lemon zest to the frangipane for a citrusy lift.
FAQ’s
Q1: Can I make the tart crust ahead of time?
Yes, the dough can be made and refrigerated up to 2 days in advance.
Q2: Can I freeze the baked tart?
Absolutely. Wrap it well and freeze for up to a month.
Q3: What can I use instead of apricot jam?
Peach or apple jelly works well too, just choose a light-colored jam.
Q4: How do I know when the tart is fully baked?
The filling should be puffed and lightly golden, and the edges of the crust crisp.
Q5: Can I use salted pistachios?
It’s better to use unsalted to control the tart’s overall flavor.
Q6: Can I use store-bought crust?
Yes, if you’re short on time, a good quality store-bought crust works fine.
Q7: Do I need to soak the pistachios?
No soaking is needed—just toast them slightly for better flavor.
Q8: Can I use almond flour instead of ground pistachios?
Yes, it will change the flavor but still work beautifully.
Q9: What’s the best way to store leftovers?
Refrigerate in an airtight container for up to 3 days.
Q10: How can I make it dairy-free?
Use vegan butter in the crust and filling.
Conclusion
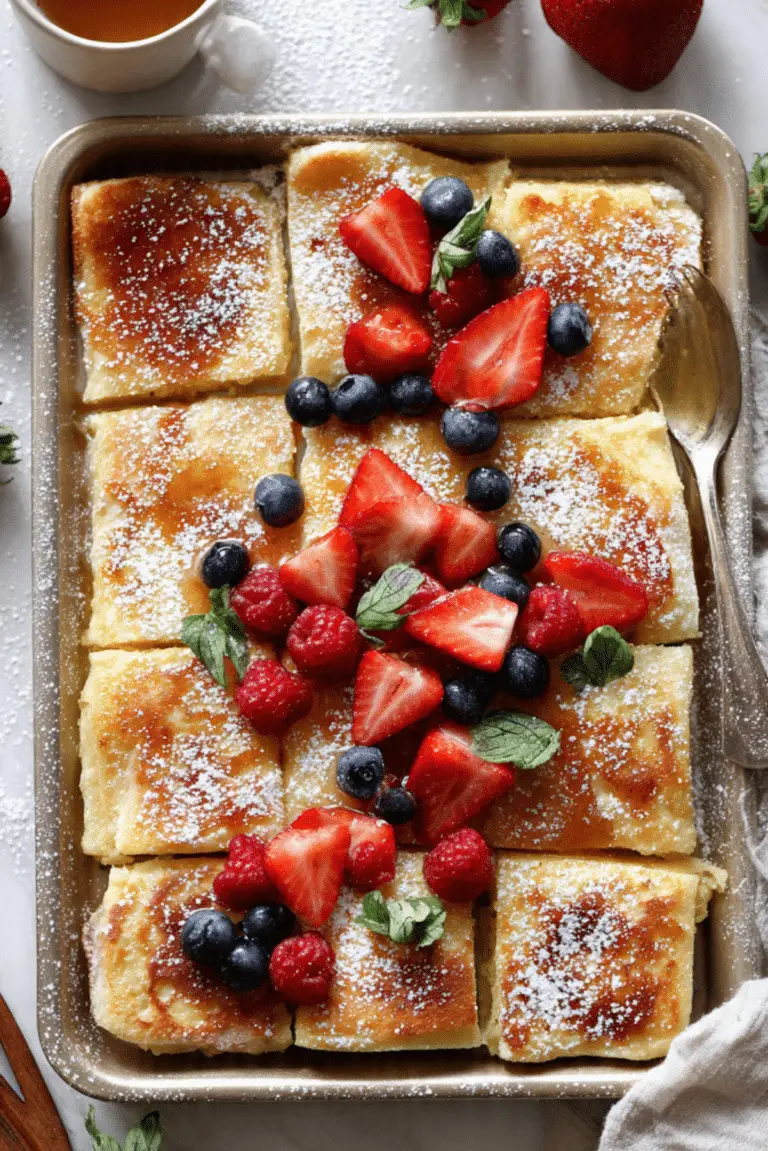
This Raspberry Pistachio Frangipane Tart is the kind of dessert that brings people together. It’s as pleasing to the eye as it is to the taste buds, with that irresistible mix of sweet, tart, and nutty. Whether you’re baking it for a special occasion or just because you deserve a treat, trust me, you’re going to love this one. It’s worth every bite.There’s something undeniably magical about the first whiff of freshly baked garlic bread wafting from the oven. Now, take that buttery, garlicky comfort and swirl in luscious cream cheese, and you’ve got a twist that’s as indulgent as it is irresistible. Cream Cheese Garlic Bread isn’t just a snack, it’s the kind of cozy, creamy goodness you dream about after a long day. With its crisp edges, gooey center, and fragrant herbs, this is the kind of bread that gets devoured before it even hits the table.
Behind the Recipe
This one takes me back to a chilly evening in Seoul, where street vendors handed out warm buns bursting with creamy, garlicky filling. The contrast between the slightly crisp crust and that melty interior had me hooked in seconds. I knew I had to recreate that flavor bomb back home, and after a few delicious experiments, this recipe was born. It’s become my go-to whenever I need something comforting yet slightly decadent. It’s street food meets homemade soul.
Recipe Origin or Trivia
Cream Cheese Garlic Bread, while it may sound like a fusion invention, actually gained massive popularity in South Korea. The version you’ll find in Korean bakeries is usually made with a round bread roll, sliced like a blooming flower, stuffed with a rich cream cheese filling, and dunked in a garlicky butter bath before baking. It’s that perfect blend of East-meets-West, drawing from classic garlic bread roots while embracing the smooth tang of cream cheese. This recipe captures that bakery magic right from your own kitchen.
Why You’ll Love Cream Cheese Garlic Bread
This bread is more than just tasty. It’s a guaranteed crowd-pleaser that ticks all the right boxes.
Versatile: Works as a snack, appetizer, or indulgent side to soups and pasta.
Budget-Friendly: Uses simple, pantry staples you likely already have.
Quick and Easy: With a little prep, the oven does most of the work.
Customizable: You can tweak the herbs, cheese blend, or even bread type.
Crowd-Pleasing: No one says no to warm, melty garlic bread. Trust me.
Make-Ahead Friendly: Prepare the filling or even the full bread ahead and bake when ready.
Great for Leftovers: If there are any, they reheat beautifully and taste just as good the next day.
Chef’s Pro Tips for Perfect Results
To make your bread bakery-worthy, keep these tips in mind:
- Use room-temperature cream cheese so it blends smoothly with the other filling ingredients.
- Choose the right bread — a round, slightly firm roll holds up best after slicing and filling.
- Don’t skip the egg yolk in the filling — it adds richness and helps bind everything together.
- Brush generously with garlic butter to get that golden, glossy, flavorful finish.
- Bake until bubbly and browned — underbaking will leave the center too soft and wet.
Kitchen Tools You’ll Need
You won’t need anything fancy, just a few kitchen staples.
Mixing Bowls: For preparing the cream cheese filling and garlic butter.
Sharp Knife: To slice the bread without tearing it.
Baking Sheet: Lined with parchment to catch drips and ensure even baking.
Pastry Brush: For evenly spreading the garlic butter mixture.
Oven: Preheated and ready to melt everything into magic.
Ingredients in Cream Cheese Garlic Bread
The beauty of this recipe lies in how each ingredient plays its part in building flavor and texture.
- Round Bread Rolls: 4 medium-sized, slightly firm — perfect shape and structure to hold filling without collapsing.
- Cream Cheese: 8 oz, softened — the star filling that adds richness and creaminess.
- Powdered Sugar: 2 tablespoons — adds a subtle sweetness to balance the garlic.
- Egg Yolk: 1 large — for added creaminess and binding.
- Heavy Cream: 2 tablespoons — loosens the filling for easy piping.
- Mozzarella Cheese (optional): ½ cup shredded — for a cheesy pull factor.
- Unsalted Butter: ½ cup melted — the base of the garlic butter bath.
- Fresh Garlic: 6 cloves minced — the heart of the flavor, use plenty.
- Parsley: 1 tablespoon chopped — adds color and freshness.
- Salt: ¼ teaspoon — enhances all the other flavors.
- Black Pepper: ⅛ teaspoon — a little kick to balance the sweetness.
- Grated Parmesan (optional): 2 tablespoons — for a savory, cheesy top layer.
Ingredient Substitutions
Need to tweak a few things? No problem.
Cream Cheese: Mascarpone or ricotta for a softer texture.
Powdered Sugar: Use honey or maple syrup for natural sweetness.
Heavy Cream: Milk or sour cream can work in a pinch.
Parsley: Swap with chives or dried Italian herbs.
Butter: Try ghee or a plant-based butter for dairy-free options.
Ingredient Spotlight
Cream Cheese: The creamy center of this recipe. Its rich texture and tangy flavor balance the savory garlic perfectly.
Fresh Garlic: Not powdered, not pre-minced. Real garlic gives this bread its irresistible aroma and depth.
Instructions for Making Cream Cheese Garlic Bread
Let’s get into the fun part — building your garlic bread masterpiece. Follow these steps to get that bakery-style result.
-
Preheat Your Equipment:
Set your oven to 350°F (175°C) and line a baking sheet with parchment paper. -
Combine Ingredients:
In a bowl, mix softened cream cheese, powdered sugar, egg yolk, and heavy cream until smooth. Add in mozzarella if using. In another bowl, mix melted butter, minced garlic, chopped parsley, salt, pepper, and parmesan. -
Prepare Your Cooking Vessel:
Have your baking sheet ready. Place each roll on the sheet with enough space between for spreading. -
Assemble the Dish:
Cut each roll into six wedges without slicing all the way through. Pipe or spoon cream cheese filling into each cut. Spoon the garlic butter mixture all over each roll, making sure it gets into the crevices. -
Cook to Perfection:
Bake for 15 to 18 minutes, or until tops are golden and cheese is bubbling. -
Finishing Touches:
Let cool slightly. Sprinkle with more parsley or parmesan if desired. -
Serve and Enjoy:
Serve warm and gooey, straight from the oven. Perfect with soup or on its own.
Texture & Flavor Secrets
This bread hits all the right notes. The outside is crispy from the garlic butter, while the inside stays soft and fluffy. That creamy filling adds a contrast that’s both smooth and rich, and the garlic brings a bold flavor kick that lingers beautifully. The hint of sweetness rounds everything out for the ultimate bite.
Cooking Tips & Tricks
These small tips go a long way.
- Use a piping bag or zip-top bag with the corner snipped for easy filling.
- Don’t overbake — it’ll dry out the filling and toughen the bread.
- Double the filling and freeze it for next time.
- Add a little chili flake to the garlic butter for a spicy edge.
What to Avoid
Even the best recipes can go sideways. Here’s what to skip:
- Cutting the bread too deep — it’ll fall apart when filled.
- Using cold cream cheese — it’ll stay lumpy and hard to spread.
- Skimping on the garlic butter — it needs that richness to carry the flavor.
- Overcrowding the tray — give the rolls room to crisp up.
Nutrition Facts
Servings: 4
Calories per serving: 410
Note: These are approximate values.
Preparation Time
Prep Time: 15 minutes
Cook Time: 18 minutes
Total Time: 33 minutes
Make-Ahead and Storage Tips
Want to prep ahead? You can! Mix your filling up to 3 days in advance and keep it in the fridge. Assemble the bread a few hours before baking and store covered in the fridge. Leftovers? Wrap tightly and refrigerate for up to 3 days. To reheat, pop in a 325°F oven for 5 to 7 minutes — tastes freshly baked all over again.
How to Serve Cream Cheese Garlic Bread
Serve it warm, oozing with filling, as a side to creamy soups like tomato or mushroom. It’s also a hit on party platters, paired with dipping sauces like marinara or even honey mustard for a sweet-savory combo.
Creative Leftover Transformations
Got extra bread? Don’t toss it — try this:
- Slice and toast for garlic bread croutons.
- Tear into chunks and toss into a salad.
- Reheat with a fried egg on top for a savory breakfast twist.
- Slice and stuff into a grilled cheese sandwich.
Additional Tips
For an even deeper flavor, roast your garlic before mixing into the butter. And if you’re feeling adventurous, mix in chopped sun-dried tomatoes or caramelized onions for a gourmet flair.
Note: Always use fresh herbs for the most vibrant flavor.
Make It a Showstopper
Want to wow your guests? Serve each bread in its own parchment wrap with a sprinkle of sea salt on top. Add a sprig of parsley or thyme for garnish. Stack them in a rustic basket lined with cloth for a bakery-style presentation.
Variations to Try
- Cheddar Jalapeño: Add shredded cheddar and chopped jalapeños to the filling.
- Herb Explosion: Use thyme, rosemary, and oregano for an earthy twist.
- Sweet Cinnamon Cream Cheese: Swap garlic with cinnamon sugar for a dessert version.
- Spinach Artichoke: Mix in chopped spinach and artichokes into the filling.
- Everything Bagel Style: Top with everything seasoning before baking.
FAQ’s
Q1. Can I use store-bought garlic butter?
A1. Yes, but homemade gives a fresher, richer flavor.
Q2. Can I freeze the assembled bread?
A2. Absolutely. Freeze unbaked, then bake straight from the freezer adding a few minutes.
Q3. What kind of bread works best?
A3. A round, semi-firm bun like brioche or dinner rolls hold up well.
Q4. How can I make it vegetarian?
A4. It already is, just skip the parmesan if you prefer dairy-free.
Q5. Can I make it spicy?
A5. Yes! Add chili flakes or a pinch of cayenne to the butter mix.
Q6. What if I don’t have a piping bag?
A6. Use a zip-top bag with a snipped corner or spoon it in gently.
Q7. Can I use flavored cream cheese?
A7. Definitely. Herb or garlic cream cheese works great.
Q8. Is this okay to serve at room temperature?
A8. Best served warm, but still delicious slightly cooled.
Q9. What’s the best way to reheat?
A9. Use an oven at 325°F for 5 to 7 minutes to regain crispness.
Q10. Can I make mini versions for parties?
A10. Yes, use smaller rolls and reduce baking time slightly.
Conclusion
Cream Cheese Garlic Bread is everything comfort food should be — rich, gooey, garlicky, and just a little indulgent. It brings people together, makes kitchens smell incredible, and disappears faster than you can say “just one more bite.” Whether you’re making it for guests, family, or just a night in with your favorite show, trust me, this one’s a total game-changer.
Print
Raspberry Pistachio Frangipane Tart
- Prep Time: 25 minutes
- Cook Time: 35 minutes
- Total Time: 1 hour
- Yield: 8 servings
- Category: Dessert
- Method: Baking
- Cuisine: French
- Diet: Vegetarian
Description
A stunning tart with a flaky crust, rich pistachio frangipane filling, and juicy raspberries glazed in apricot jam. Perfect for a special dessert or brunch centerpiece.
Ingredients
- All-purpose flour: 1 1/4 cups – Forms the base of a sturdy yet tender crust
- Unsalted butter: 1/2 cup, cold and cubed – Creates a flaky, buttery pastry
- Powdered sugar: 1/4 cup – Sweetens the tart crust subtly
- Egg yolk: 1 – Helps bind the crust together
- Ice water: 2-3 tablespoons – Adds just enough moisture to bring the dough together
- Shelled pistachios: 3/4 cup – Ground into the frangipane for a nutty richness
- Granulated sugar: 1/2 cup – Sweetens the frangipane perfectly
- Unsalted butter: 6 tablespoons, softened – Creates a creamy frangipane base
- Large egg: 1 – Binds the filling and adds richness
- All-purpose flour: 2 tablespoons – Thickens the frangipane gently
- Vanilla extract: 1 teaspoon – Adds warmth and depth to the flavor
- Fresh raspberries: 1 1/2 cups – Juicy, tart bursts of flavor to balance the sweetness
- Apricot jam: 2 tablespoons – For brushing over the tart to give a shiny finish
Instructions
- Preheat Your Equipment: Preheat your oven to 350°F (175°C). Set a rack in the middle of the oven.
- Combine Ingredients: In a food processor, combine flour, powdered sugar, and butter. Pulse until crumbly. Add egg yolk and ice water, pulsing just until a dough forms. Wrap and chill for 30 minutes.
- Prepare Your Cooking Vessel: Roll out the chilled dough and press it into a 9-inch tart pan. Trim excess and prick the base with a fork. Chill again for 10 minutes, then blind bake for 15 minutes. Remove weights and bake for 5 more minutes until golden.
- Assemble the Dish: In the same food processor, blend pistachios and sugar until fine. Add softened butter, egg, flour, and vanilla. Blend until smooth. Spread frangipane into the tart shell, then top with fresh raspberries.
- Cook to Perfection: Bake for 30–35 minutes until the filling is puffed and golden. Check the edges and cover with foil if browning too quickly.
- Finishing Touches: While the tart is still warm, brush the raspberries gently with warmed apricot jam for a beautiful shine.
- Serve and Enjoy: Let the tart cool completely before slicing. Serve with a dollop of whipped cream or enjoy it just as it is.
Notes
- Chill your tart dough before baking to prevent shrinkage.
- Toast pistachios lightly before grinding for better flavor.
- Use a serrated knife to cut through the berries cleanly.
Nutrition
- Serving Size: 1 slice
- Calories: 360
- Sugar: 18g
- Sodium: 40mg
- Fat: 22g
- Saturated Fat: 10g
- Unsaturated Fat: 10g
- Trans Fat: 0g
- Carbohydrates: 35g
- Fiber: 3g
- Protein: 6g
- Cholesterol: 55mg
Keywords: Raspberry tart, Pistachio frangipane, French tart, Elegant dessert, Fruit tart recipe