Flower Soft Bread Milk Rolls
There is something extra comforting about pulling apart a tray of warm, cloud-like bread that looks as lovely as it tastes. These soft, lightly sweet milk rolls bake up with a golden shine, feathery crumb, and delicate flower shape that makes the whole kitchen feel cozy before the first bite even happens. Trust me, you’re going to love this, especially when you tear one open and see that tender, steamy center.
Why These Soft Rolls Feel So Special
Some breads are all about crust and chew, but these rolls lean into softness in the best possible way. They are plush, buttery, and gently rich from milk, egg, and butter, which gives them that bakery-style texture people always hope for but do not always get at home. The flower shape also makes them feel just a little festive, which means they fit just as easily on a holiday table as they do next to a quiet afternoon cup of tea.
What I love most is how approachable they feel. You get that beautiful pull-apart look without needing fancy shaping skills, and the dough is soft enough to feel luxurious while still being friendly to work with. This one’s a total game-changer when you want homemade bread that looks impressive but still feels comforting and familiar.
A Little Story Behind Milk-Enriched Bread
Milk breads have long been loved in different parts of the world for their extra-soft texture and gentle richness. The idea of enriching dough with milk, butter, and eggs shows up in many baking traditions, from pillowy Japanese-style milk bread to tender European breakfast buns and soft celebratory rolls shaped for gatherings and family tables.
The flower shaping adds a decorative touch that feels old-fashioned in the nicest way. Bread has always had a way of becoming part food, part centerpiece, and these rolls really capture that. They feel homemade, generous, and welcoming, which is exactly what good bread should do.
Why You’ll Keep Coming Back to This Bake
Before we get into the mixing bowl and flour dust, let me tell you why this recipe earns a permanent spot in the baking rotation.
Versatile: These rolls work with breakfast, brunch, dinner, or dessert. They are just as lovely with jam as they are with soup or a swipe of soft butter.
Budget-Friendly: The ingredient list is made from basics you probably already know well. Flour, milk, yeast, egg, butter, and sugar come together into something that feels far more special than the cost suggests.
Quick and Easy: For enriched bread, this process is wonderfully manageable. The dough is simple to mix, the shaping is easier than it looks, and the oven does the rest.
Customizable: You can brush them with extra butter, sprinkle on sesame seeds, or keep them plain and glossy. The dough is a lovely base for little tweaks.
Crowd-Pleasing: Soft bread almost never lasts long on the table, and these disappear especially fast. Everyone reaches for the flower-shaped one, then realizes they all are.
Make-Ahead Friendly: You can prepare the dough ahead and chill it after the first rise, which makes baking day feel much smoother.
Great for Leftovers: Any extras stay soft enough for sandwiches, breakfast rolls, or a quick warm snack the next day.
Baker’s Secrets That Make a Big Difference
A soft bread like this is simple, but a few little details can take it from good to absolutely dreamy.
- Use warm milk, not hot milk: You want it pleasantly warm to wake up the yeast, not hot enough to stress it.
- Knead until the dough turns smooth and elastic: At first it may look sticky and uneven, but keep going. That stretch and shine are what give the rolls their pillowy texture.
- Let the dough rise until puffy, not just timed: Kitchens vary, so trust the look of the dough more than the clock.
- Shape evenly sized pieces: This helps every petal bake at the same rate and keeps the flower design neat.
- Brush gently with egg wash: That light coating gives the tops their glossy golden finish without weighing the dough down.
The Kitchen Helpers You’ll Want Nearby
Before the dough comes together, it helps to have everything ready so the process feels calm and easy.
Large Mixing Bowl: This gives the dough enough room to mix and rise comfortably.
Stand Mixer with Dough Hook: It makes kneading easier, though you can absolutely knead by hand if you enjoy that part.
Measuring Cups and Spoons: Accurate measuring keeps the dough balanced and dependable.
Kitchen Scale: This is especially helpful for dividing equal dough pieces for that flower look.
9-Inch Round Cake Pan: A round pan frames the flower arrangement beautifully and helps the rolls rise upward.
Pastry Brush: Perfect for brushing on the egg wash for that shiny top.
Clean Kitchen Towel or Plastic Wrap: This keeps the dough from drying out while it rises.
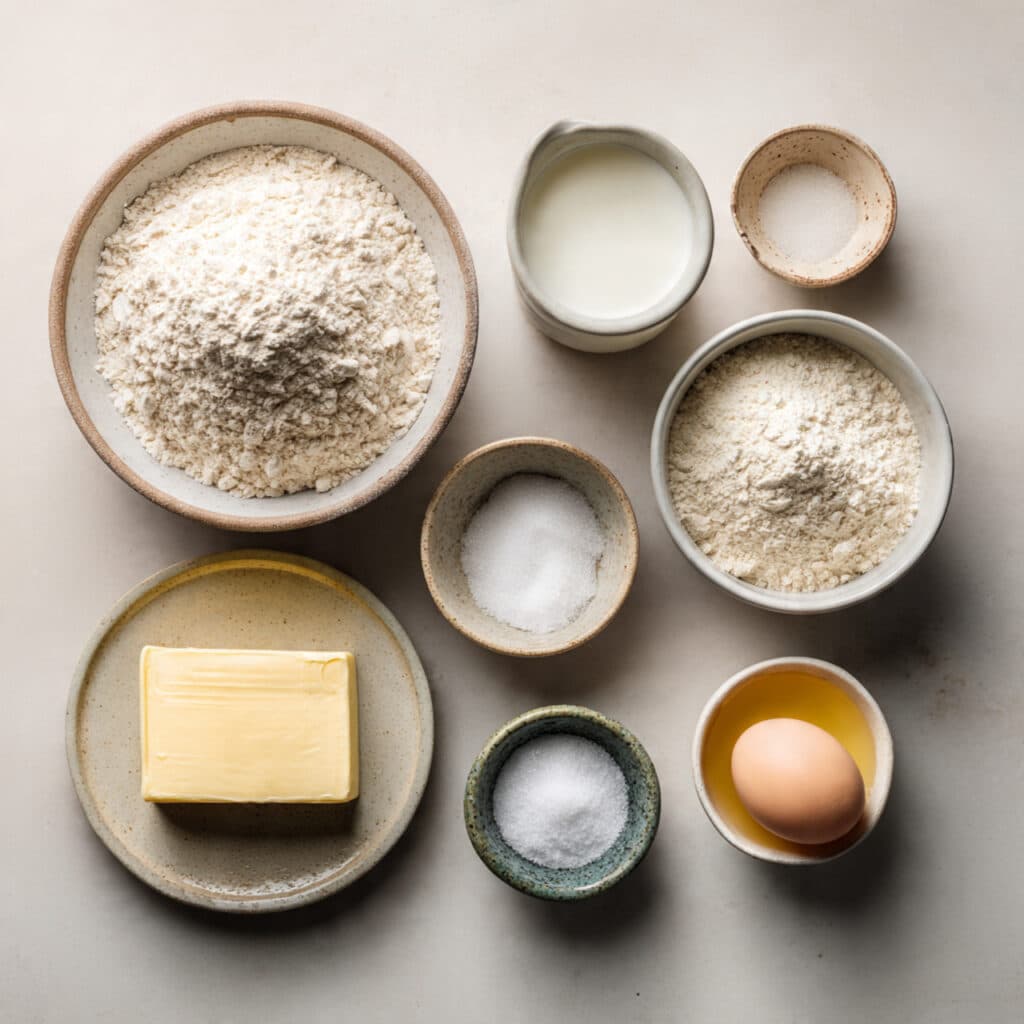
The Ingredients That Build All That Softness
Now let’s dive into the heart of it, because every ingredient here has a job to do and together they create that delicate, fluffy bite that makes these rolls so memorable.
- Bread Flour: 3 1/4 cups, 390 g. This gives the dough enough structure to rise beautifully while still staying wonderfully soft.
- Granulated Sugar: 1/4 cup, 50 g. It adds gentle sweetness and helps the yeast get going.
- Instant Yeast: 2 1/4 teaspoons, 7 g. This is what gives the dough its airy lift and light texture.
- Fine Salt: 1 teaspoon, 6 g. Salt rounds out the flavor so the rolls do not taste flat.
- Whole Milk, warm: 3/4 cup, 180 ml. Milk brings richness, tenderness, and that classic soft crumb.
- Large Egg: 1. This adds color, structure, and a little extra richness to the dough.
- Unsalted Butter, softened: 1/4 cup, 56 g. Butter makes the dough silky and gives the finished rolls a delicate, buttery finish.
- Egg Wash, for topping: 1 large egg beaten with 1 tablespoon milk. This creates the glossy golden surface that makes the rolls look bakery-beautiful.
Easy Swaps That Still Work Beautifully
Even a cozy bread like this can flex a little, which is always nice when you are working with what is already in the kitchen.
Bread Flour: All-purpose flour, though the texture will be slightly less chewy and lofty.
Whole Milk: 2 percent milk, though the crumb may be a touch less rich.
Unsalted Butter: Salted butter, just reduce the added salt slightly.
Instant Yeast: Active dry yeast, use the same amount and give it a few minutes to bloom in the warm milk first.
Egg Wash: Milk only, if you want a softer and less shiny finish.
The Ingredients That Really Make the Magic Happen
A few ingredients do the heavy lifting here, and they deserve a little spotlight before we bake.
Whole Milk: This is where the dough gets much of its tenderness and gentle richness. It helps create that soft, almost feathery interior that makes every bite feel extra comforting.
Unsalted Butter: Butter works its way through the dough and softens everything from texture to flavor. It is the reason the rolls taste warm and mellow instead of plain.
Let’s Shape and Bake These Beauty-Filled Rolls
And now the fun part begins, because this is where flour and butter turn into something soft, shiny, and impossible to resist. Here are the steps you’re going to follow.
- Preheat Your Equipment: Preheat your oven to 350°F, 175°C, when the rolls are nearly done with their second rise. Lightly grease a 9-inch round cake pan so the baked rolls release easily.
- Combine Ingredients: In a large mixing bowl, combine the bread flour, sugar, instant yeast, and salt. Add the warm milk, 1 egg, and softened butter. Mix until a shaggy dough forms, then knead for 8 to 10 minutes until the dough becomes smooth, stretchy, and slightly tacky.
- Prepare Your Cooking Vessel: Transfer the dough to a lightly greased bowl, cover it, and let it rise for 60 to 75 minutes, or until doubled in size. While it rises, make sure your pan is greased and ready.
- Assemble the Dish: Punch down the dough gently and divide it into 9 equal portions. For each roll, pinch or tuck the dough slightly so the top forms soft petal-like curves. Arrange one in the center of the pan and place the remaining pieces around it to create a flower-inspired pattern. Cover and let rise again for 30 to 40 minutes until puffy.
- Cook to Perfection: Brush the tops gently with the egg wash. Bake for 20 to 22 minutes, until the tops are evenly golden and the rolls sound lightly hollow when tapped.
- Finishing Touches: Remove the pan from the oven and let the rolls cool for 10 minutes. If you want an even softer finish, brush the tops lightly with a little melted butter while still warm.
- Serve and Enjoy: Pull the rolls apart while they are still slightly warm and serve with butter, jam, honey, or your favorite savory spread. Let me tell you, it’s worth every bite.
What Makes the Texture and Flavor So Irresistible
The first thing you notice is the top, glossy and golden with just enough color to hint at the softness underneath. Then you pull one apart and the inside stretches into fine, tender strands that feel almost fluffy enough to float. That contrast between the lightly baked surface and the soft interior is what makes these so satisfying.
Flavor-wise, the dough stays gentle and balanced. The milk and butter bring warmth and richness, the sugar adds just a whisper of sweetness, and the salt keeps everything grounded. Nothing shouts, which is exactly why the whole thing tastes so complete.
Handy Tips for Bread Success
A soft enriched dough rewards a little care, and these tips help keep everything smooth from start to finish.
- Let the dough stay slightly tacky: Dry dough makes dry rolls, so resist the urge to add too much extra flour.
- Rise in a cozy spot: A slightly warm kitchen helps the dough puff up evenly and develop a softer texture.
- Check color near the end: If the tops are browning too fast, loosely tent the pan with foil for the last few minutes.
- Cool just enough before pulling apart: Warm rolls are wonderful, but giving them a short rest helps the crumb set properly.
What to Avoid for the Softest Results
Bread baking gets easier once you know the little traps to sidestep, and thankfully these are simple ones.
- Do not overheat the milk: Hot milk can weaken or kill the yeast, which leads to dense rolls.
- Do not rush the rise: Under-proofed dough will bake up tight and less fluffy.
- Do not overload with flour during kneading: The dough should be soft and supple, not stiff.
- Do not overbake: A few extra minutes can dry out the crumb, so start checking right around the 20-minute mark.
A Quick Look at the Nutrition
Before you reach for a second one, and honestly I would not blame you, here is the general nutrition picture.
Servings: 9 rolls
Calories per serving: 210
Note: These are approximate values.
Timing It All Out
Now that you know what goes into each soft bite, here is how the full baking journey breaks down.
Prep Time: 1 hour 45 minutes
Cook Time: 22 minutes
Total Time: 2 hours 7 minutes
Make-Ahead and Storage Tips
One of my favorite things about this bread is that it works around real life quite nicely. You can prepare the dough, let it complete the first rise, then cover it and refrigerate it overnight. The next day, let it sit at room temperature for about 30 minutes before shaping.
Once baked, store the rolls in an airtight container at room temperature for up to 2 days. For longer storage, refrigerate for up to 5 days, though they are best gently rewarmed before serving. You can also freeze the baked rolls for up to 2 months. Wrap them well, thaw at room temperature, and warm in a low oven until soft again.
How to Serve Them in the Best Way
These rolls feel at home almost anywhere on the table. Serve them warm with salted butter and honey for breakfast, or tuck them beside soup, roast chicken, or a big crisp salad for dinner. They are also beautiful on a brunch spread with fruit preserves, whipped butter, and tea.
For something a little more indulgent, split one open and add sweetened cream cheese or a spoonful of jam. The soft crumb soaks up flavor beautifully without falling apart, which makes them especially lovely for both sweet and savory pairings.
Smart Ways to Use the Leftovers
If you somehow end up with extras, do not worry because these rolls are just as useful the next day.
Slice them and make mini breakfast sandwiches with egg and cheese. Tear them into chunks for a rich bread pudding. Toast halves lightly and spread with cinnamon butter or fruit jam. You can even turn them into tiny slider buns if you want a soft, tender base for savory fillings.
A Few More Little Details That Help
Bread gets better when you give yourself permission to notice the dough as it changes. If it feels sticky at first, that is normal. If it looks smoother after kneading, you are exactly where you should be. That small confidence shift makes homemade bread far more enjoyable.
Also, do not underestimate the finishing brush of melted butter after baking. It is optional, but it gives the tops a gentle sheen and keeps the crust extra soft. This one small step can make the whole pan look and taste even more inviting.
How to Make Them Look Truly Stunning
Because these rolls already have that flower shape, presentation comes very naturally. Bake them in a round pan and serve them directly in it for that pull-apart centerpiece effect. The golden tops gathered around the center have a lovely, almost festive look.
Right before serving, brush lightly with butter for a soft glow. A linen towel under the warm pan or a simple wooden board underneath also makes the whole thing feel extra special without much effort at all.
Variations to Try Next Time
Once you make this once, it is very hard not to imagine all the ways you can play with it.
Honey Butter Version: Replace 1 tablespoon of the sugar with honey and brush the warm tops with melted honey butter.
Sesame-Topped Rolls: Sprinkle white sesame seeds over the egg wash before baking for a subtle nutty finish.
Jam-Filled Center: Add a tiny spoonful of thick fruit jam in the center of each piece before shaping for a soft sweet surprise.
Cinnamon Sugar Twist: Add a light dusting of cinnamon sugar to the dough pieces before shaping for a breakfast-style version.
Herb Butter Finish: Brush the warm rolls with melted butter mixed with a little parsley for a savory dinner-table variation.
FAQ’s
Q1: Can I make the dough by hand instead of using a mixer?
Yes, absolutely. It will take a bit more kneading, usually around 10 to 12 minutes, but the dough comes together very nicely by hand.
Q2: Why is my dough sticky?
This is a soft enriched dough, so a little stickiness is normal. It should feel tacky, not wet and unmanageable.
Q3: Can I use all-purpose flour?
Yes, you can. The rolls will still be soft, though bread flour gives them a slightly loftier and chewier texture.
Q4: How do I know the rolls are fully baked?
Look for evenly golden tops and a light hollow sound when gently tapped. You can also check that the center roll feels set, not doughy.
Q5: Can I prepare these the night before?
Yes. After the first rise, refrigerate the dough overnight and shape the next day.
Q6: What can I use instead of an egg wash?
You can brush the tops with plain milk for a softer, more matte finish.
Q7: Why did my rolls turn out dense?
The most common causes are not kneading enough, using milk that was too hot, or not letting the dough rise fully.
Q8: Can I freeze them after baking?
Yes. Cool them completely, wrap well, and freeze for up to 2 months.
Q9: Are these sweet or savory?
They sit gently in the middle. They are lightly sweet, which makes them perfect for both sweet spreads and savory meals.
Q10: Can I make them smaller?
Yes. Divide the dough into more portions and reduce the baking time slightly while keeping an eye on the color.
Conclusion
There is just something wonderful about bread that feels soft enough to melt the moment you pull it apart, and these flower-shaped milk rolls really deliver that kind of comfort. They look charming, taste rich and tender, and make any table feel a little warmer and more special. Whether you bake them for guests or just because your kitchen needs that buttery bread smell, this is one of those bakes that makes people linger for one more roll.
Print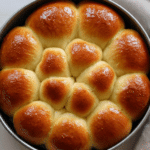
Flower Soft Bread Milk Rolls
- Prep Time: 1 hour 45 minutes
- Cook Time: 22 minutes
- Total Time: 2 hours 7 minutes
- Yield: 9 rolls 1x
- Category: Bread
- Method: Baking
- Cuisine: Asian-Inspired
- Diet: Vegetarian
Description
Soft, fluffy milk rolls shaped like a flower and baked until golden, glossy, and tender. These pull-apart rolls are lightly sweet, buttery, and perfect for breakfast, brunch, or dinner.
Ingredients
- 3 1/4 cups (390 g) bread flour
- 1/4 cup (50 g) granulated sugar
- 2 1/4 teaspoons (7 g) instant yeast
- 1 teaspoon (6 g) fine salt
- 3/4 cup (180 ml) whole milk, warm
- 1 large egg
- 1/4 cup (56 g) unsalted butter, softened
- 1 large egg, beaten, for egg wash
- 1 tablespoon milk, for egg wash
Instructions
- Lightly grease a 9-inch round cake pan and set it aside.
- In a large mixing bowl, combine the bread flour, sugar, instant yeast, and salt.
- Add the warm milk, 1 egg, and softened butter. Mix until a shaggy dough forms.
- Knead the dough for 8 to 10 minutes, until smooth, elastic, and slightly tacky.
- Transfer the dough to a lightly greased bowl, cover, and let it rise for 60 to 75 minutes, or until doubled in size.
- Punch down the dough gently and divide it into 9 equal portions.
- Shape each portion into a smooth roll with softly tucked petal-like curves. Place 1 roll in the center of the pan and arrange the remaining 8 rolls around it to create a flower shape.
- Cover and let the shaped rolls rise for 30 to 40 minutes, until puffy.
- Preheat the oven to 350°F (175°C).
- Beat the remaining egg with 1 tablespoon milk and brush the tops gently with the egg wash.
- Bake for 20 to 22 minutes, until the tops are golden brown.
- Cool in the pan for 10 minutes before serving. Brush with a little melted butter if desired for an even softer finish.
Notes
- Do not add too much extra flour during kneading, the dough should stay soft and slightly tacky.
- If using active dry yeast instead of instant yeast, bloom it in the warm milk for a few minutes before mixing.
- For a softer crust, brush the warm rolls with melted butter right after baking.
- The rolls can be frozen after baking and reheated gently in the oven.
Nutrition
- Serving Size: 1 roll
- Calories: 210
- Sugar: 5 g
- Sodium: 230 mg
- Fat: 6 g
- Saturated Fat: 3 g
- Unsaturated Fat: 2 g
- Trans Fat: 0 g
- Carbohydrates: 33 g
- Fiber: 1 g
- Protein: 5 g
- Cholesterol: 38 mg
Keywords: flower soft bread milk rolls, milk bread rolls, soft dinner rolls, pull apart bread, homemade milk rolls, fluffy bread rolls