Danish Carnival Buns with Vanilla Filling
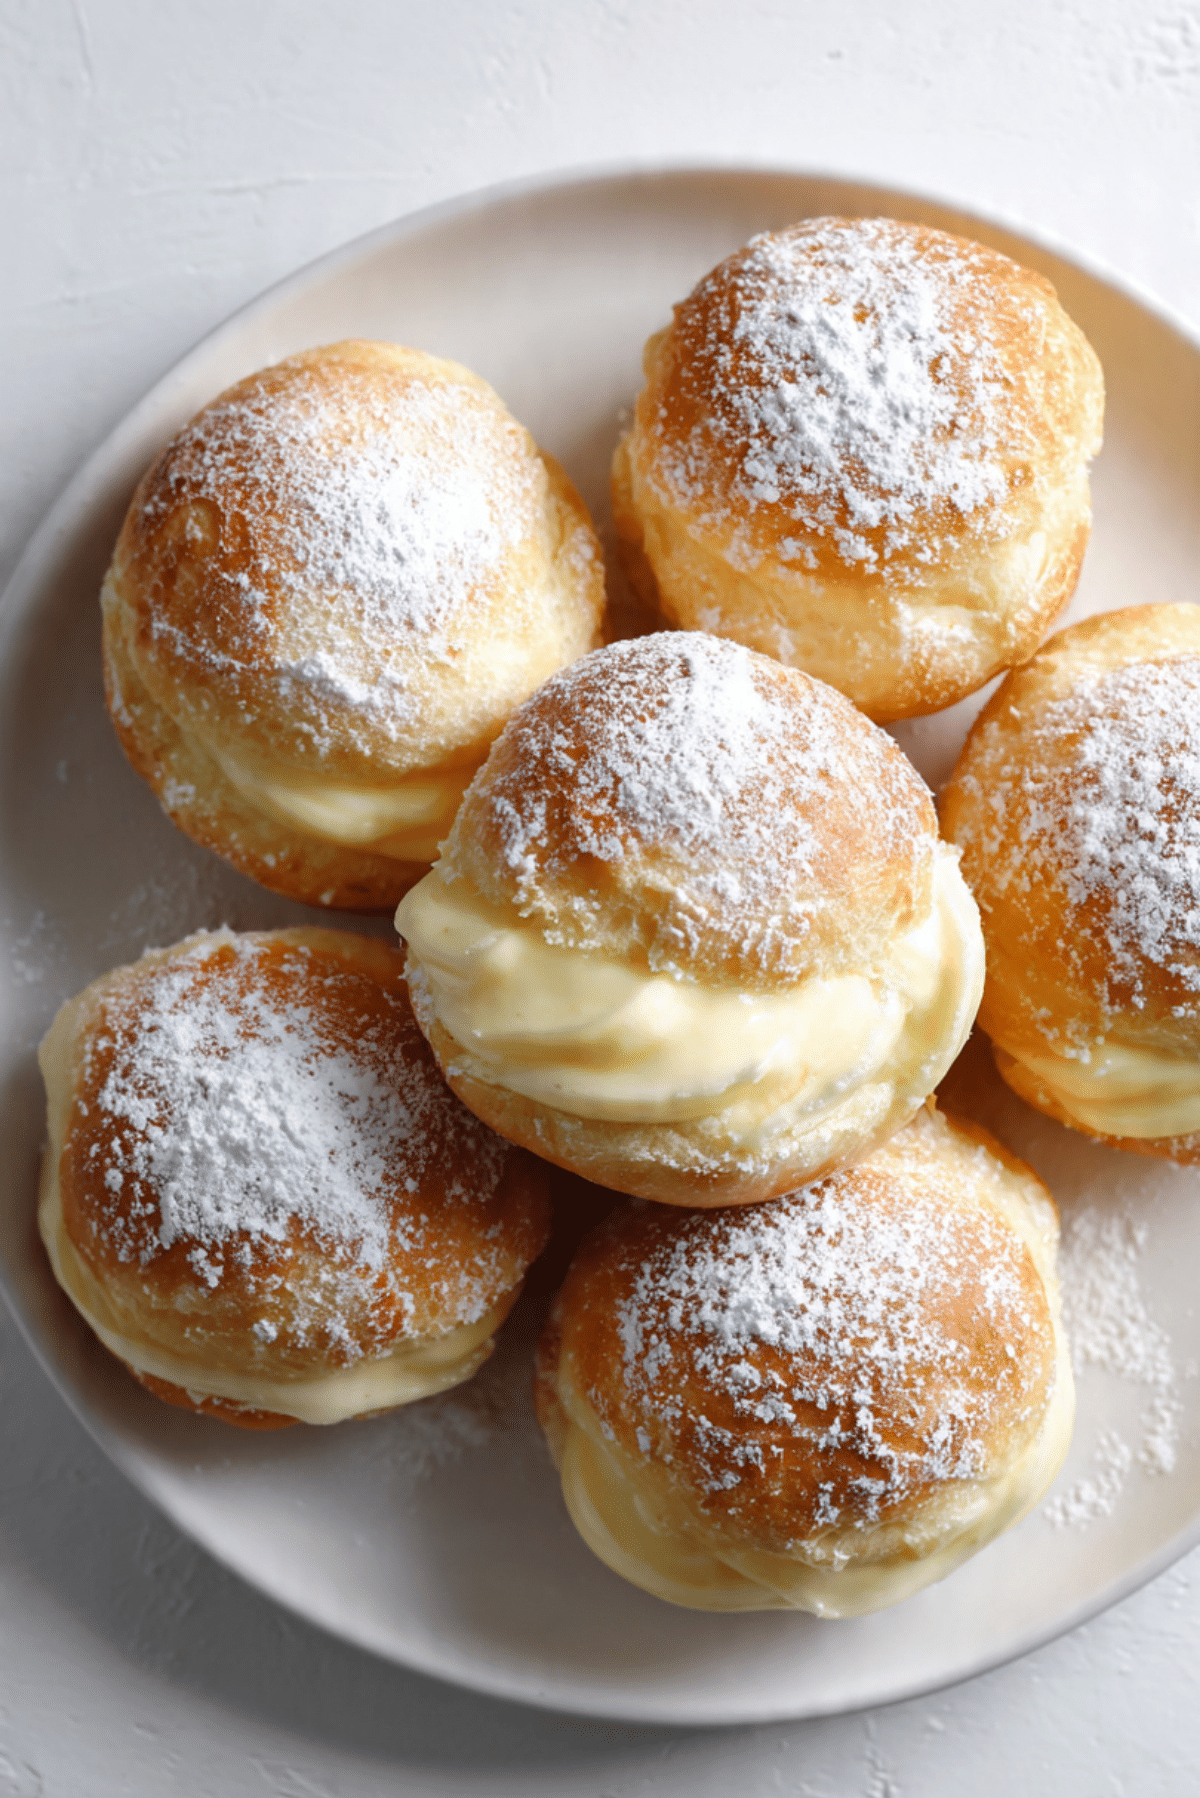
The first time a tray of Danish carnival buns comes out of the oven, the kitchen fills with that unmistakable bakery aroma, warm yeast dough, sweet vanilla, and a gentle hint of butter. These soft golden buns are a true celebration treat, especially during festive seasons in Denmark. Each fluffy bite hides a creamy vanilla filling that melts right into the airy dough. Trust me, you are going to love this.
And once you taste that delicate balance of lightly sweet bread and silky custard, it becomes clear why these buns are such a beloved classic. They feel comforting, nostalgic, and just a little bit indulgent. This one is a total game changer for anyone who loves homemade bakery style pastries.
A Sweet Treat That Feels Like a Celebration
There is something incredibly satisfying about baking a batch of soft buns that look like they came straight from a cozy Scandinavian bakery. The golden crust, the light dusting of powdered sugar, and that creamy center create a dessert that feels festive but still approachable for home bakers.
The texture alone makes these irresistible. The dough bakes into a soft and pillowy bun, while the vanilla filling stays rich and creamy. When you break one open, the contrast between the fluffy bread and smooth custard is pure magic. Let me tell you, it is worth every bite.
And now that you know how delightful they are, it makes sense to look at where these sweet buns come from.
The Festive Roots Behind These Classic Danish Buns
These buns are closely tied to Danish carnival traditions, particularly during the weeks leading up to Lent. In Denmark, bakeries fill their windows with seasonal pastries, and these custard filled buns are among the most beloved.
Historically, carnival season was a time for rich foods before the fasting period began. Bakers created indulgent treats using butter, sugar, and cream, which explains the luxurious texture of these buns.
Over time, the recipe evolved from bakery specialty to home baking favorite. Families began preparing them in their own kitchens, passing down techniques and little tips that make each batch unique.
And now, let us talk about why this recipe is such a reliable one to keep in your baking rotation.
Why Home Bakers Love This Recipe
Before we dive into the baking process, it helps to understand why these buns are such a favorite among both beginners and experienced bakers.
Versatile: These buns work beautifully for breakfast, dessert, or a cozy afternoon snack with coffee.
Budget-Friendly: The ingredients are simple pantry staples like flour, milk, eggs, and sugar.
Quick and Easy: The steps are straightforward, and the dough comes together without complicated techniques.
Customizable: You can adjust the sweetness or even add a touch of citrus zest to the filling.
Crowd-Pleasing: Soft bread and creamy vanilla filling appeal to nearly everyone at the table.
Make-Ahead Friendly: Both the dough and custard can be prepared earlier in the day.
Great for Leftovers: The buns stay soft and delicious the next day when stored properly.
Now that you are convinced these are worth baking, let us look at a few professional tips that make a big difference.
Baker’s Secrets for Perfect Soft Buns
Even simple recipes have a few tricks that elevate them from good to bakery quality.
- Allow the dough enough time to rise fully so the buns bake up light and airy.
- Warm milk helps activate the yeast more quickly and evenly.
- Do not overfill the buns with custard, a small spoonful keeps the structure perfect.
- A light dusting of powdered sugar right before serving adds both sweetness and presentation.
With those helpful tips in mind, let us gather the tools that make the process smooth and enjoyable.
Kitchen Tools That Make the Process Easy
Before mixing the dough, it helps to have a few basic tools ready.
Mixing Bowl: A large bowl allows the dough to expand comfortably during rising.
Whisk: Perfect for blending the custard filling smoothly without lumps.
Saucepan: Used to gently cook the vanilla custard until thick and silky.
Baking Tray: A flat tray lined with parchment ensures even baking.
Wooden Spoon or Dough Scraper: Helpful for combining the dough ingredients without overworking them.
Now the fun part begins. Let us talk about the ingredients that make these buns so special.
Ingredients You Will Need For These Carnival Buns
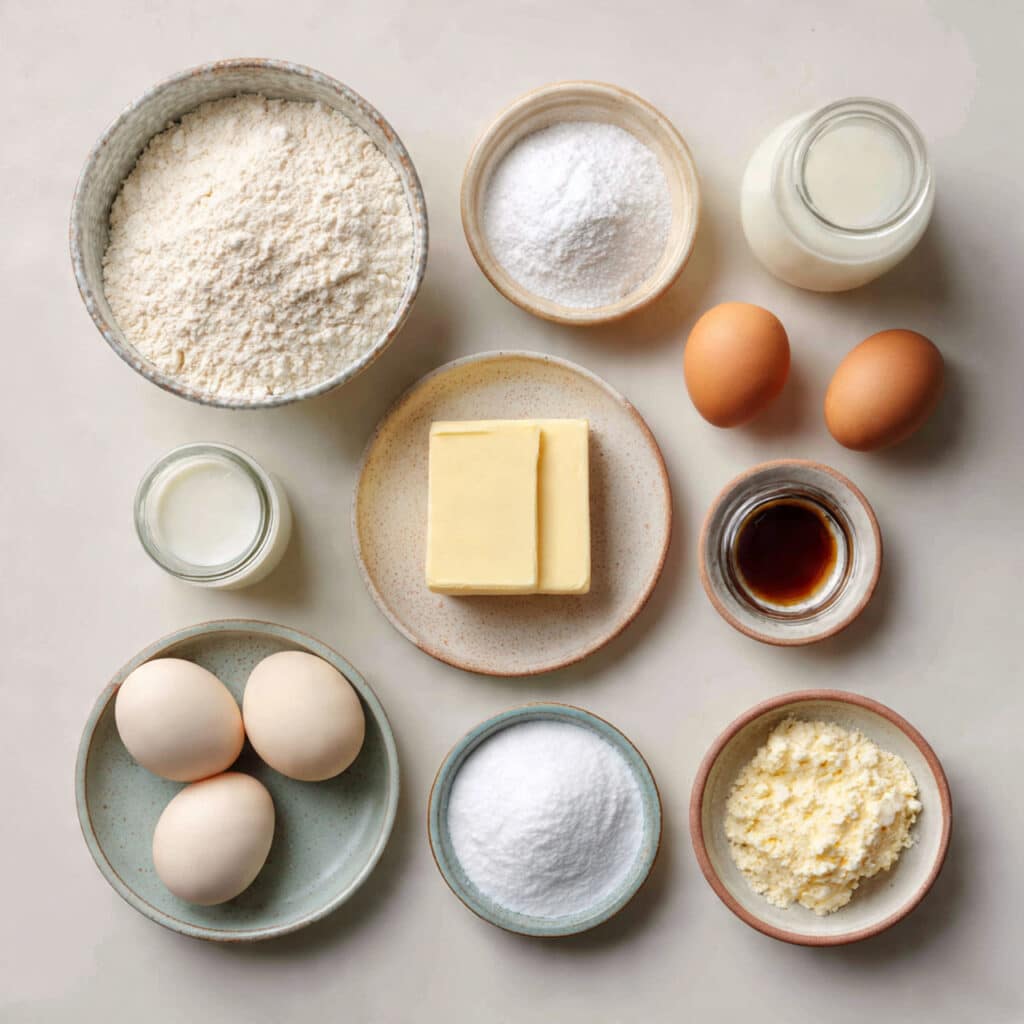
Great baking always begins with simple ingredients that work together beautifully.
- All Purpose Flour: 3 cups (360 g), forms the soft structure of the buns.
- Granulated Sugar: 1/3 cup (65 g), adds gentle sweetness to the dough and filling.
- Whole Milk: 1 cup (240 ml), creates a soft and tender dough texture.
- Unsalted Butter: 4 tablespoons (60 g), melted, gives richness and moisture.
- Eggs: 2 large eggs, one for the dough and one for the custard filling.
- Active Dry Yeast: 2 1/4 teaspoons (7 g), helps the dough rise into fluffy buns.
- Vanilla Extract: 2 teaspoons, provides the signature warm vanilla aroma.
- Cornstarch: 2 tablespoons, thickens the custard filling.
- Powdered Sugar: 1/4 cup for dusting the finished buns.
Once these ingredients come together, the dough becomes beautifully soft and fragrant.
Easy Ingredient Swaps If Needed
Sometimes you may want to adapt the recipe based on what is already in your kitchen.
Whole Milk: Almond milk or oat milk can be used, though the buns may be slightly lighter in richness.
Unsalted Butter: Neutral vegetable oil works as a substitute.
Vanilla Extract: Vanilla bean paste can add even deeper flavor.
Cornstarch: Arrowroot powder can thicken the custard similarly.
And now let us shine the spotlight on the stars of this recipe.
The Key Ingredients That Make These Buns Shine
Vanilla Extract: This ingredient defines the flavor of the creamy filling. Its warm aroma transforms a simple custard into something truly bakery worthy.
Yeast: The yeast creates the light, airy texture that makes the buns so fluffy and satisfying.
With everything prepared, we can finally move into the baking process.
Let’s Bake These Soft Vanilla Filled Buns
Now comes the part where the kitchen really starts to smell incredible. Here are the steps you are going to follow.
- Preheat Your Equipment: Preheat the oven to 350°F (175°C) and line a baking tray with parchment paper.
- Combine Ingredients: In a bowl, mix warm milk, yeast, sugar, egg, melted butter, and flour until a soft dough forms.
- Prepare Your Cooking Vessel: Lightly grease a bowl and place the dough inside. Cover and allow it to rise for about 1 hour until doubled in size.
- Assemble the Dish: Divide the dough into small portions, flatten slightly, add a spoonful of vanilla custard in the center, then shape into buns.
- Cook to Perfection: Arrange the buns on the baking tray and bake for 15 to 18 minutes until lightly golden.
- Finishing Touches: Allow the buns to cool slightly, then dust generously with powdered sugar.
- Serve and Enjoy: Serve warm and enjoy the soft dough and creamy vanilla center.
And now that the buns are ready, let us talk about the beautiful textures you will notice.
The Perfect Balance of Fluffy and Creamy
The magic of these buns lies in the contrast between textures. The dough bakes into a light and tender crumb that feels almost cloud like when you tear it open.
Inside, the vanilla custard stays smooth and creamy, adding a rich sweetness that melts into every bite. The powdered sugar on top gives a delicate finish that balances everything perfectly.
Helpful Tips for Even Better Results
If you want to take your baking to the next level, these small adjustments help.
- Use room temperature eggs so the dough mixes evenly.
- Allow the buns to cool slightly before dusting with powdered sugar.
- A second short rise after shaping can create even fluffier buns.
Common Mistakes to Avoid When Baking
Even experienced bakers occasionally make these small mistakes.
- Overfilling the buns with custard, which can cause leaking during baking.
- Skipping the dough rise, which leads to dense buns.
- Baking at too high a temperature, which browns the outside too quickly.
Estimated Nutrition Information
Servings: 8
Calories per serving: 240
Note: These are approximate values.
Time Needed to Make These Buns
Prep Time: 20 minutes
Cook Time: 18 minutes
Total Time: 38 minutes
Make-Ahead and Storage Tips
One of the best things about these buns is how easy they are to prepare in advance.
You can prepare the dough earlier in the day and store it in the refrigerator until ready to shape. The custard filling can also be made ahead and kept chilled.
For storage, keep the baked buns in an airtight container at room temperature for up to two days. They can also be gently reheated in the oven for a few minutes to bring back their soft texture.
Serving Ideas That Make Them Even Better
These buns pair beautifully with a cup of coffee or tea. The creamy vanilla filling complements both strong coffee and lighter herbal teas.
You can also serve them as a dessert with a small scoop of vanilla ice cream or fresh berries for an extra touch of sweetness.
Creative Ways to Use Leftover Buns
If you happen to have leftovers, which honestly rarely happens, there are fun ways to repurpose them.
Slice them and toast lightly with a little butter for breakfast. You can also warm them and add fresh fruit for a quick dessert.
Extra Tips for Flavor and Texture
Sometimes the smallest details make the biggest difference.
Let the buns cool slightly before serving so the custard sets perfectly. A touch of extra vanilla in the filling can deepen the flavor beautifully.
Make These Buns Look Bakery Perfect
Presentation makes homemade baking feel even more special.
Arrange the buns on a large serving plate and dust them generously with powdered sugar. The contrast between the golden crust and white sugar makes them look irresistible.
Delicious Variations to Try
Once you master the base recipe, you can experiment with fun twists.
- Add lemon zest to the custard for a fresh citrus note.
- Fill the buns with raspberry jam along with the vanilla custard.
- Sprinkle sliced almonds on top before baking for added crunch.
- Add a hint of cardamom to the dough for a Scandinavian inspired flavor.
FAQ’s
1. Can I prepare the dough the night before?
Yes. Refrigerating the dough overnight works well and can even improve flavor.
2. Why did my buns turn out dense?
The dough likely did not rise long enough. Yeast needs time to create a light texture.
3. Can I freeze the baked buns?
Yes. Allow them to cool completely, then freeze in an airtight container.
4. How do I keep the filling smooth?
Whisk the custard constantly while cooking so it thickens evenly.
5. Can I reduce the sugar?
Yes, but keep at least half the sugar to maintain proper dough texture.
6. Do I need a stand mixer?
No. This dough mixes easily with a wooden spoon and a bit of hand kneading.
7. Can I make the filling thicker?
Add a small amount of extra cornstarch if you prefer a firmer custard.
8. What flour works best?
All purpose flour provides the perfect balance of softness and structure.
9. Can these buns be served cold?
Yes, though they are most delicious when slightly warm.
10. What makes the buns so soft?
The combination of milk, butter, and proper rising time creates that pillowy texture.
Conclusion
Soft, golden, and filled with creamy vanilla goodness, these Danish carnival buns bring a little bit of bakery magic into your kitchen. They are comforting, festive, and surprisingly simple to make at home. Once you bake your first batch, you will understand why this classic treat has been loved for generations.
Trust me, once you taste that fluffy dough and silky filling together, you will want to make them again and again.
Danish Carnival Buns with Vanilla Filling
- Prep Time: 20 minutes
- Cook Time: 18 minutes
- Total Time: 38 minutes
- Yield: 8 buns 1x
- Category: Dessert
- Method: Baking
- Cuisine: Danish
- Diet: Vegetarian
Description
Soft, fluffy carnival buns filled with creamy vanilla custard and finished with a delicate dusting of powdered sugar. These classic Scandinavian treats are lightly sweet, airy, and perfect for festive baking or cozy coffee breaks.
Ingredients
- 3 cups (360 g) all purpose flour
- 1/3 cup (65 g) granulated sugar
- 1 cup (240 ml) whole milk
- 4 tablespoons (60 g) unsalted butter, melted
- 2 large eggs
- 2 1/4 teaspoons (7 g) active dry yeast
- 2 teaspoons vanilla extract
- 2 tablespoons cornstarch
- 1/4 cup powdered sugar
Instructions
- Preheat the oven to 350°F (175°C) and line a baking tray with parchment paper.
- In a mixing bowl combine warm milk, active dry yeast, granulated sugar, one egg, melted butter, and all purpose flour. Mix until a soft dough forms.
- Transfer the dough to a lightly greased bowl, cover, and let it rise for about 1 hour until doubled in size.
- In a saucepan whisk together the remaining egg, vanilla extract, cornstarch, and a portion of the sugar. Heat gently while stirring until a smooth custard forms. Allow it to cool.
- Divide the dough into equal portions. Flatten each piece slightly and place a small spoonful of vanilla custard in the center.
- Shape the dough around the filling to form smooth buns and place them on the prepared baking tray.
- Bake for 15 to 18 minutes until the buns are lightly golden and baked through.
- Allow the buns to cool slightly, then dust with powdered sugar before serving.
Notes
- Use warm milk, not hot, to activate the yeast properly.
- Allow the dough enough time to rise so the buns stay light and fluffy.
- Do not overfill the buns with custard to prevent leaking during baking.
- Dust with powdered sugar right before serving for the best presentation.
Nutrition
- Serving Size: 1 bun
- Calories: 240
- Sugar: 14 g
- Sodium: 120 mg
- Fat: 7 g
- Saturated Fat: 4 g
- Unsaturated Fat: 2 g
- Trans Fat: 0 g
- Carbohydrates: 38 g
- Fiber: 1 g
- Protein: 6 g
- Cholesterol: 55 mg
Keywords: danish carnival buns, vanilla custard buns, scandinavian sweet buns, homemade custard buns, carnival pastry