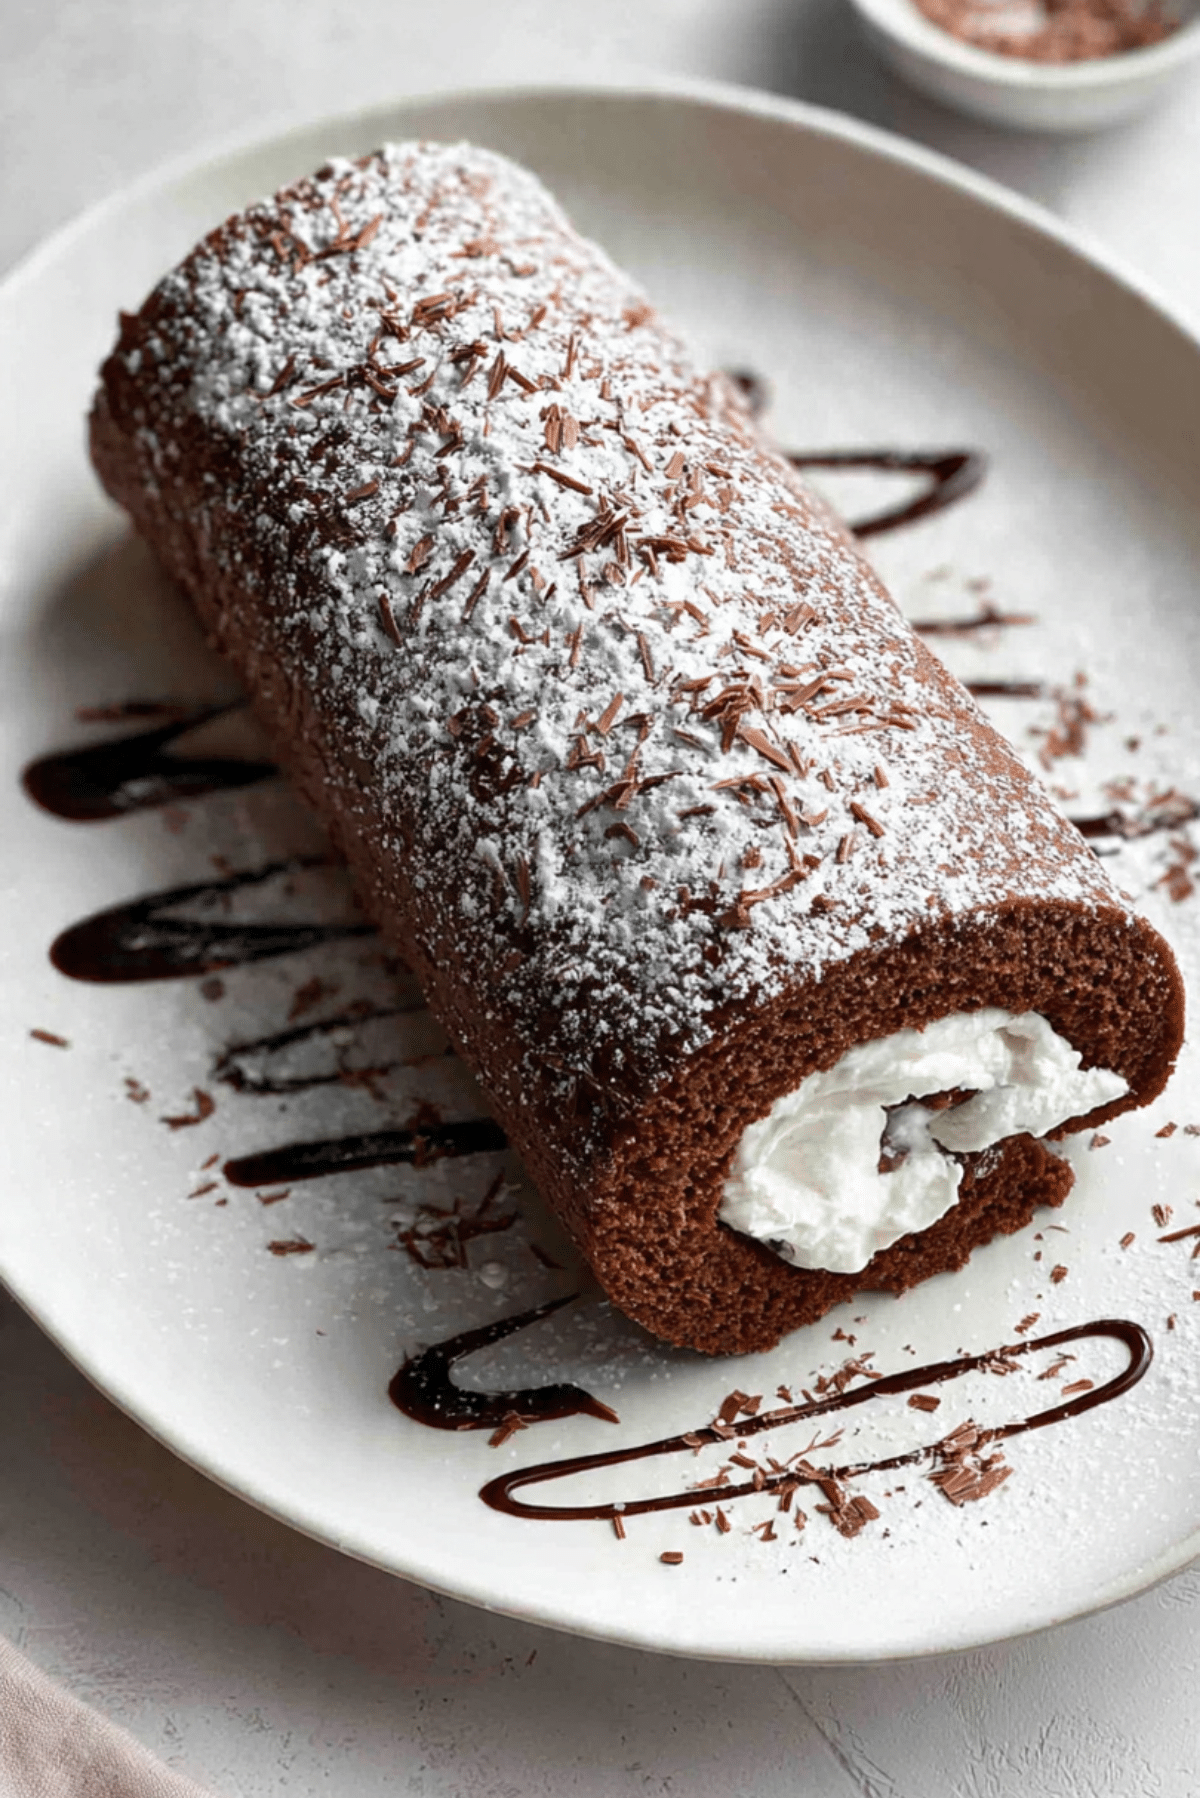
Chocolate Towel Roll
There is something so charming about a soft chocolate sponge rolled around a cloud of cream, especially when it looks fancy but feels surprisingly doable at home. This is the kind of dessert that brings a little drama to the table in the best way, with rich cocoa flavor, a tender crumb, and that beautiful swirl that makes every slice feel special. Trust me, you’re going to love this, because it tastes like a bakery treat but still has that warm homemade touch.
Why this sweet little swirl wins people over
Some desserts are all about bold flavor, others are all about texture, and this one happily gives you both. The sponge is light instead of heavy, the filling is cool and silky, and every bite melts together in a way that feels balanced rather than too sweet.
It is also one of those recipes that makes people pause when you set it down. Let me tell you, it’s worth every bite, and it is even more satisfying when you realize you made that beautiful rolled finish yourself.
The story behind this rolled classic
Before we get into the mixing bowls and cocoa, it helps to know that rolled sponge cakes have been loved across many kitchens for generations. Variations of jelly rolls, Swiss rolls, and cream-filled sponge cakes show up in European baking traditions, where a thin flexible sponge is baked quickly, rolled while warm, and later filled for that signature spiral.
What makes this version especially fun is the towel-roll method, which helps train the warm cake into shape before the filling goes in. It is a simple old-school trick, and it turns a basic sponge into something that looks polished and celebration-ready without needing complicated decorating skills.
Reasons this dessert earns a spot in your baking rotation
By the time you pull this from the oven, you will already see why it has such loyal fans. And now let’s dive into what makes it so dependable in a home kitchen.
Versatile: You can serve it at a holiday table, bring it to a birthday dinner, or slice it up for a weekend treat with coffee. It feels elegant, but it never feels fussy.
Budget-Friendly: The base uses simple pantry staples and a short ingredient list, which makes it a smart option when you want something impressive without overspending.
Quick and Easy: The sponge bakes fast, and the filling comes together in minutes. Once you understand the roll, the whole process feels much easier than it looks.
Customizable: You can keep it classic, add berries, swap in a mocha note, or finish it with extra chocolate for a more decadent version.
Crowd-Pleasing: Chocolate and cream is a combination that rarely misses. Even people who say they are not big dessert fans usually go back for another slice.
Make-Ahead Friendly: This one chills beautifully, which means you can prepare it ahead and let the texture settle before serving.
Great for Leftovers: A slice straight from the fridge the next day is honestly a little dream. The flavors blend even more, and the swirl stays neat and lovely.
A few baker’s secrets before you begin
A rolled cake sounds fancy, but a few smart habits make the process feel smooth from start to finish. This one’s a total game-changer when you want impressive results without stress.
- Roll the sponge while it is still warm, because warm cake bends much more easily and is less likely to crack.
- Do not overbake the sheet cake, since even one or two extra minutes can dry it out and make rolling harder.
- Sift the dry ingredients, which keeps the batter light and helps avoid cocoa lumps.
- Whip the cream until it holds firm peaks, but stop before it turns grainy.
- Let the cake cool in its rolled shape before filling, because that helps it remember the spiral.
Kitchen tools that make the process easier
Now that the technique is starting to sound less intimidating, let’s talk about the tools that quietly make everything work better.
Mixing bowls: You will need a couple of bowls for separating the batter steps and whipping the filling comfortably.
Electric mixer: This helps create volume in the eggs and whip the cream to the right texture.
Fine sieve: Sifting the flour and cocoa gives the sponge a smoother, airier finish.
Rubber spatula: Gentle folding is key here, and a spatula helps keep the batter light.
10 x 15-inch jelly roll pan: This size gives the sponge the right thickness for easy rolling.
Parchment paper: It helps the cake release cleanly and makes transfer much easier.
Clean kitchen towel: The towel is essential for shaping the warm cake into that classic roll.
Cooling rack: This helps the sponge cool evenly after baking.
Offset spatula or butter knife: Very handy for spreading the whipped cream in an even layer.
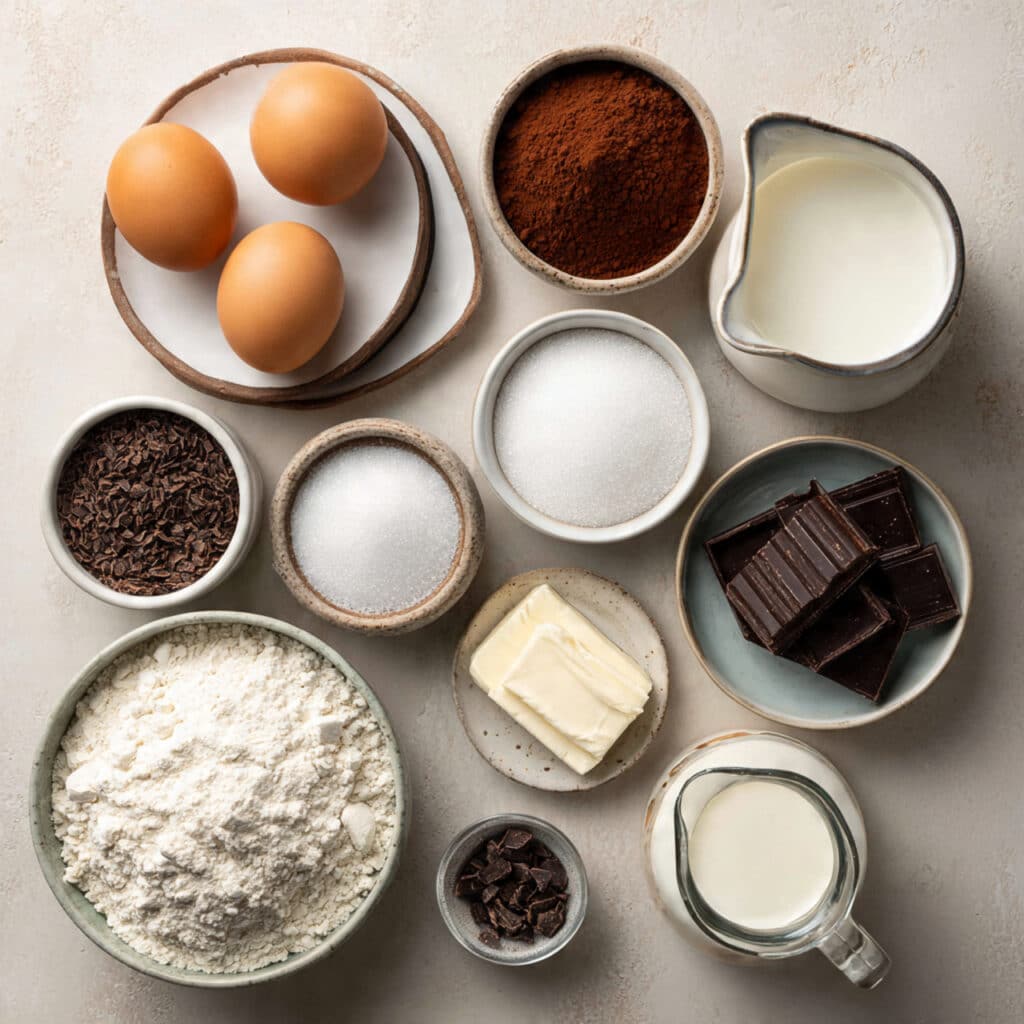
What goes into this soft and chocolatey favorite
Every ingredient here has a clear job, and together they build that balance of airy sponge, deep cocoa flavor, and cool creamy filling. Nothing feels extra, and that is part of the beauty.
- Eggs: 4 large eggs, these give the sponge structure and lift while helping it stay flexible enough to roll.
- Granulated sugar: 1/2 cup, this sweetens the cake and helps create a light, stable foam when beaten with the eggs.
- All-purpose flour: 1/3 cup, this adds just enough body without making the sponge feel heavy.
- Unsweetened cocoa powder: 1/4 cup, this brings the deep chocolate flavor and that rich dark color.
- Baking powder: 1 teaspoon, this gives the sponge an extra bit of lift for a tender crumb.
- Fine salt: 1/4 teaspoon, this sharpens the cocoa and keeps the sweetness balanced.
- Milk: 2 tablespoons, this adds a little moisture so the sponge stays soft and pliable.
- Vanilla extract: 1 teaspoon, this rounds out the flavor and gives the cake a warmer dessert note.
- Heavy whipping cream: 1 cup, this becomes the cool fluffy filling that makes each slice feel light and luscious.
- Powdered sugar: 2 tablespoons, this sweetens the whipped cream without making it gritty.
- Dark chocolate: 1/2 cup, finely chopped, this melts into a simple drizzle that adds richness on top.
- Powdered sugar for dusting: 2 tablespoons, this gives the finished roll that soft bakery-style look.
Easy swaps when you need a little flexibility
If you are missing something or just want to make the recipe fit your pantry, there is plenty of room to adapt without losing the spirit of the dessert.
All-purpose flour: Use a cup-for-cup gluten-free flour blend if needed.
Unsweetened cocoa powder: Dutch-process cocoa works too, as long as you keep the measurement the same.
Vanilla extract: A little coffee extract can add a deeper flavor twist.
Heavy whipping cream: Stabilized whipped topping can work in a pinch, though fresh cream tastes lighter and more natural.
Dark chocolate: Semisweet chocolate is a good alternative if you want a sweeter finish.
The ingredients that really make this one shine
Before we move into the method, it is worth slowing down for the stars of the show. These are the ingredients that give the dessert its personality.
Unsweetened cocoa powder: This is where the main flavor begins. It gives the sponge that rich cocoa depth without weighing it down, which is exactly what you want in a rolled cake.
Heavy whipping cream: This brings the cool contrast that makes each slice feel balanced. Against the soft sponge, it creates that dreamy bakery-style bite that people remember.
Let’s roll, step by step
This is the fun part, and once you see the flow, it all starts to feel very manageable. Here are the steps you are going to follow, and each one brings you closer to that beautiful spiral slice.
- Preheat Your Equipment: Heat your oven to 350°F and line a 10 x 15-inch jelly roll pan with parchment paper. Lightly grease the parchment so the sponge releases easily after baking.
- Combine Ingredients: In a medium bowl, sift together the flour, cocoa powder, baking powder, and salt. In a large bowl, beat the eggs and granulated sugar with an electric mixer for about 4 to 5 minutes until the mixture looks pale, thick, and airy. Fold the dry ingredients in gently, then add the milk and vanilla extract and mix just until combined.
- Prepare Your Cooking Vessel: Pour the batter into the lined pan and spread it evenly into the corners with a spatula. Tap the pan lightly on the counter to level the surface.
- Assemble the Dish: Bake for 10 to 12 minutes, until the top springs back lightly when touched. While it bakes, lay a clean kitchen towel on the counter and dust it generously with some of the powdered sugar for dusting.
- Cook to Perfection: Turn the hot cake out onto the prepared towel, carefully peel away the parchment, and roll the cake up from the short end with the towel inside. Let it cool completely in this shape so the sponge sets into a spiral without fighting you later.
- Finishing Touches: In a chilled bowl, whip the heavy whipping cream with the 2 tablespoons powdered sugar until firm peaks form. Unroll the cooled sponge gently, spread the whipped cream evenly over the surface, then roll it back up without the towel. Melt the chopped dark chocolate and drizzle it over the top, then finish with the remaining powdered sugar for dusting.
- Serve and Enjoy: Chill the roll for at least 30 minutes before slicing. Cut with a sharp knife, wipe the blade between slices, and serve the swirls proudly.
What makes the texture and flavor so satisfying
Once the cake is rolled and chilled, the magic really shows up in the slice. The sponge stays soft and springy, with just enough cocoa bitterness to keep it from tasting flat. Then the filling comes in cool and creamy, which softens every bite and gives the dessert that light, almost cloud-like contrast.
The drizzle on top adds another layer of richness, but because the cake itself is airy, the whole thing never feels too dense. You get softness, silkiness, and a little chocolate intensity all in one neat spiral, which is exactly why this dessert has such a devoted following.
Smart little tricks for the best result
A few practical habits can make the process smoother, especially the first time you try a rolled sponge.
- Dust the towel well with powdered sugar so the warm cake does not stick.
- Spread the filling almost to the edges, but leave a small border so it does not squeeze out too much while rolling.
- Chill the finished roll before slicing for cleaner, prettier spirals.
- Use a serrated knife or a very sharp thin blade for the neatest cuts.
Mistakes worth skipping from the start
Even simple desserts have a few sneaky trouble spots, and knowing them ahead of time makes everything feel calmer.
- Do not overmix the batter after adding the dry ingredients, or the sponge can lose its airy texture.
- Do not skip rolling while the cake is warm, because a cold unrolled sponge is much more likely to crack.
- Do not overwhip the cream, or it can turn dense and less smooth to spread.
- Do not bake until the cake feels dry, because a flexible sponge is the goal here.
A quick look at the nutrition
It is always helpful to know what you are serving, especially when dessert is being shared around the table.
Servings: 8
Calories per serving: 260
Note: These are approximate values.
Timing at a glance
This dessert looks special, but the actual time commitment is pleasantly reasonable.
Prep Time: 25 minutes
Cook Time: 12 minutes
Total Time: 37 minutes
Make-ahead and storage tips that really help
One of the nicest things about this dessert is how well it fits into a busy schedule. You can bake and roll the sponge earlier in the day, let it cool, and fill it later when you are ready. You can also fully assemble it several hours ahead and keep it chilled until serving.
For storage, wrap the finished roll gently and keep it in the refrigerator for up to 3 days. For freezing, wrap slices or the whole roll tightly in plastic wrap and then foil, and freeze for up to 1 month. Thaw overnight in the fridge. For the best texture, serve it slightly chilled, not icy cold, so the cream stays smooth and the sponge tastes tender.
The best ways to serve it
Now that the hard work is done, the serving part should feel fun. This dessert pairs beautifully with coffee, espresso, or a cold glass of milk. You can dress each slice with a few berries for brightness or add a tiny spoonful of whipped cream on the side if you want it to feel extra polished.
For gatherings, slice it into even rounds and arrange them on a white platter so the spirals show clearly. It looks elegant without needing much decoration, which is always a win.
Fun ideas for leftover slices
Leftovers rarely last long, but when they do, there are a few delicious ways to give them a second life.
You can cube a slice and layer it into a dessert glass with extra whipped cream for a quick trifle-style treat. You can also chill slices well and serve them with a scoop of vanilla ice cream for a plated dessert that feels restaurant-worthy. Even a leftover piece with morning coffee has a quiet little luxury to it.
A few extra details that make a difference
Sometimes it is the small things that take a dessert from good to really memorable. Let the sponge cool fully before adding the filling so the cream stays fluffy. Use cold cream and a chilled bowl for the fastest whip. And if you want cleaner presentation, trim the ends before serving so the swirl in the center looks extra neat.
This one’s a total game-changer when you want a dessert that feels special but still realistic for a home kitchen.
How to make it look as good as it tastes
Presentation here is all about letting the swirl do the work. A light snowfall of powdered sugar instantly gives it that bakery-window charm, while a thin chocolate drizzle adds shine and contrast. You can place the roll on a plain platter and let the dark sponge and white filling stand out naturally.
For an even prettier finish, slice the ends off cleanly and place one slice slightly angled next to the roll so guests can see the inside before serving. It is simple, but it looks so inviting.
Delicious ways to change it up
Once you have the base method down, there are plenty of ways to play with the flavors while keeping the same lovely texture.
Mocha Version: Add 1 teaspoon instant espresso powder to the dry ingredients for a deeper chocolate profile.
Berry Cream Twist: Spread a thin layer of berry jam under the whipped cream for a bright fruity contrast.
Chocolate Chip Filling: Fold a few mini chocolate chips into the whipped cream for extra texture.
Orange Chocolate Variation: Add 1 teaspoon finely grated orange zest to the filling for a fresh citrus note.
Cookies and Cream Style: Fold a few crushed chocolate sandwich cookies into the whipped cream for a playful crunch.
FAQ’s
1. Can I make the sponge a day ahead?
Yes, you can bake and roll the sponge a day ahead. Keep it wrapped once cool, then fill and finish it the next day.
2. Why did my cake crack while rolling?
That usually happens when the sponge is overbaked or allowed to cool flat before rolling. Rolling it warm is the key step.
3. Can I use whipped topping instead of fresh cream?
Yes, you can, though the flavor and texture will be a bit different. Fresh whipped cream gives the cleanest, lightest result.
4. Do I have to use a towel?
The towel really helps shape the sponge while it is warm, so it is strongly recommended for the easiest roll.
5. Can I add fruit to the filling?
Yes, just keep it light. A very thin layer of jam or a small amount of finely chopped berries works best.
6. How do I keep the roll neat when slicing?
Chill it first, then use a sharp knife and wipe the blade between slices for cleaner edges.
7. Can I make this without the chocolate drizzle?
Absolutely. It will still look lovely with just the powdered sugar finish.
8. Is this dessert very sweet?
It is sweet, but the cocoa and cream keep it balanced. The overall texture feels light rather than sugary.
9. Can I freeze the finished dessert?
Yes, wrap it tightly and freeze it for up to 1 month. Thaw it in the fridge before serving.
10. What is the best pan size for this recipe?
A 10 x 15-inch jelly roll pan works best because it creates a thin sponge that rolls easily without becoming too fragile.
Conclusion
There is something extra satisfying about slicing into a rolled cake and seeing that perfect swirl waiting inside. It feels nostalgic, a little elegant, and still cozy enough for an ordinary day at home. With its airy sponge, creamy center, and rich chocolate finish, this dessert brings together everything people love about simple baking done well. Trust me, you’re going to love this, and once you make it once, it will be hard not to come back to it whenever you want something beautiful and deeply comforting.
Print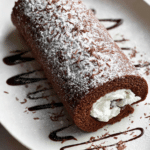
Chocolate Towel Roll
- Prep Time: 25 minutes
- Cook Time: 12 minutes
- Total Time: 37 minutes
- Yield: 8 servings 1x
- Category: Dessert
- Method: Baked
- Cuisine: European-inspired
- Diet: Vegetarian
Description
A soft chocolate sponge rolled with fluffy whipped cream and finished with a light dark chocolate drizzle. This elegant homemade dessert is tender, creamy, and perfect for slicing into beautiful swirls.
Ingredients
- 4 large eggs
- 1/2 cup granulated sugar
- 1/3 cup all-purpose flour
- 1/4 cup unsweetened cocoa powder
- 1 teaspoon baking powder
- 1/4 teaspoon fine salt
- 2 tablespoons milk
- 1 teaspoon vanilla extract
- 1 cup heavy whipping cream
- 2 tablespoons powdered sugar
- 1/2 cup dark chocolate, finely chopped
- 2 tablespoons powdered sugar for dusting
Instructions
- Preheat the oven to 350°F. Line a 10 x 15-inch jelly roll pan with parchment paper and lightly grease the parchment.
- In a medium bowl, sift together the flour, cocoa powder, baking powder, and salt.
- In a large bowl, beat the eggs and granulated sugar for 4 to 5 minutes until pale, thick, and airy. Gently fold in the dry ingredients, then add the milk and vanilla extract and mix just until combined.
- Spread the batter evenly in the prepared pan. Bake for 10 to 12 minutes, until the top springs back lightly when touched.
- Lay a clean kitchen towel on the counter and dust it with some of the powdered sugar for dusting. Turn the hot cake out onto the towel, peel off the parchment, and roll the cake up from the short end with the towel inside. Let it cool completely.
- Whip the heavy whipping cream with the 2 tablespoons powdered sugar until firm peaks form.
- Gently unroll the cooled cake, spread the whipped cream evenly over the surface, then roll it back up without the towel.
- Melt the dark chocolate and drizzle it over the top. Finish with the remaining powdered sugar for dusting.
- Chill for at least 30 minutes before slicing and serving.
Notes
- Roll the cake while it is still warm to help prevent cracks.
- Do not overbake the sponge, or it can become dry and hard to roll.
- Chill the finished roll before slicing for cleaner swirls.
- Store covered in the refrigerator for up to 3 days.
Nutrition
- Serving Size: 1 slice
- Calories: 260
- Sugar: 18g
- Sodium: 95mg
- Fat: 15g
- Saturated Fat: 9g
- Unsaturated Fat: 5g
- Trans Fat: 0g
- Carbohydrates: 27g
- Fiber: 2g
- Protein: 5g
- Cholesterol: 120mg
Keywords: chocolate roll cake, chocolate sponge roll, whipped cream dessert, cocoa sponge cake, homemade rolled cake