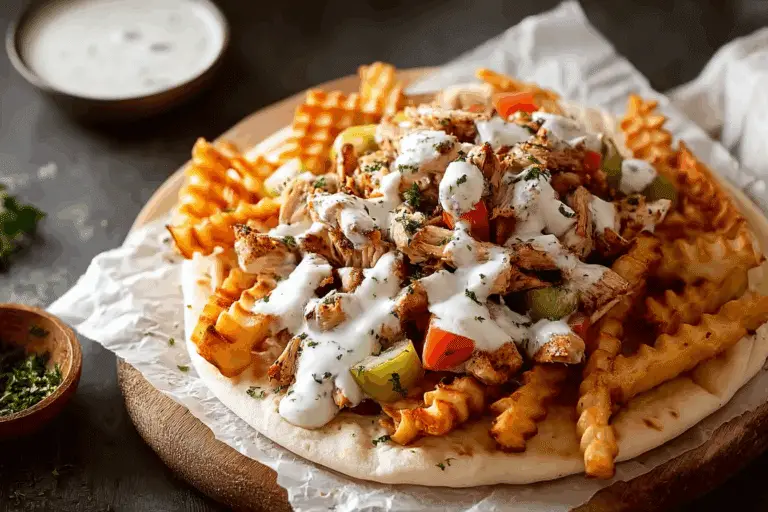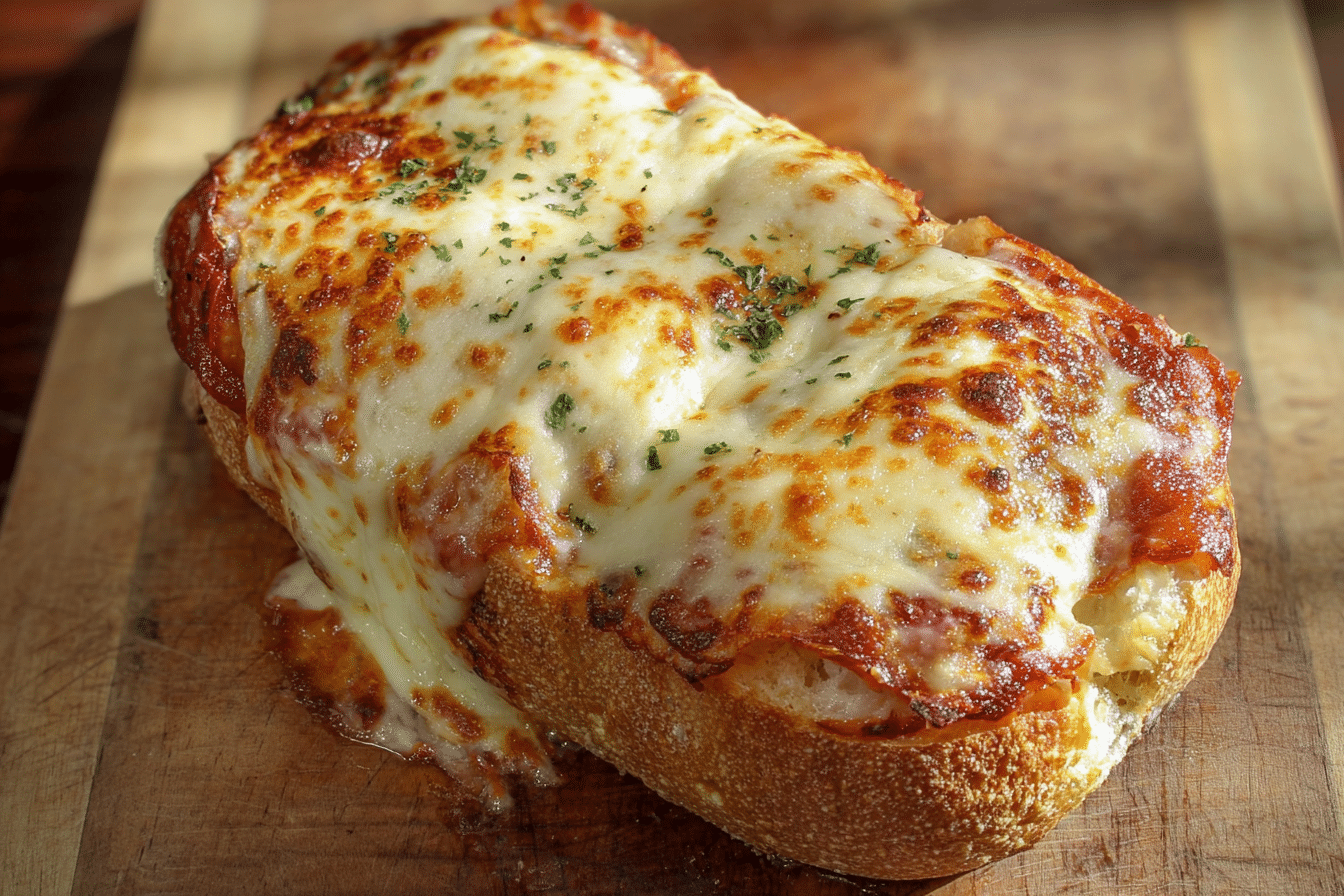
Chicken Parm Bread Boat
Imagine biting into a crusty, golden bread boat overflowing with juicy, tender chicken, gooey melted cheese, and a rich tomato sauce that clings to every bite like a warm embrace. This Chicken Parm Bread Boat brings all the magic of a classic Italian-American favorite into a handheld masterpiece, perfect for sharing or savoring solo. The toasted exterior gives way to a saucy, cheesy, savory interior that’s as indulgent as it is irresistible. Trust me, you’re going to love this.
Behind the Recipe
There’s something undeniably comforting about chicken parmesan. For me, it brings back memories of bustling family dinners, where the smell of garlic and marinara would fill the house and everyone would gather around the table, eagerly waiting for the first slice to be served. But as life gets busier, finding quicker, fun ways to enjoy those nostalgic flavors becomes key—and that’s how this bread boat was born. It’s everything you adore about chicken parm, packed neatly into a crispy loaf you can slice and serve with ease.
Recipe Origin or Trivia
Chicken Parmesan, or “chicken parmigiana,” has its roots in Italian-American cuisine, inspired by eggplant parmigiana from Southern Italy. When Italian immigrants brought their culinary traditions to America, chicken became a more affordable and accessible alternative. The breaded cutlet, rich marinara sauce, and melted cheese combo quickly became a beloved staple. The bread boat variation is a modern twist, designed for convenience, shareability, and a little fun in every slice.
Why You’ll Love Chicken Parm Bread Boat
This dish isn’t just a fun twist—it’s a full-on flavor bomb that’s as practical as it is delicious.
Versatile: Perfect for dinner, game nights, parties, or even next-day lunch.
Budget-Friendly: Uses simple, accessible ingredients with minimal waste.
Quick and Easy: Minimal prep and cleanup make this a weeknight hero.
Customizable: Swap cheeses, sauces, or bread types to match your mood.
Crowd-Pleasing: Everyone loves a pull-apart, cheesy, saucy bread.
Make-Ahead Friendly: Assemble ahead and bake when ready to serve.
Great for Leftovers: Reheats like a dream, and even better the next day.
Chef’s Pro Tips for Perfect Results
To make your Chicken Parm Bread Boat absolutely unforgettable, keep these insider tricks in your back pocket:
- Toast the Inside of the Bread First: Lightly toast the hollowed bread before filling to prevent sogginess.
- Use Fresh Mozzarella and Parmesan: It makes a huge difference in texture and flavor.
- Shred Chicken Finely: This helps it absorb the sauce better and makes every bite more flavorful.
- Add a Layer of Cheese on the Bottom: Creates a barrier so the bread doesn’t get soggy.
- Let It Rest Before Slicing: A few minutes of rest helps everything set perfectly.
Kitchen Tools You’ll Need
You don’t need a full kitchen arsenal to make this dish—just a few essentials:
Bread Knife: To neatly slice and hollow out your loaf.
Mixing Bowls: For tossing the chicken with sauce and cheese.
Sheet Pan: To bake the bread boat evenly and catch any cheesy drips.
Foil: To cover and prevent over-browning during baking.
Spatula or Tongs: For stuffing and serving the finished boat.
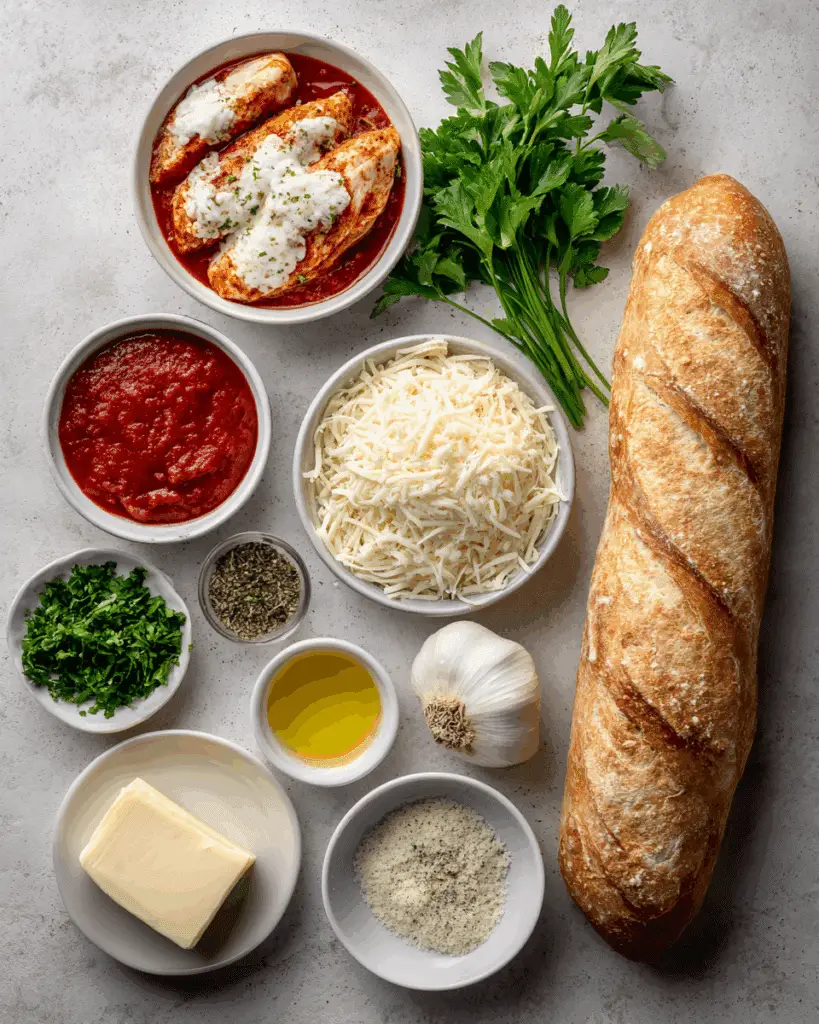
Ingredients in Chicken Parm Bread Boat
This recipe is a delicious marriage of simple ingredients that create big, bold flavors.
Baguette or Italian Loaf: 1 large (about 18 inches) – Serves as the crispy, golden vessel that holds everything together.
Cooked Chicken Breast: 2 cups, shredded – Soaks up the marinara beautifully and adds hearty protein.
Marinara Sauce: 1 cup – Brings tangy, garlicky richness and ties all the flavors together.
Mozzarella Cheese: 1½ cups, shredded – Melts into gooey perfection with a stretch you’ll love.
Parmesan Cheese: ½ cup, grated – Adds salty, nutty depth to complement the sauce.
Garlic Powder: 1 teaspoon – Enhances the savory flavors without overpowering.
Italian Seasoning: 1 teaspoon – Adds a classic herbaceous note that lifts the whole dish.
Butter: 2 tablespoons, melted – Brushed over the bread for a rich, golden finish.
Fresh Parsley: 2 tablespoons, chopped – Adds color and a burst of freshness to finish.
Ingredient Substitutions
Here are some easy swaps to make the dish fit your pantry:
Bread: Use ciabatta or sourdough instead of baguette.
Chicken: Rotisserie chicken or leftover grilled chicken works beautifully.
Marinara Sauce: Substitute with tomato basil pasta sauce or pizza sauce.
Mozzarella Cheese: Try provolone or fontina for a different melt.
Parmesan Cheese: Pecorino Romano is a great alternative.
Butter: Olive oil can be used for brushing the bread.
Parsley: Swap with basil or oregano for a different herb finish.
Ingredient Spotlight
Mozzarella Cheese: Its mild, creamy flavor and gooey melt make it the star of any cheesy dish, and here, it forms the delicious glue that holds everything together.
Parmesan Cheese: Sharp and salty, this aged cheese enhances the umami of the chicken and sauce, adding depth and that unmistakable chicken parm signature.
Instructions for Making Chicken Parm Bread Boat
This is where the magic happens—layering, baking, and transforming simple ingredients into a showstopping dish.
1. Preheat Your Equipment:
Set your oven to 375°F (190°C) and line a baking sheet with foil or parchment for easy cleanup.
2. Combine Ingredients:
In a mixing bowl, combine shredded chicken, marinara sauce, 1 cup of mozzarella, ¼ cup of Parmesan, garlic powder, and Italian seasoning. Stir until everything is well coated and cheesy.
3. Prepare Your Cooking Vessel:
Slice the top off the baguette and hollow out the inside, creating a bread boat. Be careful not to cut through the bottom. Lightly toast the interior in the oven for 5 minutes to create a crisp base.
4. Assemble the Dish:
Sprinkle a thin layer of mozzarella at the bottom of the bread boat. Spoon in the chicken mixture, packing it in tightly. Top with the remaining mozzarella and Parmesan.
5. Cook to Perfection:
Place the bread boat on your prepared baking sheet. Cover loosely with foil and bake for 15 minutes. Remove foil and bake another 10 minutes until golden and bubbly.
6. Finishing Touches:
Brush melted butter over the crust and sprinkle with fresh parsley.
7. Serve and Enjoy:
Let it rest for 5 minutes, then slice and serve. Watch the cheese stretch with every pull—it’s worth every bite.
Texture & Flavor Secrets
What makes this recipe truly special is the interplay of textures and layers of flavor. The outer bread becomes wonderfully crisp, giving a satisfying crunch with each bite. Inside, the juicy chicken and rich marinara meld with melted cheese to create a creamy, savory filling. The combination of mild mozzarella and sharp Parmesan hits every flavor note—from creamy and mild to nutty and salty. A finishing brush of butter adds a golden sheen and extra indulgence.
Cooking Tips & Tricks
Here are some extra nuggets of wisdom to keep in your apron pocket:
- Let the bread cool slightly before slicing for cleaner cuts.
- Use day-old bread for a sturdier boat.
- Add a pinch of red pepper flakes to the chicken mix for a little heat.
What to Avoid
Avoid these pitfalls for the perfect result every time:
- Don’t skip toasting the bread—it prevents sogginess.
- Avoid overloading with sauce or the bread may collapse.
- Don’t slice too soon—let it rest to keep layers intact.
Nutrition Facts
Servings: 6
Calories per serving: 420
Note: These are approximate values.
Preparation Time
Prep Time: 15 minutes
Cook Time: 25 minutes
Total Time: 40 minutes
Make-Ahead and Storage Tips
You can prep this bread boat up to a day in advance. Assemble everything, cover, and refrigerate. When ready, bake as directed. Leftovers keep well in the fridge for 3 days. Reheat in the oven to keep the bread crisp. You can also freeze individual slices, wrapped tightly, for up to a month.
How to Serve Chicken Parm Bread Boat
This dish is made for casual feasting. Serve it sliced on a platter for a party or game day. Pair with a crisp Caesar salad, some roasted veggies, or even marinara for dipping. It’s hearty enough to be a meal, but also fits perfectly as a shared appetizer.
Creative Leftover Transformations
Got leftovers? Don’t let them sit idle.
- Cheesy Chicken Parm Sliders: Reheat slices and sandwich between mini buns.
- Parm Pasta Toss: Dice leftovers and toss with cooked pasta for an easy meal.
- Omelet Filling: Add chopped bread boat to a fluffy egg omelet for brunch.
Additional Tips
Here are a few final flourishes to make your Chicken Parm Bread Boat truly sing:
- Use a microplane for finely grated Parmesan that melts beautifully.
- Garnish with extra herbs or a drizzle of balsamic glaze for elegance.
- Bake on a wire rack over a sheet pan for extra crisping underneath.
Make It a Showstopper
To elevate the presentation, slice the bread diagonally and fan it out on a cutting board. Add a sprinkling of fresh herbs and maybe a few cherry tomatoes on the side. Serve it on a rustic wooden board for that farmhouse-chic look.
Variations to Try
- Spicy Arrabbiata: Swap marinara for a spicy tomato sauce with red pepper.
- White Parm Boat: Use Alfredo sauce instead of marinara for a creamy twist.
- Caprese Style: Add sliced tomato and basil before baking for a fresh layer.
- Buffalo Parm: Mix in a touch of buffalo sauce with the chicken and top with blue cheese.
- Veggie Parm: Replace chicken with grilled eggplant or zucchini for a vegetarian version.
FAQ’s
Q1. Can I use store-bought rotisserie chicken?
Yes, it’s a great time-saver and works beautifully in this recipe.
Q2. What type of bread works best?
A crusty baguette or Italian loaf holds up best to the fillings.
Q3. Can I make this gluten-free?
Absolutely—just use a gluten-free loaf and confirm your sauce and cheeses are safe.
Q4. How do I reheat leftovers?
Bake slices in a 350°F oven for 10–15 minutes or until heated through.
Q5. Can I add vegetables?
Yes! Sauteed mushrooms, spinach, or bell peppers make great additions.
Q6. Is this freezer-friendly?
Yes, wrap tightly and freeze up to one month. Reheat in the oven for best texture.
Q7. What’s the best cheese alternative for mozzarella?
Provolone or fontina offer similar melt and flavor.
Q8. How can I make it spicier?
Add crushed red pepper flakes or a dash of hot sauce to the mix.
Q9. Can I double the recipe?
Sure—just use a second loaf and double the filling.
Q10. Do I need to serve it with anything?
It’s a meal on its own, but salad, soup, or extra sauce for dipping are great sides.
Conclusion
This Chicken Parm Bread Boat is more than just a fun twist—it’s a delicious nod to comfort food with an irresistible crunch and melty, saucy center. Whether you’re serving it for a cozy family dinner or showing off at a weekend party, this dish promises flavor, warmth, and a little wow-factor. So grab a loaf, gather your ingredients, and let’s bring some joy to the table. This one’s a total game-changer.Kickass Apple Pie Cookies
There’s something downright magical about capturing the soul of a warm apple pie in the form of a chewy, golden cookie. Imagine biting into a buttery crust, caramelized apple chunks melting on your tongue, hints of cinnamon swirling with brown sugar—all in a cookie that fits snugly in your palm. That’s exactly what you get with these Kickass Apple Pie Cookies. They’re comforting, nostalgic, and totally addictive, making them the perfect bake for chilly weekends, holiday trays, or just because you crave a bite of fall.
Behind the Recipe
This recipe was born out of pure dessert rebellion. One cozy evening, craving apple pie but dreading the long wait and clean-up, I thought, “Why not shrink the pie into a cookie?” The result was a deliciously chewy, slightly crisp cookie that hit every nostalgic apple pie note without the fuss. With the warmth of cinnamon and the caramel-kissed apples nestled in every bite, these cookies quickly became a household favorite—and trust me, one batch is never enough.
Recipe Origin or Trivia
While apple pie has deep American roots, tracing back to the early settlers who brought over English pie traditions, cookies have always been a global treat of convenience and creativity. Combining the two brings together centuries of dessert evolution. The beauty of this recipe lies in its fusion—the familiarity of American apple pie meets the snackable joy of cookies. It’s like giving your favorite pie a playful, bite-sized twist.
Why You’ll Love Kickass Apple Pie Cookies
Warm, cozy, and jam-packed with flavor, these cookies are as fun to make as they are to eat.
Versatile: Whether you serve them warm with ice cream or pack them for a picnic, these cookies adapt beautifully to any occasion.
Budget-Friendly: Uses pantry staples and seasonal fruit, so no fancy shopping trips needed.
Quick and Easy: No crust rolling or lattice weaving—just mix, bake, and bite.
Customizable: Want them nutty or drizzled with caramel? Go for it. These cookies welcome your creativity.
Crowd-Pleasing: The comforting taste of apple pie in a cookie always wins hearts.
Make-Ahead Friendly: Bake and freeze them, or prep the dough ahead for stress-free baking.
Great for Leftovers: Day-old apples or that last cinnamon stick in the jar? Perfect for this recipe.
Chef’s Pro Tips for Perfect Results
Mastering these cookies is easier than pie—literally. But a few tricks can elevate them from good to unforgettable.
- Use tart apples: Granny Smith apples hold their shape and add a bright contrast to the sweet cookie base.
- Chop apples finely: Small, even pieces cook faster and blend better into the dough.
- Don’t overmix: Mix until just combined to avoid tough cookies.
- Chill the dough: Even 30 minutes in the fridge can prevent spreading and intensify flavor.
- Bake until golden: Look for lightly crisped edges and a soft, puffy center.
Kitchen Tools You’ll Need
This recipe keeps things simple with tools you probably already have on hand.
Mixing Bowls: For blending dry and wet ingredients separately.
Baking Sheet: A sturdy tray ensures even baking and golden bottoms.
Parchment Paper: Keeps cookies from sticking and makes cleanup easy.
Small Saucepan: To sauté the apples to caramelized perfection.
Measuring Cups & Spoons: Accuracy matters for that perfect chew.
Cookie Scoop: Helps portion uniform cookies for even baking.
Ingredients in Kickass Apple Pie Cookies
What makes these cookies shine is the beautiful balance of cozy spices, buttery dough, and tender apple bits. Every element plays a delicious role.
- Unsalted Butter: 1 cup (softened) brings rich flavor and a tender crumb.
- Brown Sugar: 1 cup adds molasses depth and chewiness.
- Granulated Sugar: 1/2 cup for balanced sweetness and structure.
- Eggs: 2 large eggs for moisture and binding.
- Vanilla Extract: 2 teaspoons adds warmth and enhances flavor.
- All-Purpose Flour: 2 1/2 cups forms the sturdy, soft cookie base.
- Baking Soda: 1 teaspoon gives lift and a tender texture.
- Salt: 1/2 teaspoon balances the sweetness.
- Cinnamon: 2 teaspoons for that classic apple pie aroma.
- Nutmeg: 1/4 teaspoon adds depth and a cozy undertone.
- Apples (Granny Smith): 2 medium (peeled and diced) create juicy, tart bursts.
- Lemon Juice: 1 teaspoon prevents browning and brightens flavor.
- Butter (for apples): 2 tablespoons to sauté the apples to golden caramelized bliss.
- Brown Sugar (for apples): 2 tablespoons adds sweet caramel notes during sautéing.
Ingredient Substitutions
If you’re short on something, don’t worry—there’s wiggle room in this recipe.
All-Purpose Flour: Use gluten-free 1:1 flour for a gluten-free version.
Brown Sugar: Coconut sugar makes a great unrefined alternative.
Eggs: Use flax eggs for a vegan twist.
Butter: Vegan butter or margarine works well for dairy-free options.
Granny Smith Apples: Try Honeycrisp or Pink Lady for a sweeter bite.
Ingredient Spotlight
Granny Smith Apples: Their tartness cuts through the cookie’s sweetness, giving you those bold, bright pops of apple flavor in every bite.
Cinnamon: The hero spice of fall, cinnamon adds a familiar warmth and aroma that screams comfort food.
Instructions for Making Kickass Apple Pie Cookies
Ready to bake? Let’s walk through the process together. It’s easy, fun, and the reward is utterly delicious.
-
Preheat Your Equipment:
Preheat your oven to 350°F (175°C). Line baking sheets with parchment paper for a nonstick surface. -
Combine Ingredients:
In a large bowl, cream together butter, brown sugar, and granulated sugar until fluffy. Beat in the eggs and vanilla. In a separate bowl, whisk flour, baking soda, salt, cinnamon, and nutmeg. Gradually mix dry into wet. -
Prepare Your Cooking Vessel:
Heat 2 tablespoons of butter in a small saucepan over medium heat. Add diced apples, lemon juice, and 2 tablespoons brown sugar. Sauté until soft and caramelized, about 5–7 minutes. Let cool before folding into dough. -
Assemble the Dish:
Gently fold cooled apples into the cookie dough. Scoop rounded tablespoons of dough onto prepared sheets, spacing well apart. -
Cook to Perfection:
Bake for 12–14 minutes, until edges are golden and centers are puffed but soft. Cool on the pan for 5 minutes, then transfer to wire racks. -
Finishing Touches:
Optional but irresistible—sprinkle warm cookies with a cinnamon-sugar mix or drizzle with vanilla glaze. -
Serve and Enjoy:
Serve slightly warm with a cold glass of milk or a scoop of vanilla ice cream. Get ready for compliments.
Texture & Flavor Secrets
The magic of these cookies lies in their contrast: the crisp edges cradle soft, chewy centers studded with juicy apple bits. The sautéed apples add caramel depth, while cinnamon and nutmeg weave through every bite, making each mouthful taste like the first forkful of a warm apple pie.
Cooking Tips & Tricks
Just a few tweaks can elevate your cookie game.
- Let the sautéed apples cool completely before mixing into the dough to prevent melting the butter.
- Chill the dough for 30–60 minutes for thicker cookies.
- Use a cookie scoop for uniform baking and visual appeal.
- For a crunchy twist, fold in chopped pecans or walnuts.
What to Avoid
Here are some common mistakes and how to fix them.
- Don’t skip chilling the dough—it keeps your cookies from spreading too much.
- Avoid using apples that are too soft—they’ll get mushy and watery.
- Don’t overbake—cookies firm up as they cool, so take them out when they’re slightly underdone in the center.
- Skipping lemon juice? Your apples may brown and lack brightness.
Nutrition Facts
Servings: 24
Calories per serving: 190
Note: These are approximate values.
Preparation Time
Prep Time: 20 minutes
Cook Time: 14 minutes
Total Time: 34 minutes
Make-Ahead and Storage Tips
These cookies are ideal for baking ahead. You can chill the dough up to 2 days in advance, or freeze it in scoops for future cravings. Once baked, store them in an airtight container for up to 4 days. Want them warm again? Just pop one in the microwave for 10 seconds. You can even freeze the baked cookies—wrap them well and thaw as needed.
How to Serve Kickass Apple Pie Cookies
These cookies are perfection on their own, but if you want to get fancy, pair them with:
- A drizzle of caramel sauce
- A scoop of cinnamon or vanilla bean ice cream
- Crumbled over yogurt or oatmeal
- Alongside a mug of hot cider or chai
Creative Leftover Transformations
Got extras? Turn them into:
- Cookie ice cream sandwiches using softened vanilla or cinnamon ice cream
- Apple pie cookie crumble as a topping for parfaits or pies
- Mini cookie trifles layered with whipped cream and apple slices
- Crushed crust base for mini cheesecakes or bars
Additional Tips
- Store with a slice of bread in the container to keep cookies soft.
- Toast the spices lightly before adding to release their oils and deepen flavor.
- Want extra texture? Add oatmeal or crushed graham crackers into the dough.
Make It a Showstopper
Presentation matters, especially when these cookies already smell heavenly. Stack them on a rustic wooden board, dust with powdered sugar, or drizzle with icing in a crisscross pattern. You can also serve them warm in mini pie tins with a dollop of whipped cream for an extra “wow” factor.
Variations to Try
- Caramel Apple Cookies: Add soft caramel bits to the dough for gooey pockets.
- Maple Glazed: Replace vanilla glaze with a maple syrup drizzle.
- Nutty Apple Delight: Fold in toasted pecans or walnuts.
- Apple Oatmeal Cookies: Swap 1/2 cup flour for oats for chew and nuttiness.
- Apple Pie Bars: Press dough into a pan and bake as bars with extra apple filling.
FAQ’s
Q1: Can I make these cookies gluten-free?
A1: Yes, use a 1:1 gluten-free flour blend and make sure all ingredients are certified gluten-free.
Q2: Can I freeze the dough?
A2: Absolutely. Scoop into balls, freeze on a tray, then store in a freezer bag for up to 2 months.
Q3: What apples work best?
A3: Granny Smith is best for tartness and structure, but Honeycrisp and Pink Lady are also great.
Q4: How do I prevent soggy cookies?
A4: Let the apples cool completely before mixing and don’t overbake.
Q5: Can I double the recipe?
A5: Yes, it scales beautifully—just use a larger bowl and bake in batches.
Q6: What if I don’t have nutmeg?
A6: You can skip it or use a pinch of allspice or cloves for warmth.
Q7: Are these good for gifting?
A7: Totally! Wrap them in parchment and tie with twine for a rustic, charming gift.
Q8: Can I skip the lemon juice?
A8: It helps keep apples fresh and bright—highly recommended, but a splash of apple cider vinegar can sub in a pinch.
Q9: What glaze works best?
A9: A simple powdered sugar and milk glaze with a touch of vanilla is perfect.
Q10: Can I use applesauce instead of eggs?
A10: Yes, 1/4 cup unsweetened applesauce per egg makes a great vegan alternative.
Conclusion
If you’re craving comfort in cookie form, these Kickass Apple Pie Cookies deliver everything you love about apple pie without the wait. With tender apples, cozy spices, and chewy edges, they’ll have you reaching for seconds (and thirds). Whether it’s a holiday treat or a weeknight indulgence, these cookies deserve a permanent place in your baking rotation. Trust me, they’re worth every bite.
Print
Chicken Parm Bread Boat
- Prep Time: 15 minutes
- Cook Time: 25 minutes
- Total Time: 40 minutes
- Yield: 6 servings
- Category: Main Dish
- Method: Baking
- Cuisine: Italian-American
- Diet: Halal
Description
This Chicken Parm Bread Boat brings all the beloved flavors of chicken parmesan into a crispy, cheesy, and saucy handheld delight—perfect for sharing or indulging solo.
Ingredients
- Baguette or Italian Loaf: 1 large (about 18 inches)
- Cooked Chicken Breast: 2 cups, shredded
- Marinara Sauce: 1 cup
- Mozzarella Cheese: 1½ cups, shredded
- Parmesan Cheese: ½ cup, grated
- Garlic Powder: 1 teaspoon
- Italian Seasoning: 1 teaspoon
- Butter: 2 tablespoons, melted
- Fresh Parsley: 2 tablespoons, chopped
Instructions
- Preheat Your Equipment: Set your oven to 375°F (190°C) and line a baking sheet with foil or parchment.
- Combine Ingredients: Mix shredded chicken, marinara, 1 cup mozzarella, ¼ cup Parmesan, garlic powder, and Italian seasoning in a bowl.
- Prepare Your Cooking Vessel: Slice top off the bread and hollow it out. Lightly toast inside for 5 minutes.
- Assemble the Dish: Add a layer of mozzarella to the bread base, fill with chicken mixture, and top with remaining cheese.
- Cook to Perfection: Bake covered for 15 minutes, then uncovered for 10 more until golden and bubbly.
- Finishing Touches: Brush with melted butter and sprinkle with parsley.
- Serve and Enjoy: Let rest for 5 minutes, slice, and serve warm.
Notes
- Use day-old bread for better structure.
- Let the bread rest after baking for cleaner slices.
- Add red pepper flakes for extra spice.
Nutrition
- Serving Size: 1 slice
- Calories: 420
- Sugar: 4g
- Sodium: 780mg
- Fat: 22g
- Saturated Fat: 10g
- Unsaturated Fat: 9g
- Trans Fat: 0g
- Carbohydrates: 28g
- Fiber: 2g
- Protein: 28g
- Cholesterol: 75mg
Keywords: chicken parmesan, bread boat, cheesy loaf, party food, chicken parm sandwich, baked chicken boat