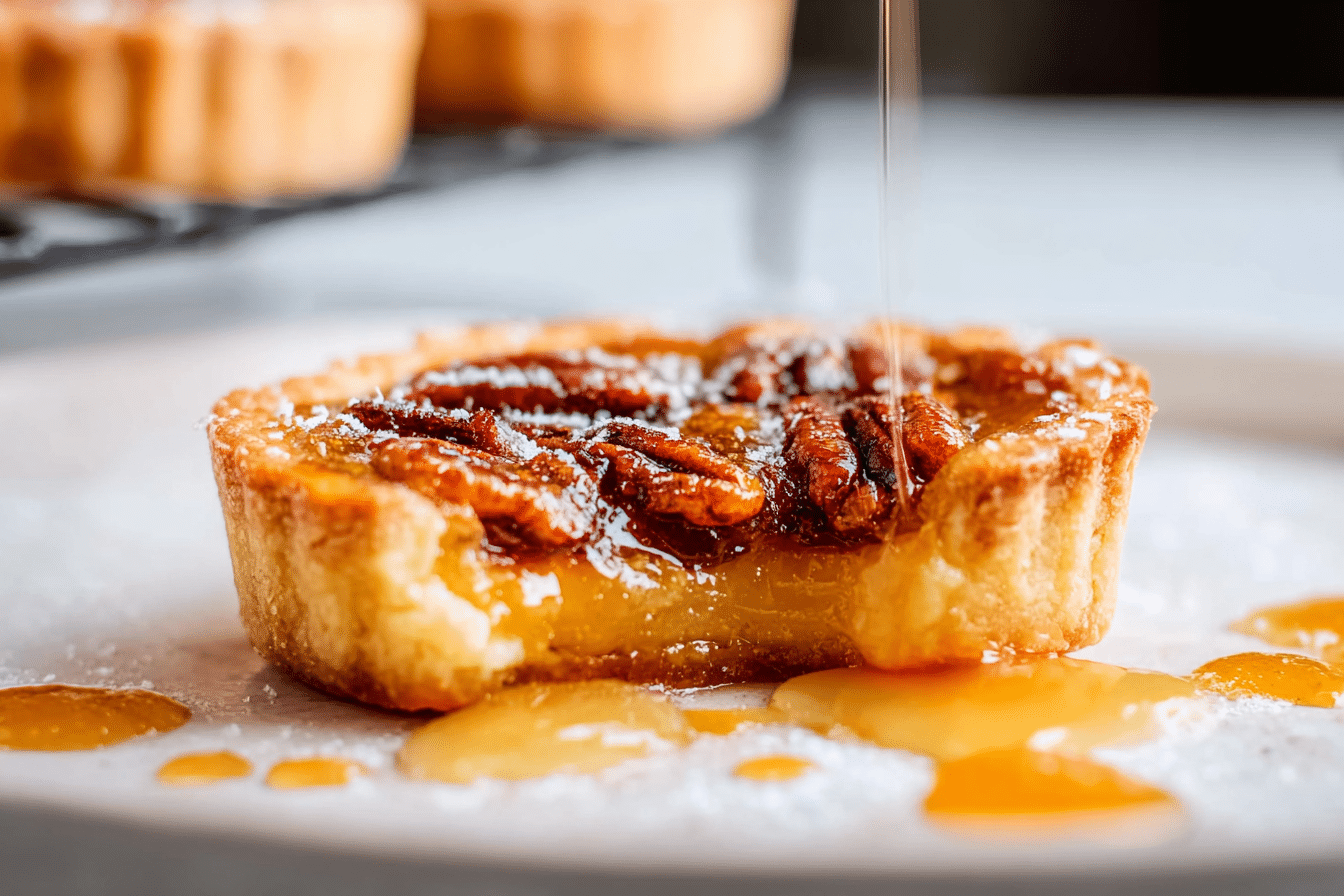
Canadian Butter Tarts
There’s something undeniably nostalgic about Canadian Butter Tarts. Imagine biting through a flaky, buttery pastry shell only to meet a filling that’s sweet, gooey, and just a little chewy around the edges. Each bite is a perfect balance: crisp, delicate pastry cradling a molten center that feels like a hug from the inside out.
If you’ve never had a butter tart before, think of it as Canada’s answer to pecan pie—only smaller, more portable, and somehow even more addictive. These little treats are rich, indulgent, and just messy enough to make you lick your fingers without shame. Trust me, once you’ve had one, you’ll understand why they’re a national treasure.
So, whether you’re baking for the holidays, bringing something special to a potluck, or just treating yourself to a quiet afternoon indulgence, these butter tarts are pure magic. Let’s dive in.
Why You’ll Love This Recipe
This recipe isn’t just about making a sweet treat—it’s about creating a moment that feels warm and memorable. Here’s why Canadian Butter Tarts are worth the effort every single time:
Iconic: Butter tarts are one of Canada’s most beloved desserts, with recipes passed down through generations. You’re not just baking—you’re carrying on a delicious tradition.
Flaky & Gooey Combo: The contrast between crisp, buttery pastry and sticky, caramel-like filling is irresistible. Every bite gives you a little crunch followed by molten sweetness.
Customizable: Team Raisin vs. Team No Raisin is a very real debate when it comes to butter tarts, and this recipe lets you choose. Pecans? Chocolate chips? Dried cranberries? Go wild.
Perfect for Sharing: These tarts are small, handheld, and perfect for parties, bake sales, or holiday dessert tables. They disappear in minutes.
Comfort in a Bite: Butter tarts are the kind of dessert that feel homemade in the best way. They’re not fussy or over-decorated—just honest, rich, and comforting.
Recipe Origin
Butter tarts are deeply Canadian, tracing back to the late 1800s when home cooks first started baking them with pantry staples. Simple ingredients—flour, butter, sugar, eggs—came together to create something extraordinary. They’ve since become a hallmark of Canadian baking, with whole festivals dedicated to celebrating them.
Depending on where you are in Canada, you’ll find variations: some bakers prefer runny centers that ooze when you bite in, while others swear by firmer, more set fillings. Raisins, pecans, or even a plain version—everyone has their favorite. This recipe strikes a lovely balance: gooey without being messy, sweet without being cloying, and flaky enough to make you close your eyes after the first bite.
Kitchen Tools You’ll Need
- Large mixing bowl
- Pastry cutter (or two knives/fingers for cutting in butter)
- Measuring cups and spoons
- Rolling pin
- Muffin tin
- Whisk
- Small saucepan or microwave-safe bowl (for melting butter)
- Spatula or spoon for filling
Canadian Butter Tarts
- Prep Time: 30 mins
- Cook Time: 25 mins
- Total Time: 55 mins
- Yield: 12 tarts 1x
- Category: Dessert
- Method: Baking
- Cuisine: Canadian
- Diet: Vegetarian
Description
Canadian Butter Tarts are a classic Canadian dessert with a flaky homemade pastry and a rich, gooey filling of butter, brown sugar, and syrup. Sweet, indulgent, and customizable with raisins or pecans, they’re a true comfort treat!
Ingredients
For the Pastry Dough:
- 2 ½ cups all-purpose flour
- ¾ cup salted butter, cold
- ¼ cup shortening, cold
- 1 tablespoon light brown sugar, packed
- 1 teaspoon salt
- 1 tablespoon apple cider vinegar
- Ice water, as needed
For the Filling:
- ⅔ cup light brown sugar, packed
- ⅓ cup light corn syrup
- 1 egg
- 1 egg yolk
- ½ teaspoon salt
- 1 ½ teaspoons vanilla extract
- ⅓ cup salted butter, melted
- ¼ cup golden raisins
- ¼ cup pecans, chopped
Instructions
- Preheat the oven to 375°F (190°C).
- Make the pastry: In a large bowl, whisk together flour, brown sugar, and salt. Cut in the cold butter and shortening with a pastry cutter or fork until crumbly.
- Add apple cider vinegar and a few tablespoons of ice water, mixing just until the dough comes together. Shape into a disc, wrap, and chill for 30 minutes.
- On a floured surface, roll out the dough to about ⅛ inch thickness. Cut into circles large enough to fit into a muffin tin. Press circles into the cups of a greased muffin tin.
- Make the filling: In a medium bowl, whisk together brown sugar, corn syrup, egg, egg yolk, salt, and vanilla. Stir in the melted butter until smooth. Fold in raisins and pecans.
- Spoon the filling evenly into the prepared tart shells, filling about ⅔ full to allow for bubbling as they bake.
- Bake for 20–25 minutes, until the filling is set but slightly jiggly in the center and the pastry is golden brown.
- Cool in the pan for 10 minutes before transferring to a wire rack. Serve warm or at room temperature.
Notes
- Butter tarts can be made with or without raisins or nuts, depending on preference.
- For extra flaky pastry, keep all ingredients cold while making the dough.
- Store leftovers in an airtight container at room temperature for up to 3 days or refrigerate for longer freshness.
Nutrition
- Serving Size: 1 tart
- Calories: 320
- Sugar: 20g
- Sodium: 210mg
- Fat: 19g
- Saturated Fat: 10g
- Unsaturated Fat: 8g
- Trans Fat: 0g
- Carbohydrates: 34g
- Fiber: 1g
- Protein: 3g
- Cholesterol: 60mg
Keywords: Canadian butter tarts, butter tart recipe, classic Canadian dessert, homemade pastry tarts, sweet tart recipe
Ingredients in Canadian Butter Tarts
(Note: the full ingredient list, including measurements, is provided in the recipe card directly below.)
Let’s take a closer look at what makes these little tarts so delightful:
All-Purpose Flour
The backbone of the pastry dough. Flour provides structure while still allowing for tenderness when combined with butter and shortening.
Butter (Salted, Cold)
Cold butter is the key to a flaky crust. Those little pockets of fat melt as the tarts bake, creating layers of delicate pastry.
Shortening (Cold)
Adding shortening alongside butter ensures an extra tender, almost melt-in-your-mouth crust. It balances the richness of the butter.
Light Brown Sugar (in Pastry Dough)
Just a touch of sugar adds flavor depth to the crust without making it overly sweet.
Salt
Essential for balancing sweetness and enhancing all the other flavors.
Apple Cider Vinegar
The secret ingredient in the dough! Vinegar helps prevent gluten from overdeveloping, keeping the pastry light and tender.
Ice Water
Cold water helps bring the dough together without warming up the fats. The colder, the better.
Brown Sugar (for Filling)
The star of the filling, bringing rich caramel notes that make the tarts so irresistible.
Corn Syrup (Light)
Keeps the filling gooey and glossy. It helps prevent crystallization, ensuring the perfect smooth texture.
Eggs + Egg Yolk
Provide structure and richness. The yolk especially adds that velvety texture to the filling.
Salt
Balances the sweetness so the filling isn’t overwhelming.
Vanilla Extract
Adds warmth and depth, enhancing the brown sugar and buttery notes.
Butter (Melted)
Gives the filling richness and a silky mouthfeel. Combined with sugar and syrup, it creates a luscious, toffee-like center.
Golden Raisins
Sweet little bursts of chewiness. They plump up beautifully in the filling.
Pecans (Chopped)
Add crunch and nuttiness, balancing the gooey filling with texture.
Instructions
Let’s walk through how to make these Canadian gems step by step:
Prepare the Pastry Dough
In a large mixing bowl, combine flour, sugar, and salt. Cut in the cold butter and shortening until the mixture resembles coarse crumbs. Drizzle in apple cider vinegar and ice water a little at a time, mixing until the dough just comes together. Divide into two disks, wrap in plastic, and chill for at least 30 minutes.
Roll and Cut
On a floured surface, roll out the dough to about ⅛-inch thick. Using a round cutter (or the rim of a glass), cut circles and gently press them into the cups of a muffin tin. Chill again while you prepare the filling.
Make the Filling
Whisk together brown sugar, corn syrup, egg, egg yolk, salt, vanilla, and melted butter until smooth and glossy. Stir in raisins and pecans.
Fill the Shells
Spoon the filling into each pastry shell, about two-thirds full. Don’t overfill—these little guys bubble up as they bake.
Bake to Perfection
Bake at 375°F until the pastry is golden and the filling is set around the edges but still a little jiggly in the center (about 20–25 minutes).
Cool and Enjoy
Allow the tarts to cool in the pan for 10 minutes before carefully removing them. The filling will set as they cool, making them easier to handle.

How to Serve Canadian Butter Tarts
- With Coffee or Tea: Butter tarts are the ultimate cozy pairing for a hot cup of coffee or black tea.
- On a Holiday Platter: Pair with shortbread, fudge, or cookies for a festive dessert spread.
- With Ice Cream: Serve warm butter tarts with a scoop of vanilla ice cream for a decadent twist.
- As a Gift: Wrap in a decorative box or tin—they travel beautifully and make heartfelt homemade gifts.
Make-Ahead and Storage Tips
- Make Ahead: Dough can be made and refrigerated up to 3 days in advance, or frozen for 2 months.
- Storage: Baked butter tarts keep well at room temperature in an airtight container for 2 days, or in the fridge for 5 days.
- Freezing: Freeze cooled butter tarts in a single layer, then transfer to a freezer bag. Thaw at room temperature before serving.
Variations to Try
- Classic Plain: Skip raisins and pecans for a smooth, gooey filling.
- Chocolate Chip: Swap the raisins for mini chocolate chips.
- Cranberry-Orange: Add dried cranberries and a little orange zest.
- Boozy Twist: Stir a splash of rum or bourbon into the filling for adult gatherings.
- Nut-Free: Leave out pecans for an allergen-friendly version.
Additional Tips
- Chill your dough often—cold pastry means flaky pastry.
- Don’t overmix the dough; tenderness comes from handling it gently.
- Avoid overbaking; the centers should still wobble slightly when removed from the oven.
- For easier removal, let the tarts cool before sliding a butter knife around the edges.
FAQ Section
Q1: Can I use store-bought pastry dough?
A1: Yes, store-bought works in a pinch, but homemade gives that classic buttery flakiness.
Q2: Do butter tarts need to be refrigerated?
A2: Not right away—2 days at room temp is fine. For longer storage, refrigerate or freeze.
Q3: How runny should the filling be?
A3: That’s up to you! Bake a few minutes less for gooier centers, or longer for firmer filling.
Q4: Can I make mini butter tarts?
A4: Absolutely—just use a mini muffin tin and reduce baking time slightly.
Q5: What’s the difference between butter tarts and pecan pie?
A5: Butter tarts are smaller, often runnier, and have a different pastry-to-filling ratio.
Q6: Can I use dark corn syrup instead of light?
A6: Yes, but the flavor will be deeper and more molasses-like.
Q7: Are butter tarts very sweet?
A7: They’re sweet, yes, but the salt in the dough and filling keeps them balanced.
Q8: Can I skip the raisins?
A8: Of course! The raisin debate is real—some swear by them, others leave them out.
Q9: Can I double the recipe?
A9: Yes, and you should! These disappear fast.
Q10: How do I keep the filling from bubbling over?
A10: Don’t overfill the pastry shells, and leave room for expansion as they bake.
Conclusion
Canadian Butter Tarts aren’t just a dessert—they’re a tradition, a piece of culinary heritage, and a true comfort food. With their flaky shells, gooey centers, and endless variations, they’re the kind of bake that makes people gather around the table and reach for seconds.
Whether you’re making them for the holidays, sharing them at a gathering, or just treating yourself to a quiet indulgence, these tarts are a little bite of joy. Once you’ve tried them, you’ll see why Canadians proudly claim them as their own.
So roll up your sleeves, preheat that oven, and get ready to bake a batch of sweet, buttery goodness. One bite and you’ll understand why these little tarts have stood the test of time.
Canadian Butter Tarts
Learn how to make these classic Canadian treats step-by-step: