Checkerboard Cookies
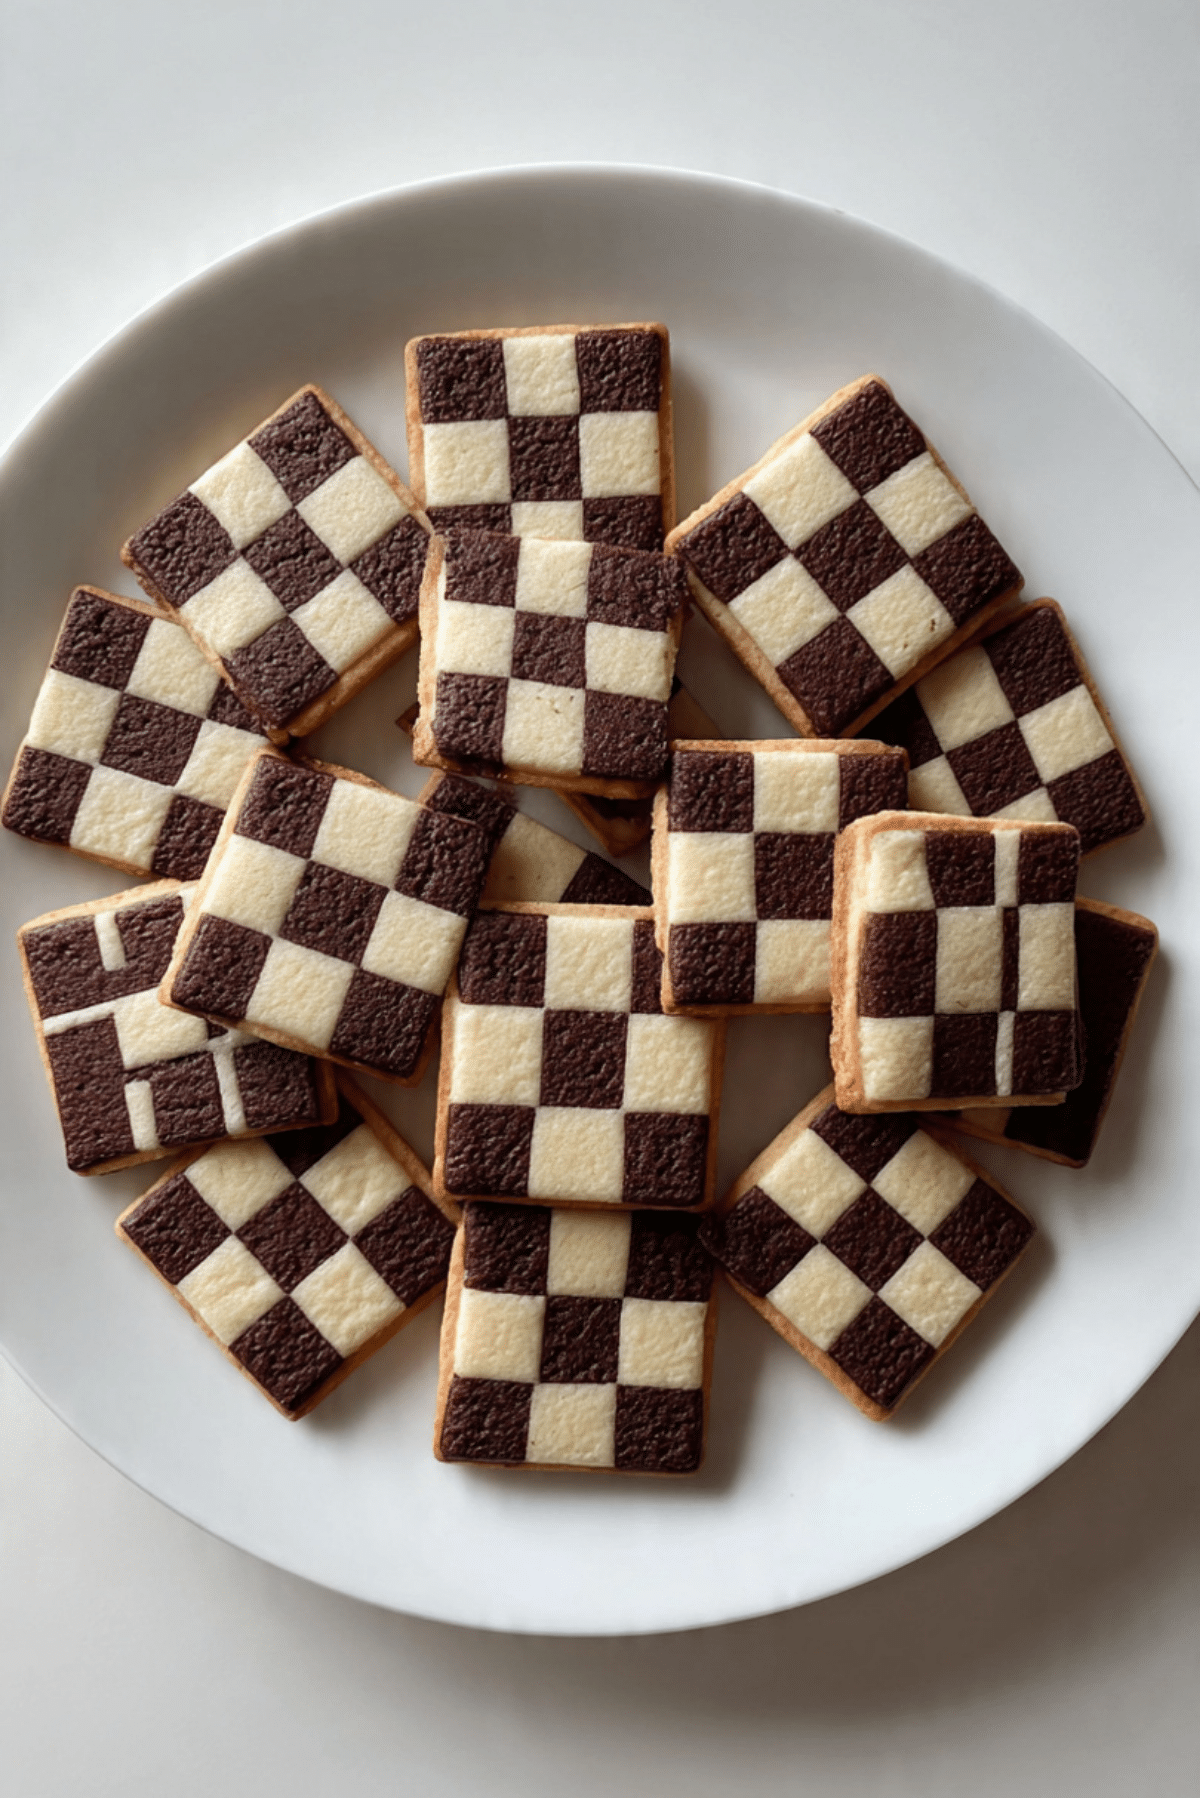
Checkerboard cookies are one of those treats that bring together both fun and flavor in every square bite. These visually striking cookies are a delightful mix of chocolate and vanilla dough, arranged in a tidy, checkerboard pattern that instantly catches the eye. Crisp at the edges, soft in the center, and gently sweet with a hint of cocoa, they’re as fun to make as they are to eat.
Behind the Recipe
The first time I made checkerboard cookies was on a chilly winter afternoon, trying to bring some cheer into a quiet kitchen. There’s something soothing about aligning those chocolate and vanilla strips, almost like building edible puzzle pieces. They quickly became a holiday staple and a conversation starter every time they hit the cookie plate.
Recipe Origin or Trivia
Checkerboard cookies are inspired by the classic European butter cookie and often seen in festive trays across German and Scandinavian holiday traditions. Their playful design pays tribute to precision baking, where shape and symmetry matter as much as taste. While the pattern might look complex, it’s surprisingly easy to achieve with a bit of patience and dough chilling.
Why You’ll Love Checkerboard Cookies
These cookies aren’t just a pretty face — they’ve got plenty of reasons to win your heart.
Versatile: Great for holidays, tea parties, or gift boxes.
Budget-Friendly: Simple pantry ingredients come together in a fancy-looking treat.
Quick and Easy: Most of the work is in assembling the pattern, but it’s beginner-friendly.
Customizable: Swap flavors or colors for a different vibe, like strawberry and vanilla.
Crowd-Pleasing: Both kids and adults are drawn to the design and love the taste.
Make-Ahead Friendly: Dough can be prepared in advance and baked later.
Great for Leftovers: These cookies store well and stay fresh for days.
Chef’s Pro Tips for Perfect Results
Let me tell you, the secret to perfect checkerboard cookies isn’t complicated — just a few tried-and-true steps.
- Chill Your Dough: After rolling and shaping, always chill to make cutting and stacking easier.
- Use a Ruler: For even squares, measure the dough strips so the pattern looks clean.
- Sharp Knife Only: A clean, sharp knife gives crisp edges when slicing the pattern.
- Don’t Overbake: Bake just until the edges begin to turn golden — that keeps the centers tender.
- Rotate During Baking: Halfway through baking, turn your tray to ensure even browning.
Kitchen Tools You’ll Need
Before we get to mixing and baking, gather these essentials.
Mixing Bowls: For separating and flavoring each dough.
Electric Mixer: Creams butter and sugar to the perfect texture.
Measuring Cups and Spoons: Precision matters for the checkerboard.
Plastic Wrap: Helps with dough shaping and chilling.
Rolling Pin: To roll the dough evenly.
Sharp Knife: To slice dough cleanly and create even squares.
Baking Sheet with Parchment: Prevents sticking and promotes even baking.
Ingredients in Checkerboard Cookies
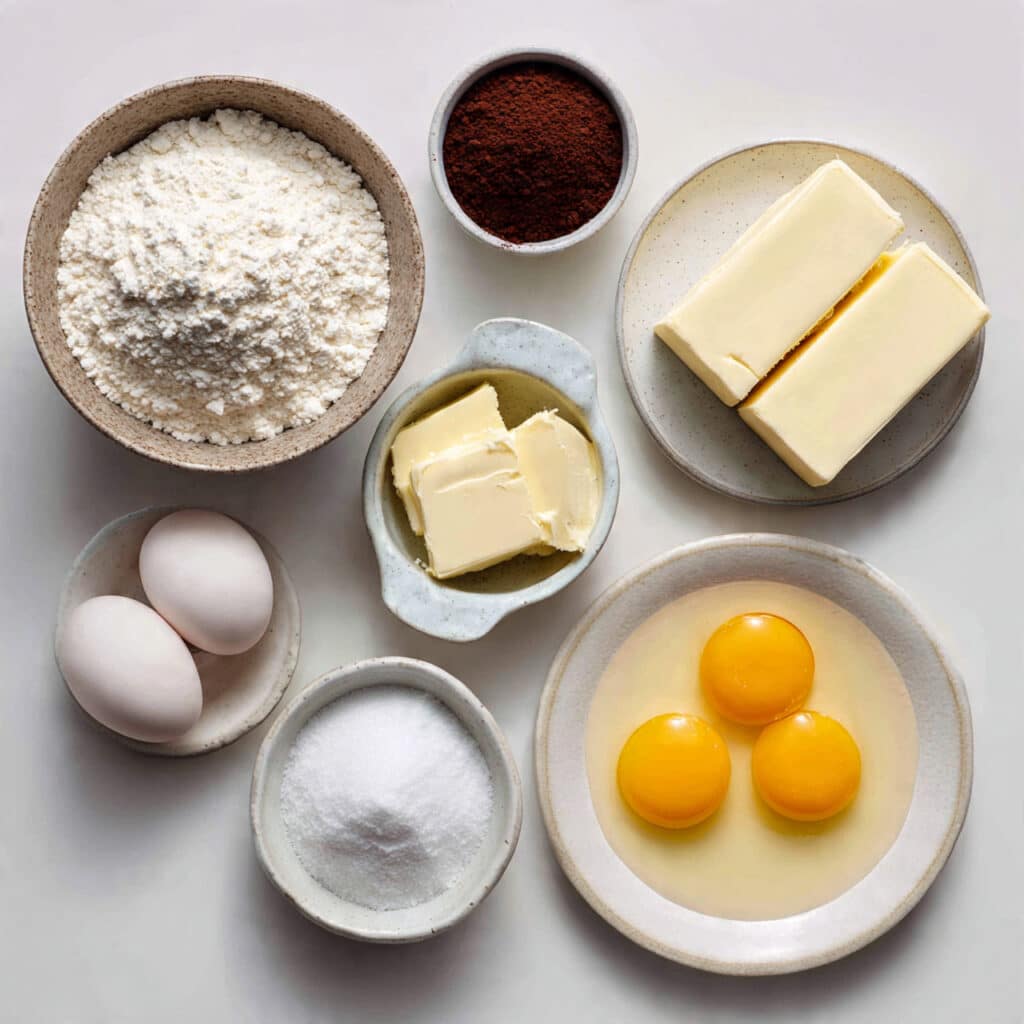
What makes checkerboard cookies so satisfying is the harmony of simple ingredients, each playing their part in both texture and taste.
- All-Purpose Flour: 2 ½ cups – Provides the structure and base for both doughs.
- Unsalted Butter: 1 cup (softened) – Gives richness and that melt-in-your-mouth texture.
- Granulated Sugar: ¾ cup – Adds sweetness without overpowering the vanilla or cocoa.
- Egg Yolks: 2 large – Help bind the dough and add a tender crumb.
- Vanilla Extract: 1 ½ teaspoons – Adds warm, aromatic flavor to the light dough.
- Cocoa Powder: 2 tablespoons – Brings that deep chocolate color and flavor.
- Salt: ¼ teaspoon – Balances out the sweetness.
Ingredient Substitutions
No stress if you’re out of something — here are some easy swaps.
Unsalted Butter: Salted butter, just reduce added salt.
Granulated Sugar: Try superfine sugar for a smoother finish.
Egg Yolks: Use a whole egg if needed, though texture may vary.
Cocoa Powder: Use black cocoa for a darker, more intense flavor.
Ingredient Spotlight
Cocoa Powder: This simple pantry staple adds a beautiful contrast and bold flavor. Choosing a high-quality unsweetened version makes a noticeable difference.
Vanilla Extract: A good pure vanilla brings warmth and balances the chocolate, giving the cookies their nostalgic bakery scent.
Instructions for Making Checkerboard Cookies
Get ready to roll up your sleeves — the fun’s about to begin. Making checkerboard cookies is like baking and crafting all in one.
- Preheat Your Equipment:
Preheat your oven to 350°F (175°C) and line a baking sheet with parchment paper. - Combine Ingredients:
In a large bowl, cream the butter and sugar until light and fluffy. Add the egg yolks and vanilla extract, mixing well. Gradually add flour and salt. Divide the dough in half. - Prepare Your Cooking Vessel:
Place one half of the dough back in the bowl and mix in cocoa powder until fully blended. Wrap each dough in plastic and chill for 30 minutes. - Assemble the Dish:
Roll out both vanilla and chocolate doughs into rectangles of equal size and thickness. Cut into long, even strips. Alternate stacking the strips in a checkerboard pattern, gently pressing them together. - Cook to Perfection:
Chill the assembled dough block again for 20 minutes. Slice into cookies about ¼-inch thick and place them on the prepared baking sheet. - Finishing Touches:
Bake for 10 to 12 minutes or until edges are lightly golden. Let cool on the tray for 2 minutes, then transfer to a wire rack. - Serve and Enjoy:
Let them cool completely, then serve with a cup of tea or wrap them up for gifting.
Texture & Flavor Secrets
What makes these cookies irresistible is the contrast. The vanilla squares stay buttery and delicate, while the chocolate ones carry a richer bite. Together, they create a perfect balance — crisp edges, soft centers, and just the right hint of sweetness.
Cooking Tips & Tricks
Let’s make sure every cookie is a winner.
- Chill the dough before slicing to help keep the checkerboard lines sharp.
- Don’t skip the ruler or straight edge if you want clean, bakery-style lines.
- You can double the batch and freeze half the dough for later.
What to Avoid
Avoiding these common missteps will make a big difference.
- Cutting dough while too soft — it’ll mash rather than slice.
- Overmixing the dough can lead to tough cookies.
- Uneven dough thickness leads to uneven baking.
Nutrition Facts
Servings: 24
Calories per serving: 120
Note: These are approximate values.
Preparation Time
Prep Time: 45 minutes
Cook Time: 12 minutes
Total Time: 1 hour
Make-Ahead and Storage Tips
Checkerboard cookies are fantastic for prepping ahead. You can shape the dough, wrap it tightly, and store it in the fridge for up to 3 days or in the freezer for a month. Once baked, they stay fresh in an airtight container for up to a week. For best texture, avoid refrigerating baked cookies.
How to Serve Checkerboard Cookies
They look beautiful on a holiday cookie tray or stacked in clear treat bags as edible gifts. Pair with hot cocoa, vanilla chai, or a scoop of vanilla ice cream for an indulgent treat.
Creative Leftover Transformations
Have extras? Here’s how to breathe new life into them:
- Crumble over yogurt or ice cream for a crunchy topping.
- Use as a cookie crust for mini cheesecakes.
- Layer in a dessert trifle with whipped cream and fruit.
Additional Tips
- Use gel food coloring to make themed versions, like red and green for the holidays.
- Always chill between steps — it keeps edges sharp and textures perfect.
- Stack with parchment between layers if packing in tins to avoid sticking.
Make It a Showstopper
Tie a ribbon around a stack, place in clear bags, or layer on a white cake stand for extra wow factor. For cookie swaps or bake sales, these always turn heads.
Variations to Try
- Red Velvet & Vanilla: Swap cocoa for red food coloring and a touch of vinegar.
- Lemon & Poppyseed: Use lemon zest in one half and poppy seeds in the other.
- Matcha & Vanilla: Add matcha powder for a green tea twist.
- Almond & Chocolate: Add almond extract to vanilla dough for a nutty vibe.
- Espresso & Vanilla: Mix instant espresso powder into chocolate dough for a bold boost.
FAQ’s
Q1: Can I make these cookies gluten-free?
Yes, use a 1:1 gluten-free baking flour blend. The texture may be slightly different but still delicious.
Q2: Can I freeze the dough?
Absolutely. Wrap it tightly in plastic, then foil. Freeze for up to 1 month.
Q3: Can I add food coloring to make themed cookies?
Yes, gel coloring works best and doesn’t affect texture.
Q4: Why is my dough cracking when I roll it?
It might be too cold. Let it sit at room temp for 5 to 10 minutes before rolling.
Q5: Do I need to use a ruler?
It’s optional but really helps make perfect, clean lines.
Q6: Can I use Dutch-processed cocoa?
Yes, it creates a deeper flavor and darker color.
Q7: How long do the cookies stay fresh?
Up to 1 week in an airtight container at room temperature.
Q8: Can I make smaller cookies?
Sure, just reduce the baking time slightly.
Q9: Are they overly sweet?
Not at all. They’re buttery with a balanced sweetness.
Q10: Do they spread while baking?
Not much. Chilling the dough helps them hold their shape.
Conclusion
Checkerboard cookies are the perfect blend of charm and flavor. Whether you’re baking for the holidays or just want something fun and satisfying, these cookies are guaranteed to impress. Trust me, they’re worth every bite — and they might just become your new go-to cookie tradition.
Print
Checkerboard Cookies
- Prep Time: 20 minutes
- Cook Time: 3 hours
- Total Time: 3 hours 20 minutes
- Yield: 6 servings 1x
- Category: Soup
- Method: Stovetop
- Cuisine: Comfort Food
- Diet: Low Lactose
Description
A rich and comforting soup made with melt-in-your-mouth short ribs, deeply caramelized onions, and a savory broth. Perfect for chilly nights and hearty appetites.
Ingredients
- 2 pounds bone-in short ribs, trimmed of excess fat
- 4 large yellow onions, thinly sliced
- 4 garlic cloves, minced
- 2 tablespoons olive oil
- 2 tablespoons unsalted butter
- 6 cups beef broth
- 4 sprigs fresh thyme
- 2 bay leaves
- 1½ teaspoons salt, or to taste
- ½ teaspoon black pepper, freshly ground
- Crusty bread slices, for serving
Instructions
- Heat a large Dutch oven over medium-high heat and add 1 tablespoon of olive oil.
- Season the short ribs with salt and pepper, then sear in batches until browned on all sides. Remove and set aside.
- Lower the heat and add remaining oil and butter. Add onions and cook slowly for 25–30 minutes, stirring often, until deeply golden. Stir in garlic and cook for 1 more minute.
- Return the short ribs to the pot. Add beef broth, thyme, bay leaves, and more salt if needed. Bring to a simmer.
- Cover partially, reduce heat, and simmer for 2½ to 3 hours until meat is very tender.
- Remove short ribs and bay leaves. Shred the meat off the bones and return it to the pot. Stir and taste to adjust seasoning.
- Toast crusty bread slices. Optionally, top with cheese and broil until melted.
- Serve soup hot with toasted bread on top or on the side, and garnish with fresh herbs if desired.
Notes
- Chill soup before storing to easily skim fat from the top.
- Use high-quality broth for a richer flavor.
- This soup tastes even better the next day.
- Add a splash of vinegar at the end to brighten the flavors.
Nutrition
- Serving Size: 1 bowl
- Calories: 460
- Sugar: 6g
- Sodium: 980mg
- Fat: 28g
- Saturated Fat: 11g
- Unsaturated Fat: 15g
- Trans Fat: 0g
- Carbohydrates: 18g
- Fiber: 2g
- Protein: 32g
- Cholesterol: 105mg
Keywords: short rib onion soup, braised beef soup, hearty winter soup, slow-cooked soup recipe